Feb 18, 2023
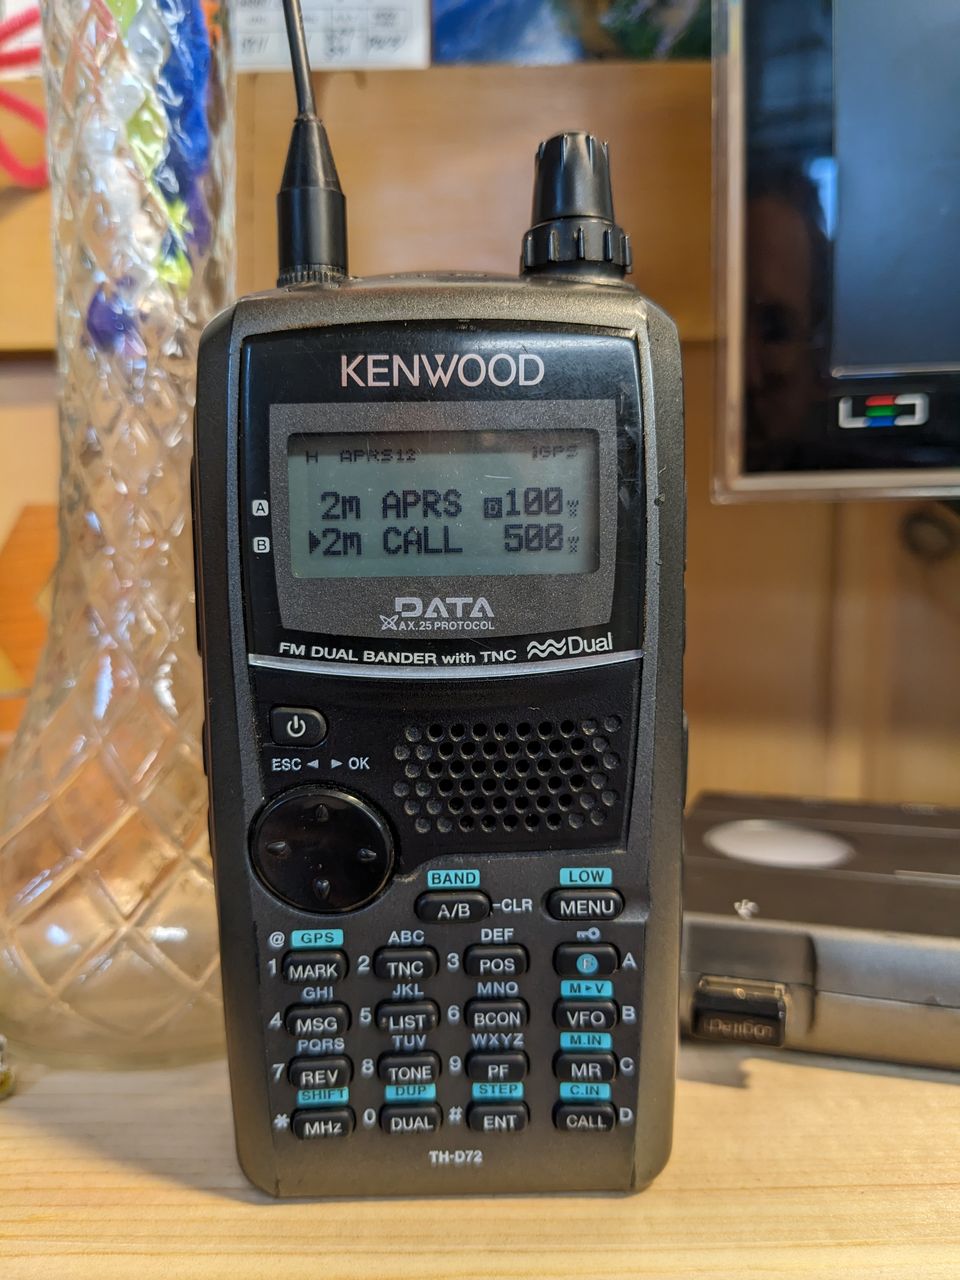
I broke the SMA antenna connector on my Kenwood TH-D72A radio recently, and I was surprised to find how easy it was to repair.
Broken
This happens to every handheld radio eventually, right? At least if you are a klutz like me. I dropped it in the garage, appeared undamaged, and then took it skiing with me. I'm not sure which started to break the connector, but when I got home it was fully broken off.
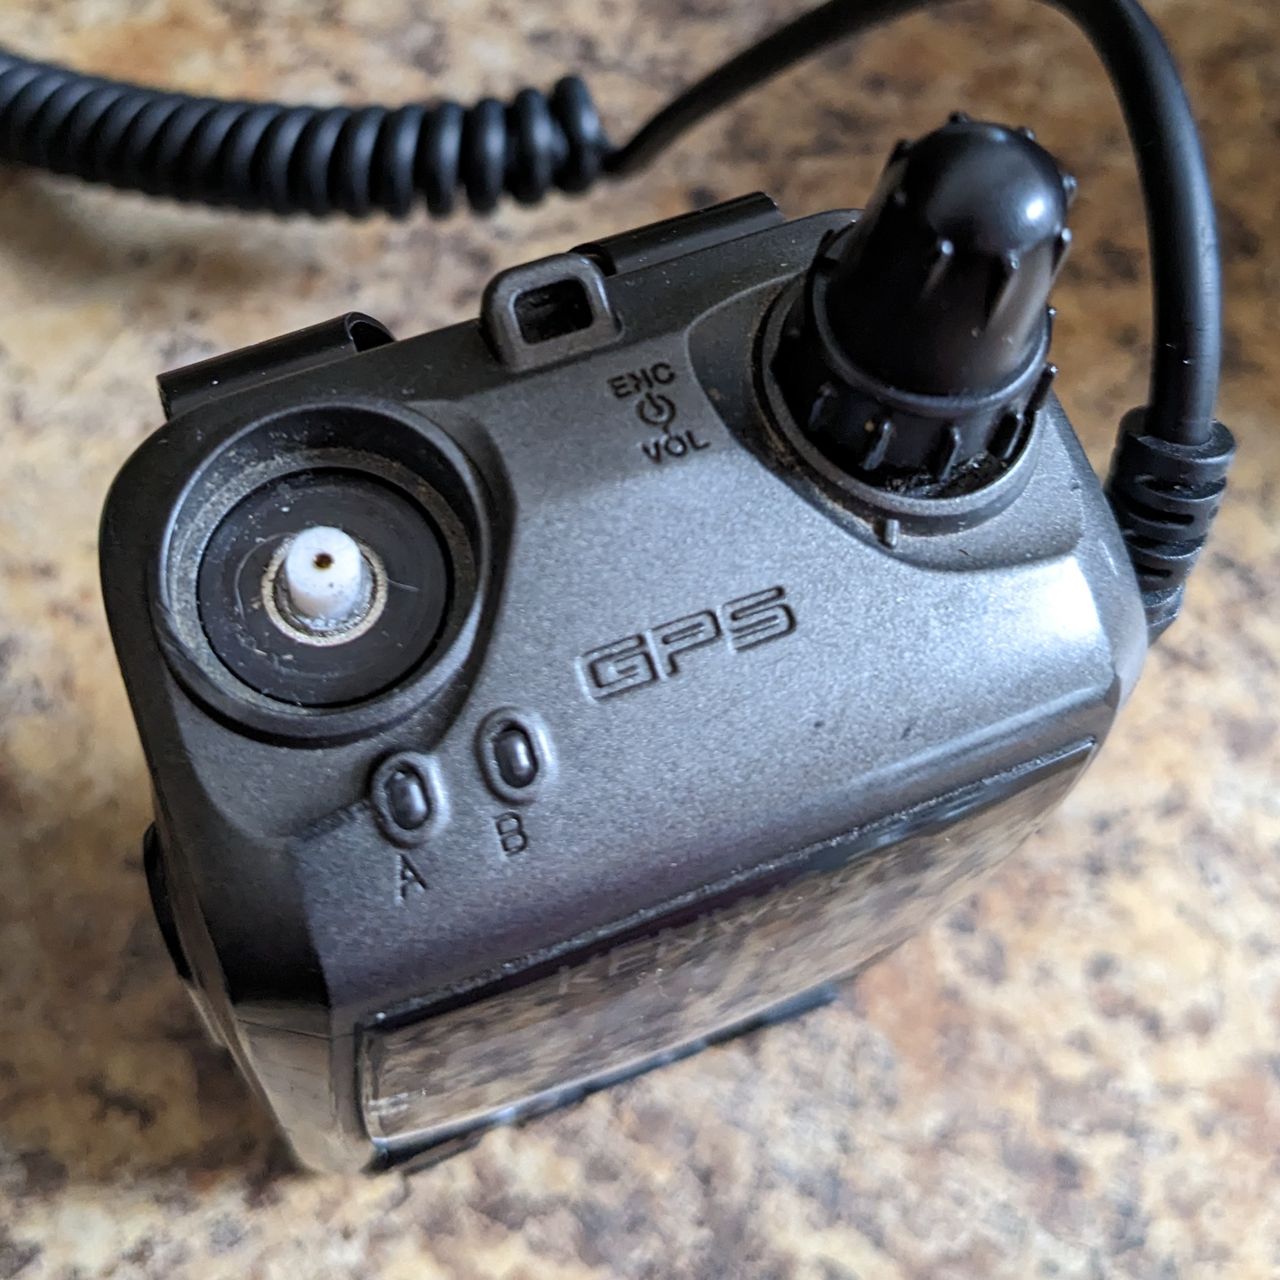
I was worried I would have to ship this off to the official service shop to get a new connector soldered on. At least, that's what I had to do after my first HT fell off my desk while still connected via a pigtail to an amplifier. Thankfully I feel a lot more confident pulling things apart and getting them back together now, and even doing a little soldering, so I thought I would see how bad of a repair this was. Turns out that the antenna is connected to the main board via a little spring, and the part was easy to find online and not too expensive.

So I ordered the part, was working on moving my hamshack and bringing my soldering station inside from the cold garage, and then life happened and it sat around in my desk drawer for about a month. I promised a few folks to document this, so here it goes.
I'm not a video producer person - I tried when iMovie first came out, but I learn better from written articles, but I will include lots of photos. If you want to find a video of someone tearing down a TH-D72A and repairing the speaker, here is the one that inspired me to try opening up the radio.
Disassembly
Pulling apart the radio is fairly easy. Remembering how to remove the battery (lift latch and then press button) was the most difficult part. There are two screws holding the belt clip on, and two screws at the bottom of the battery compartment that need to be removed.
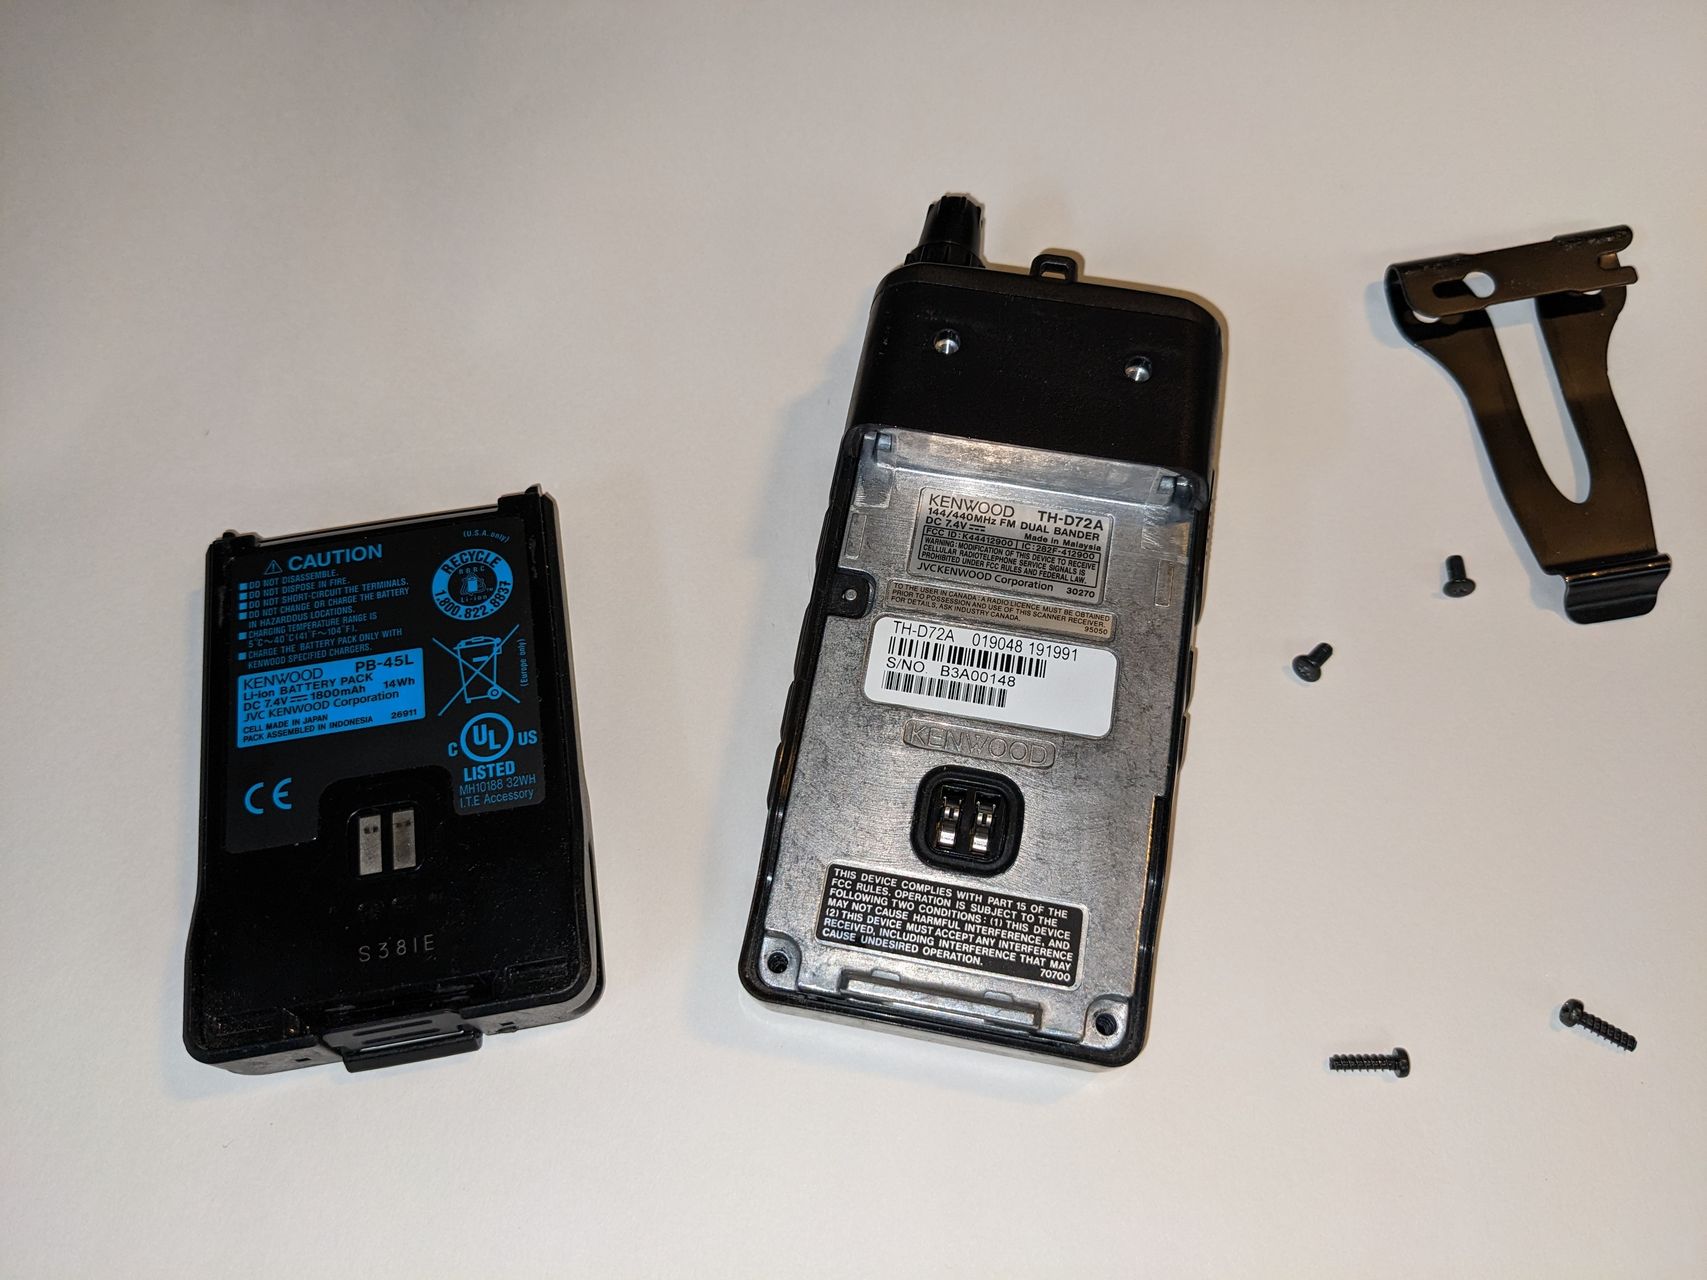
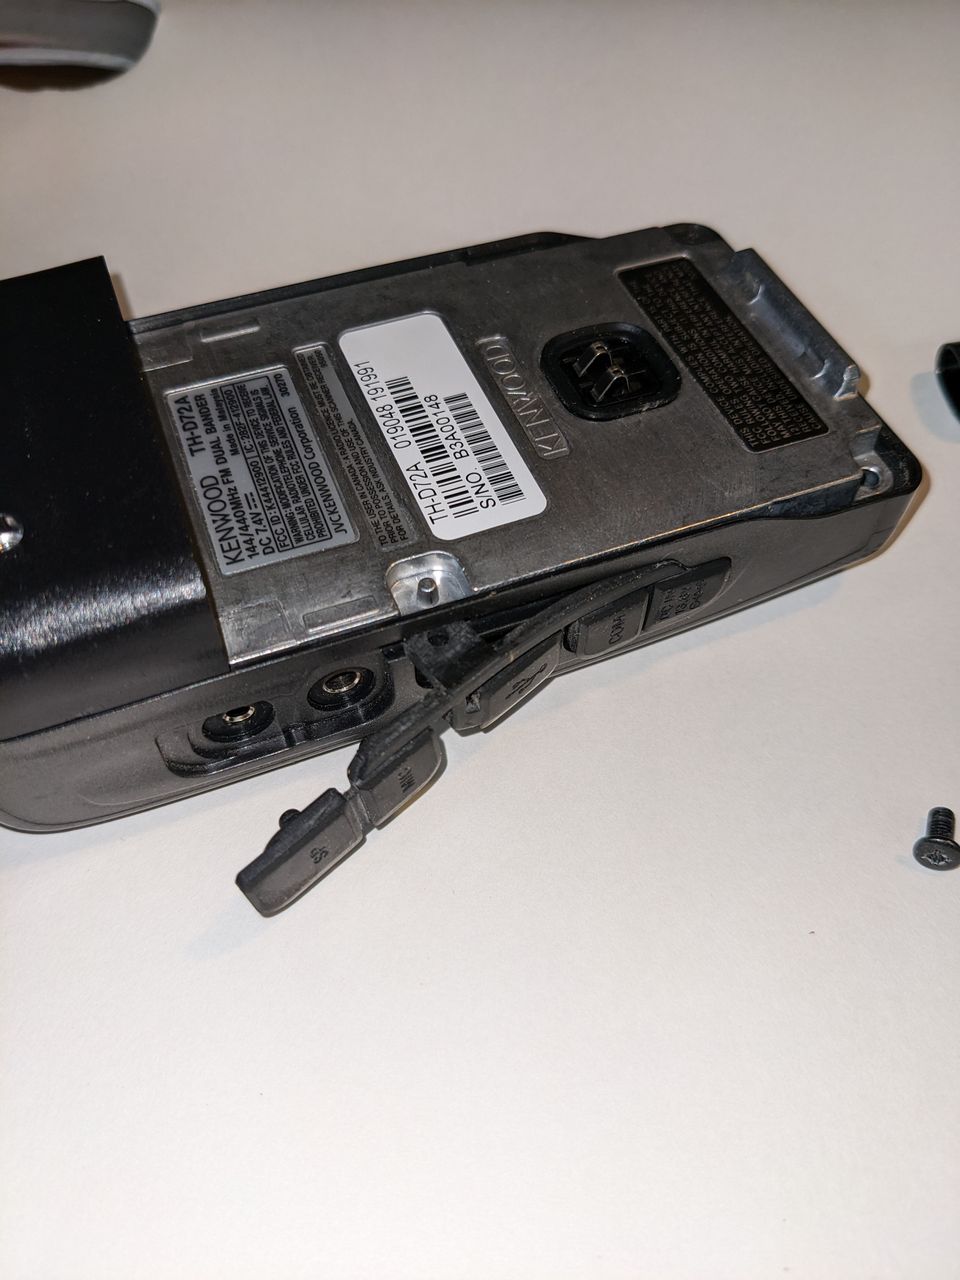
Next the rubber port cover needs to be removed. Slipping a small screwdriver under the nub that sticks into the battery compartment is necessary and then it comes off very easily.
Pulling off the cover takes a little muscle but should come off easily. At this point the button pad and arrow pad on the front are loose, nothing else holds them down. Be sure to put the arrow pad back on before reassembly! I forgot the first time. When you put them back together, trying to get the buttons to line up is important, but if a few are askew you can rub them around to get them back into place.
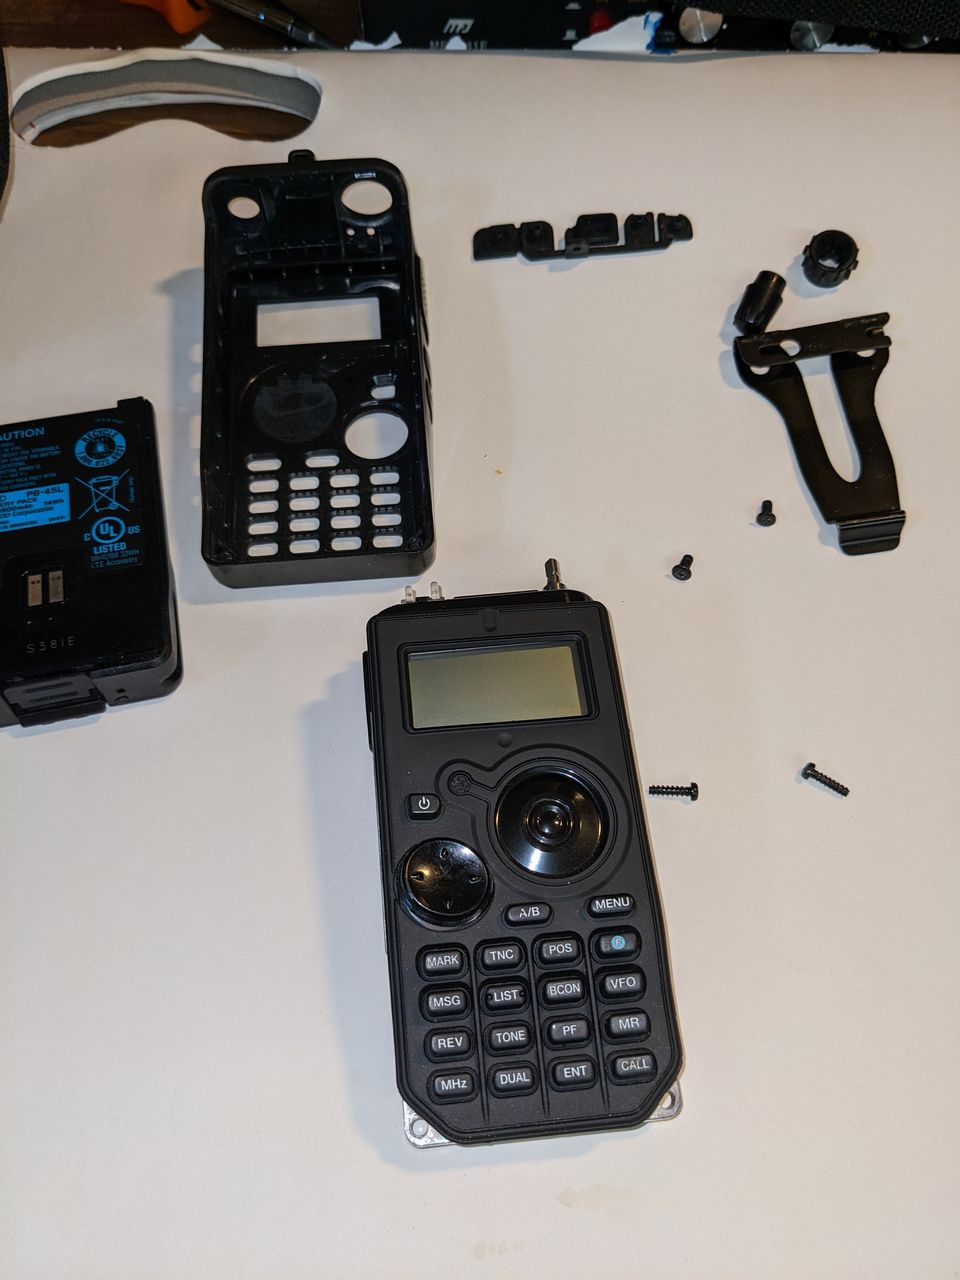
The two knobs for the dial and volume control need to be pulled off - these are just held in place by friction.
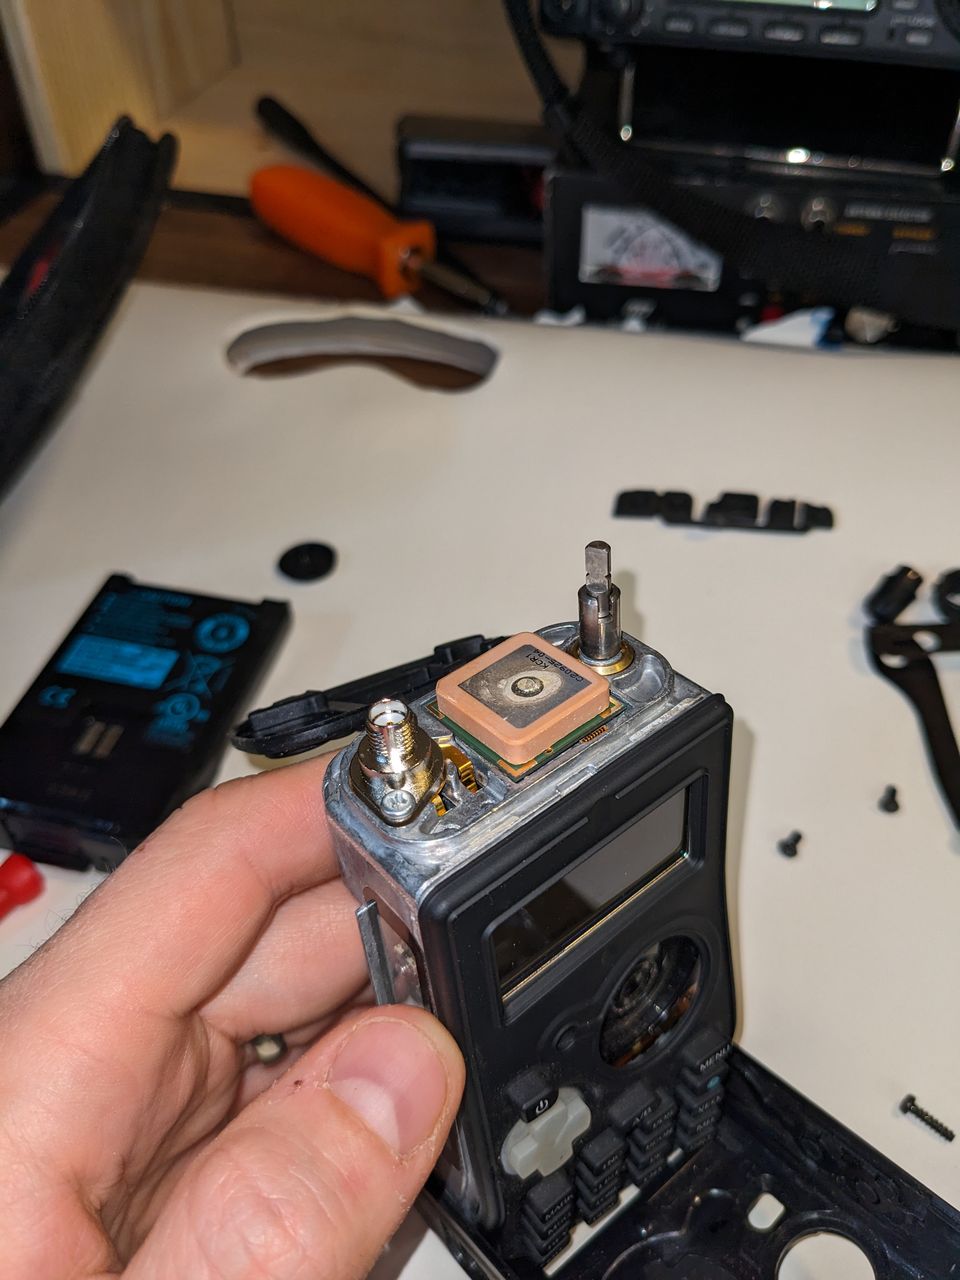
Finally you need to remove two covers over the top of the radio, this plastic one and a rubber one under it. The plastic one has a couple of points that snap it in place. Work around it to find these and slide it off. The rubber one can be bent back while working on the components under it. This plastic one is easy to forget and needs to go back on the radio before putting the cover back in place.
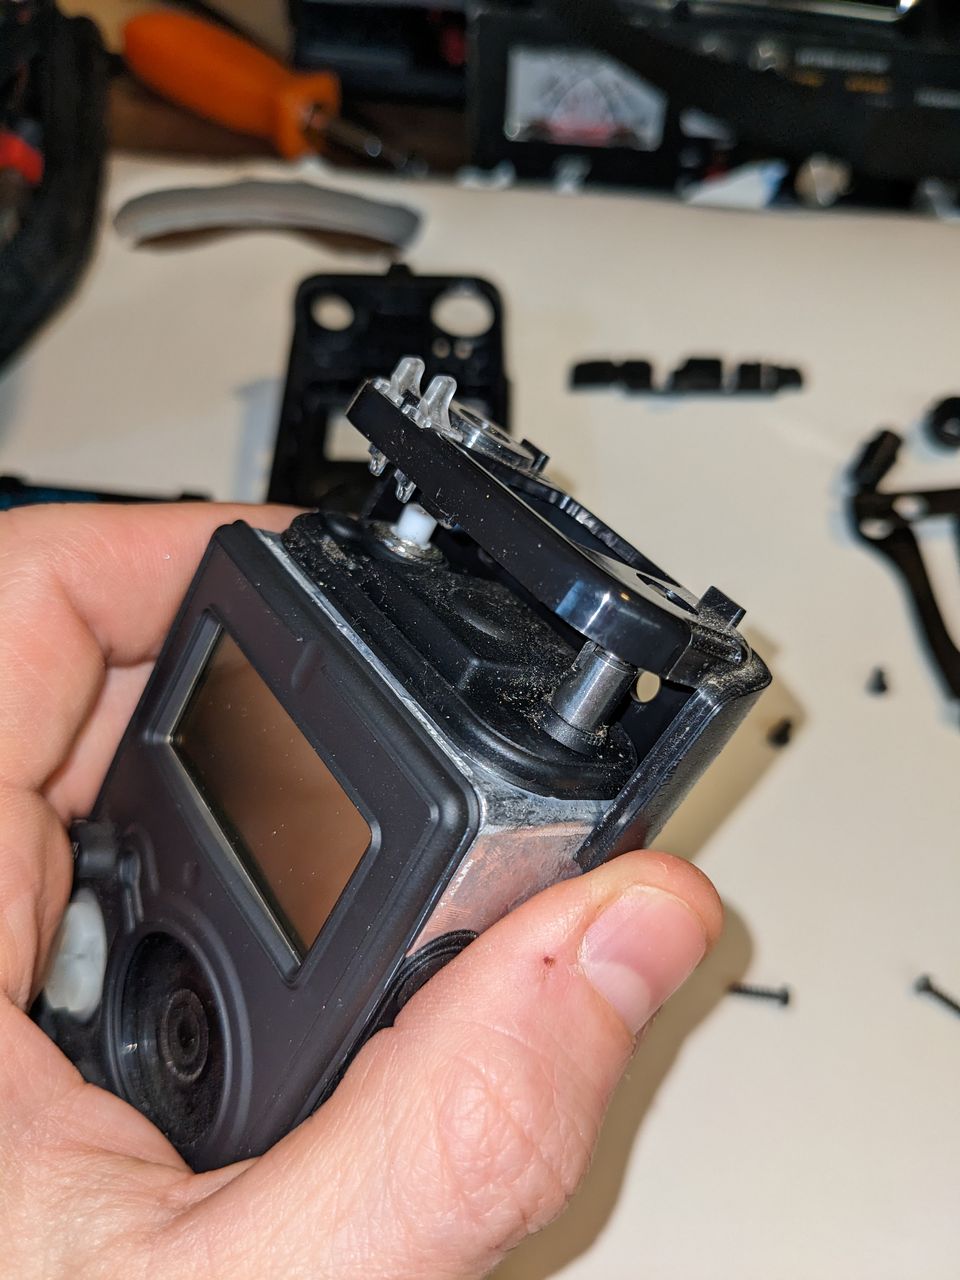
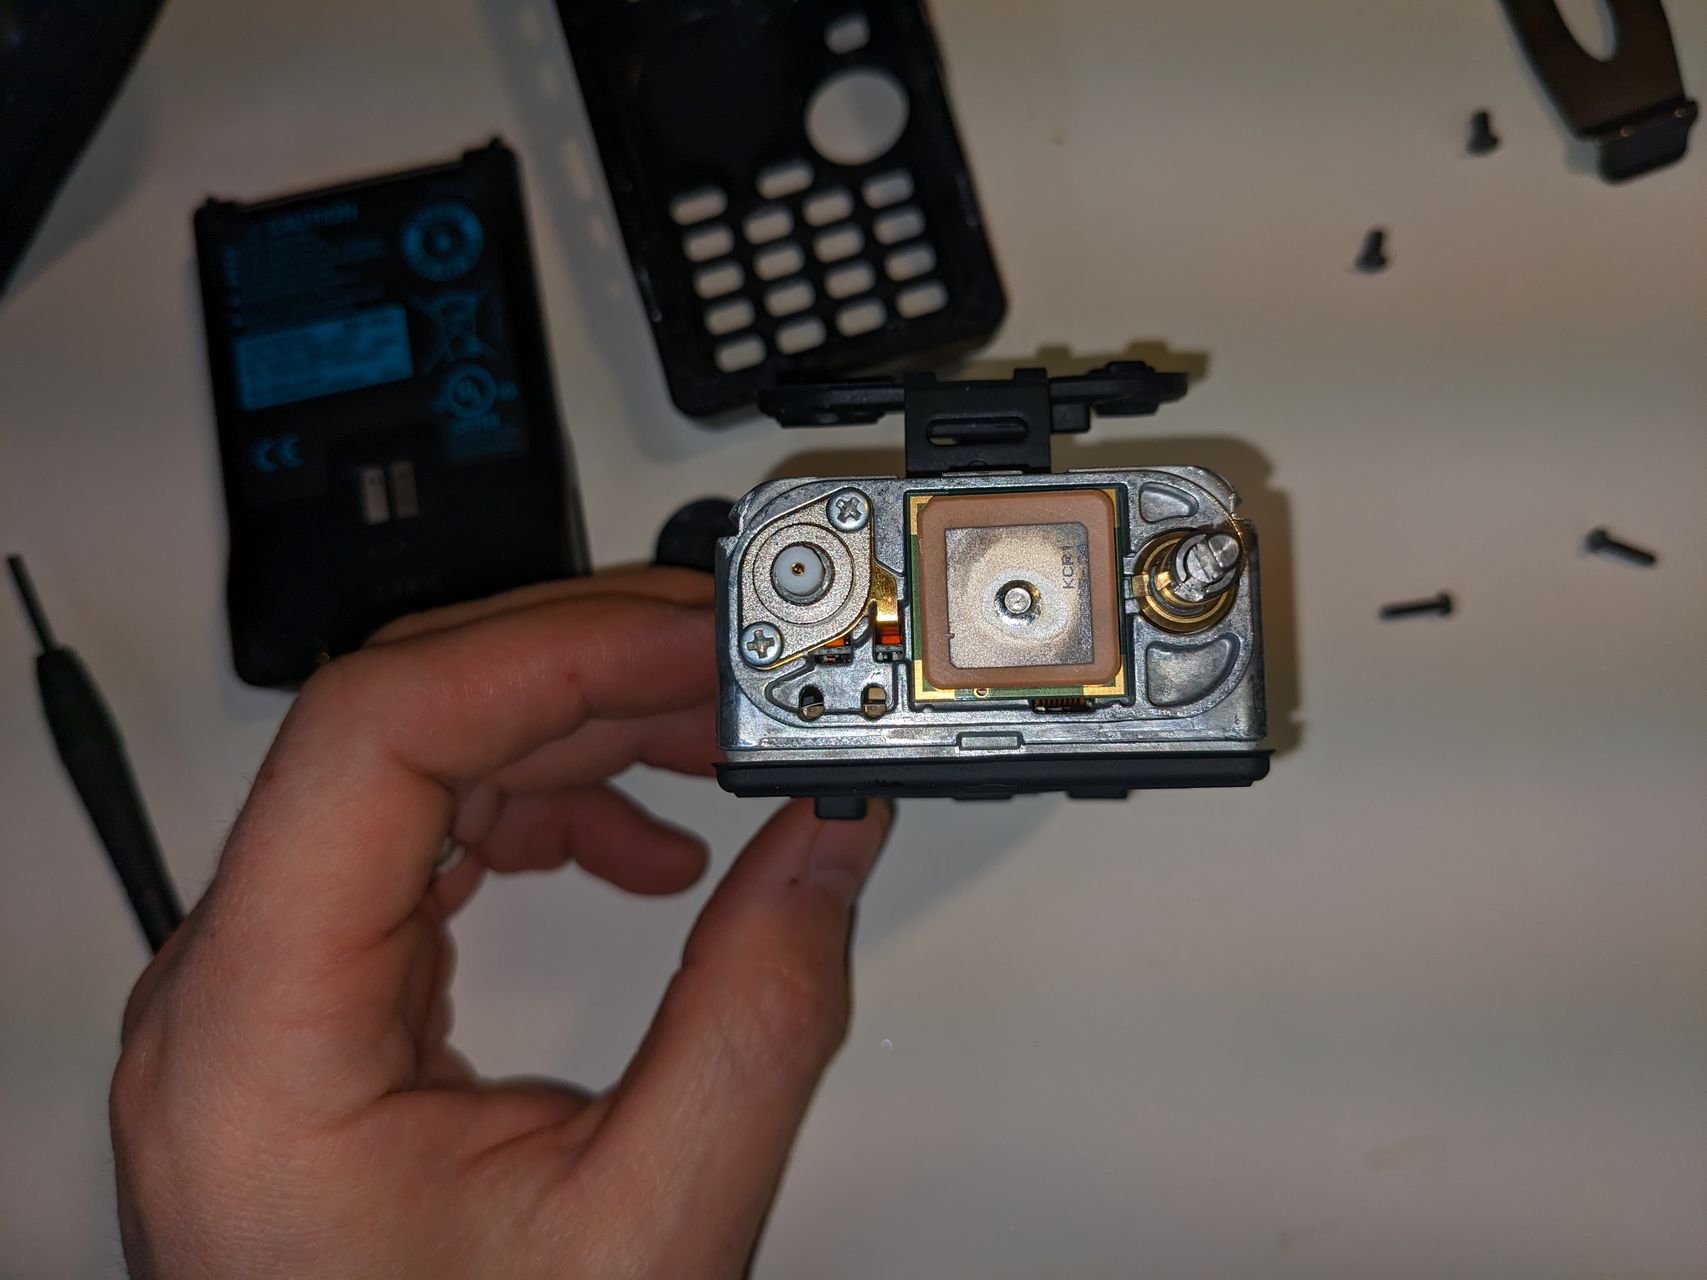
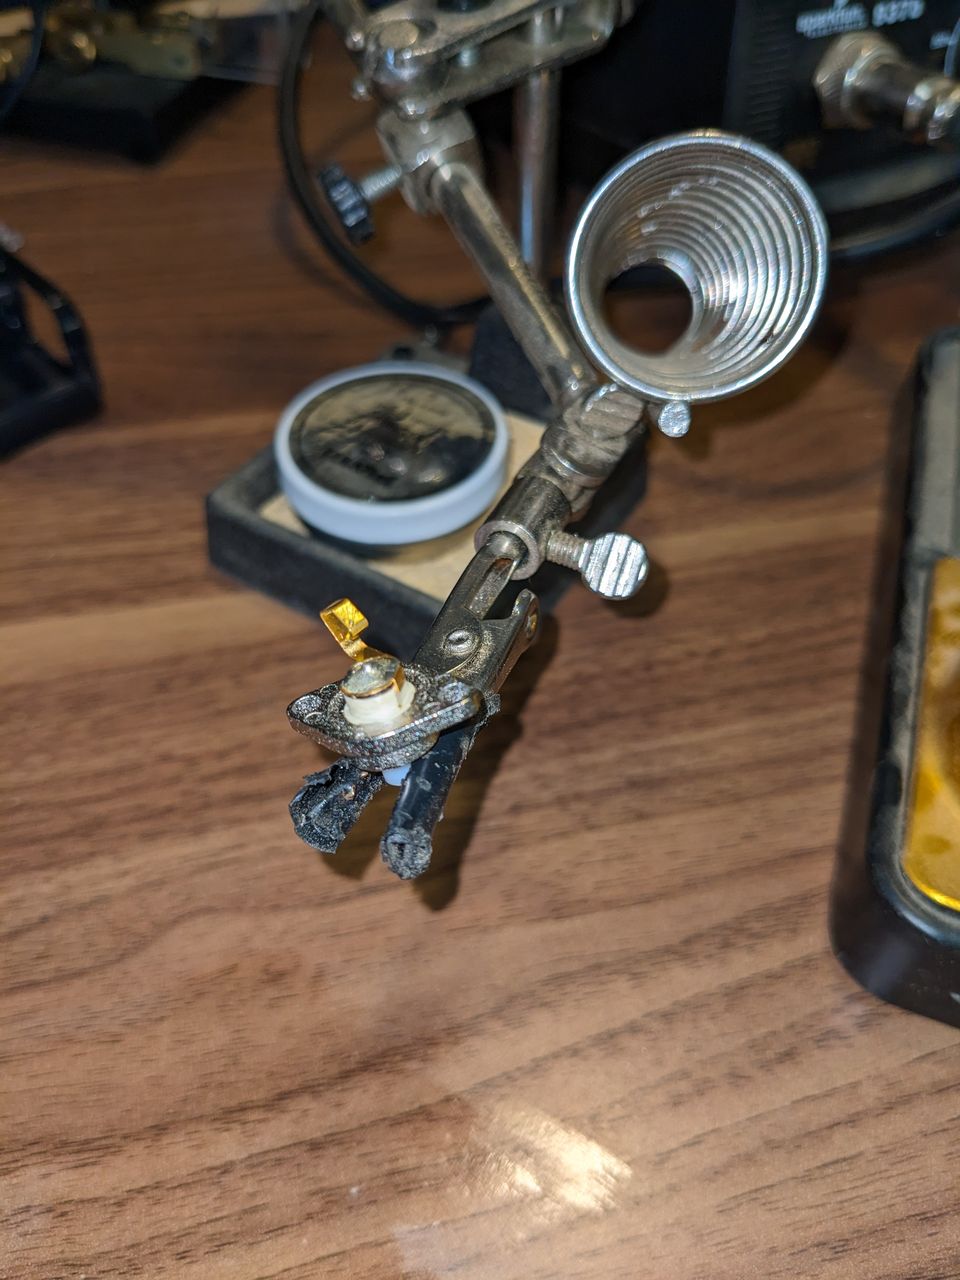
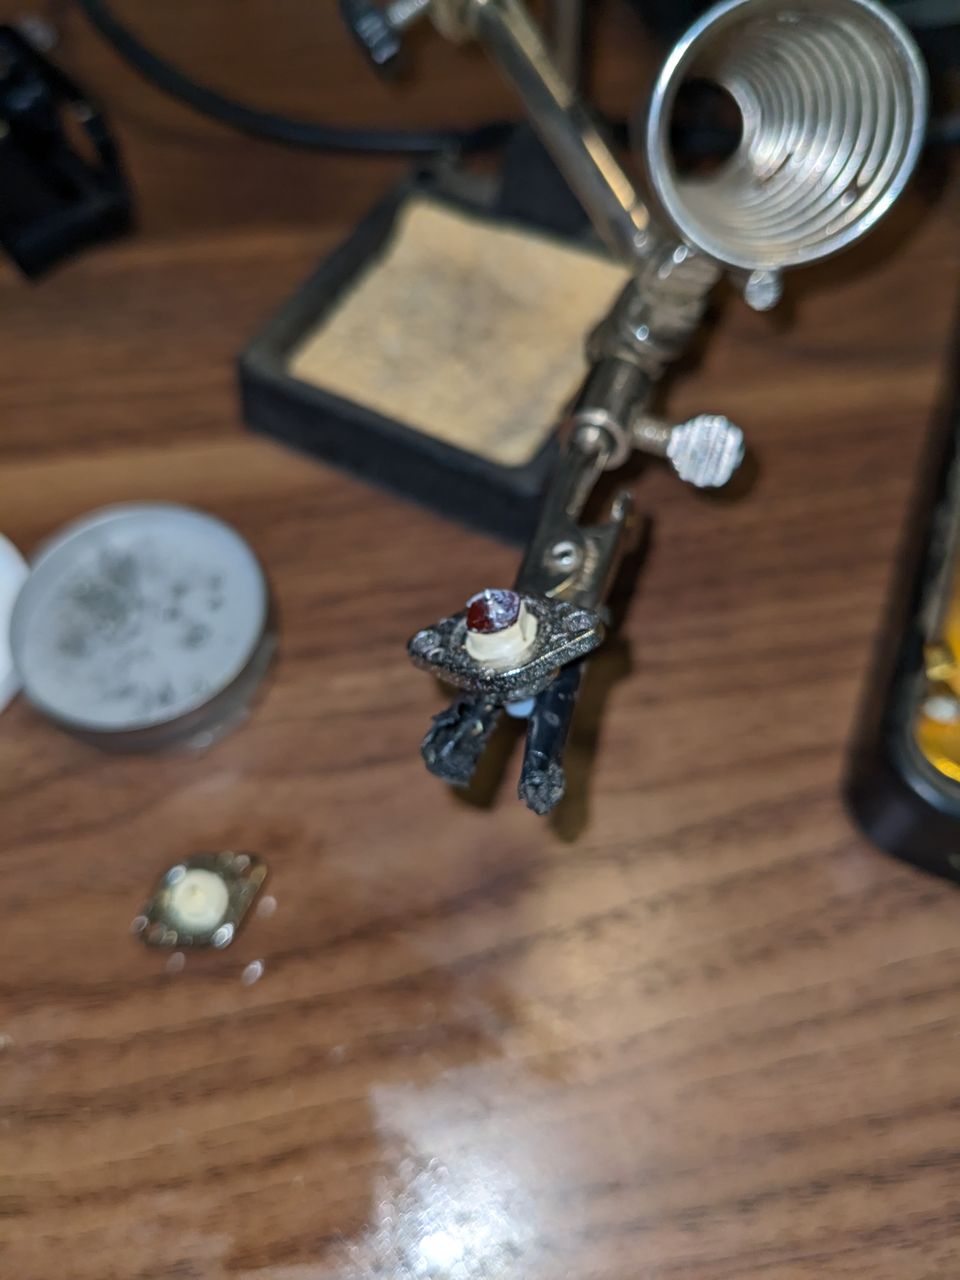
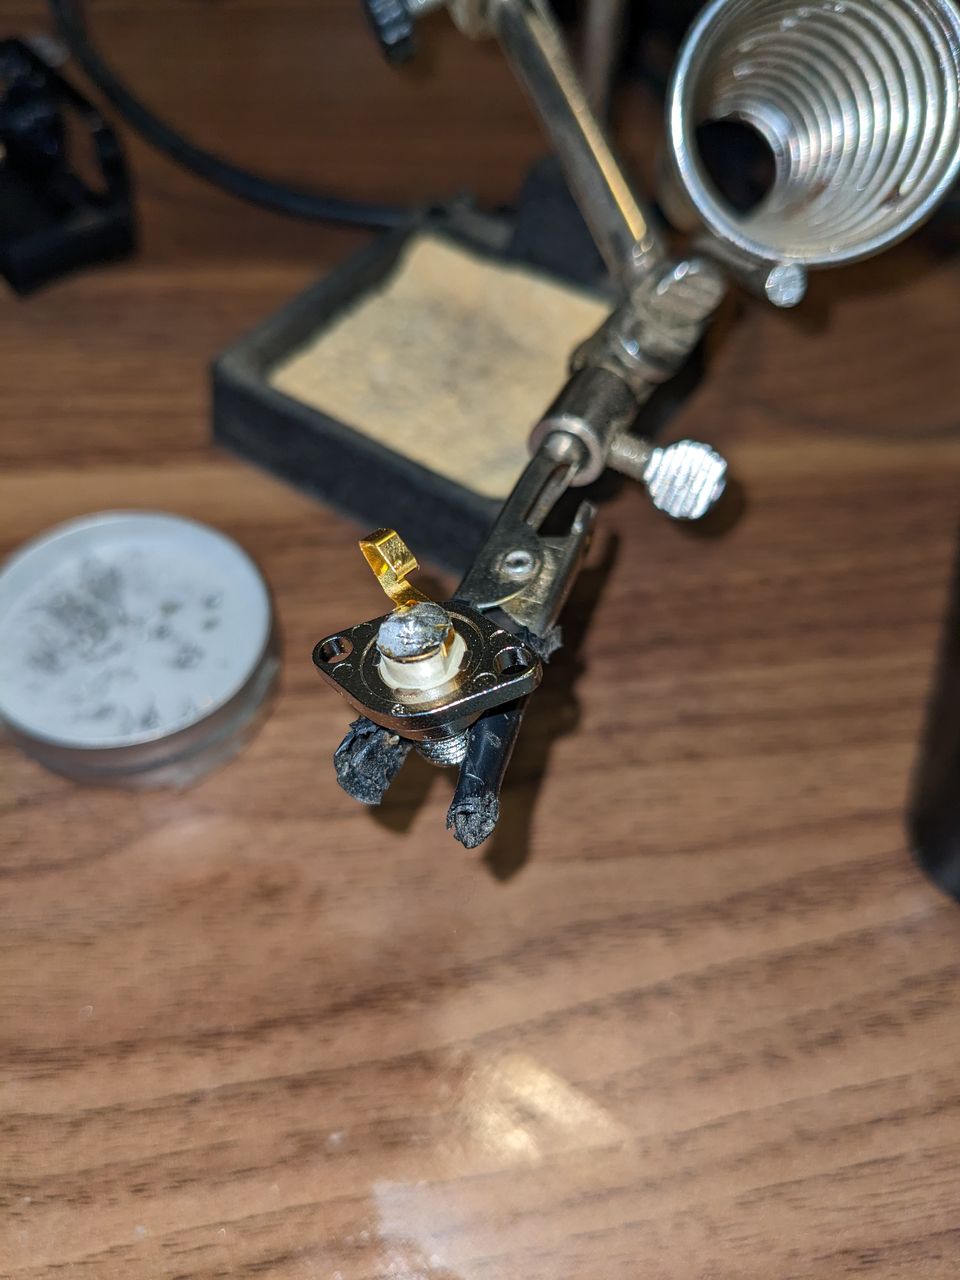
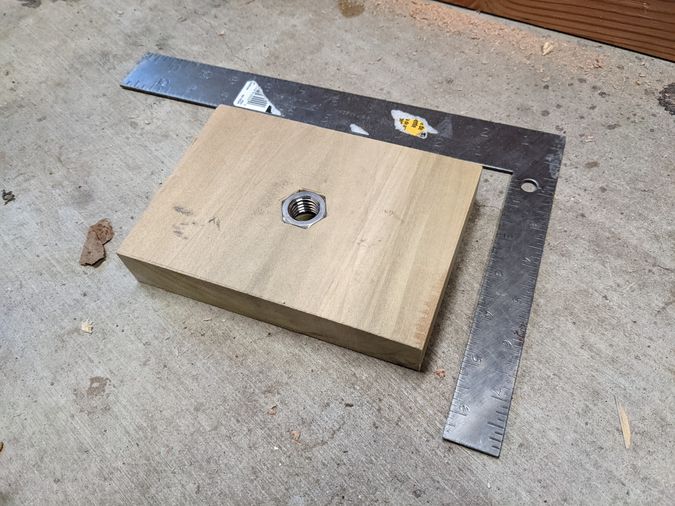
The connector is held into place with two small screws.
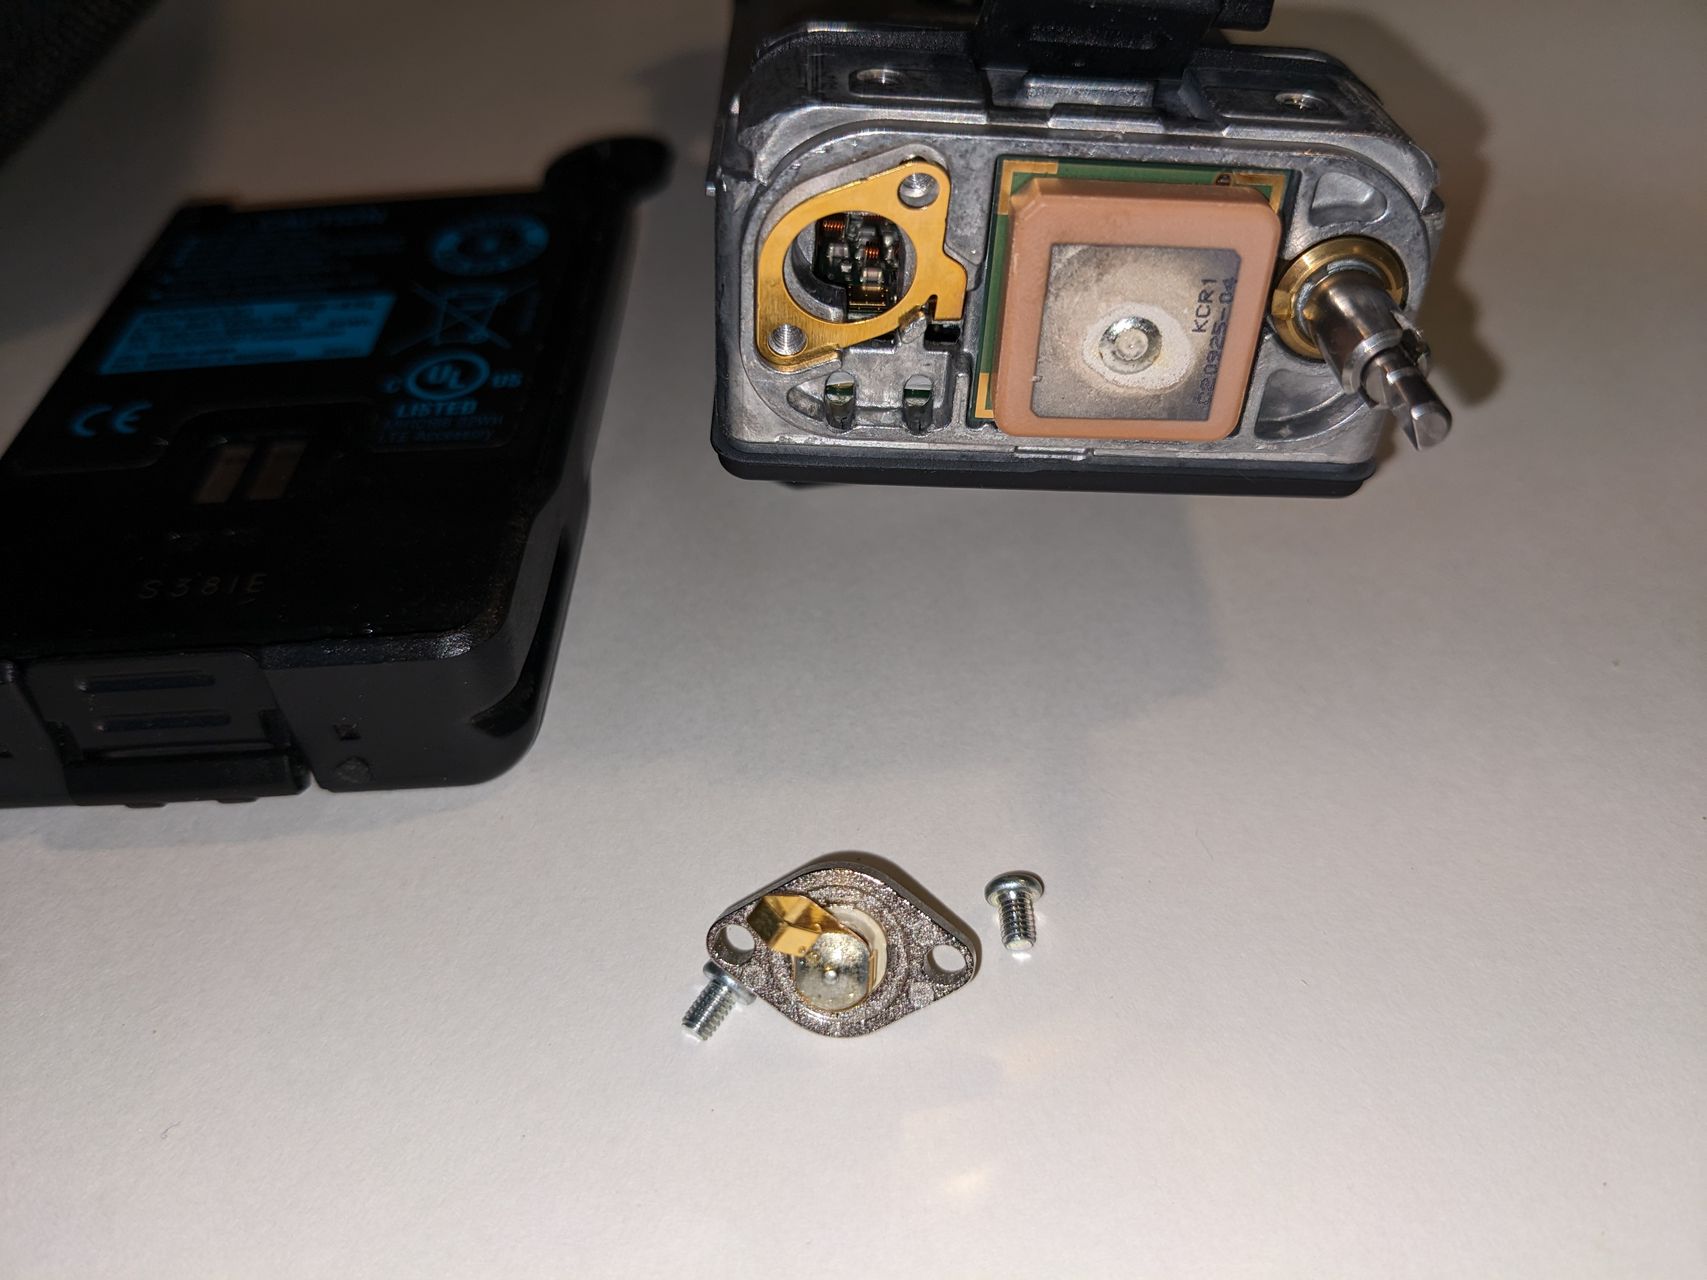
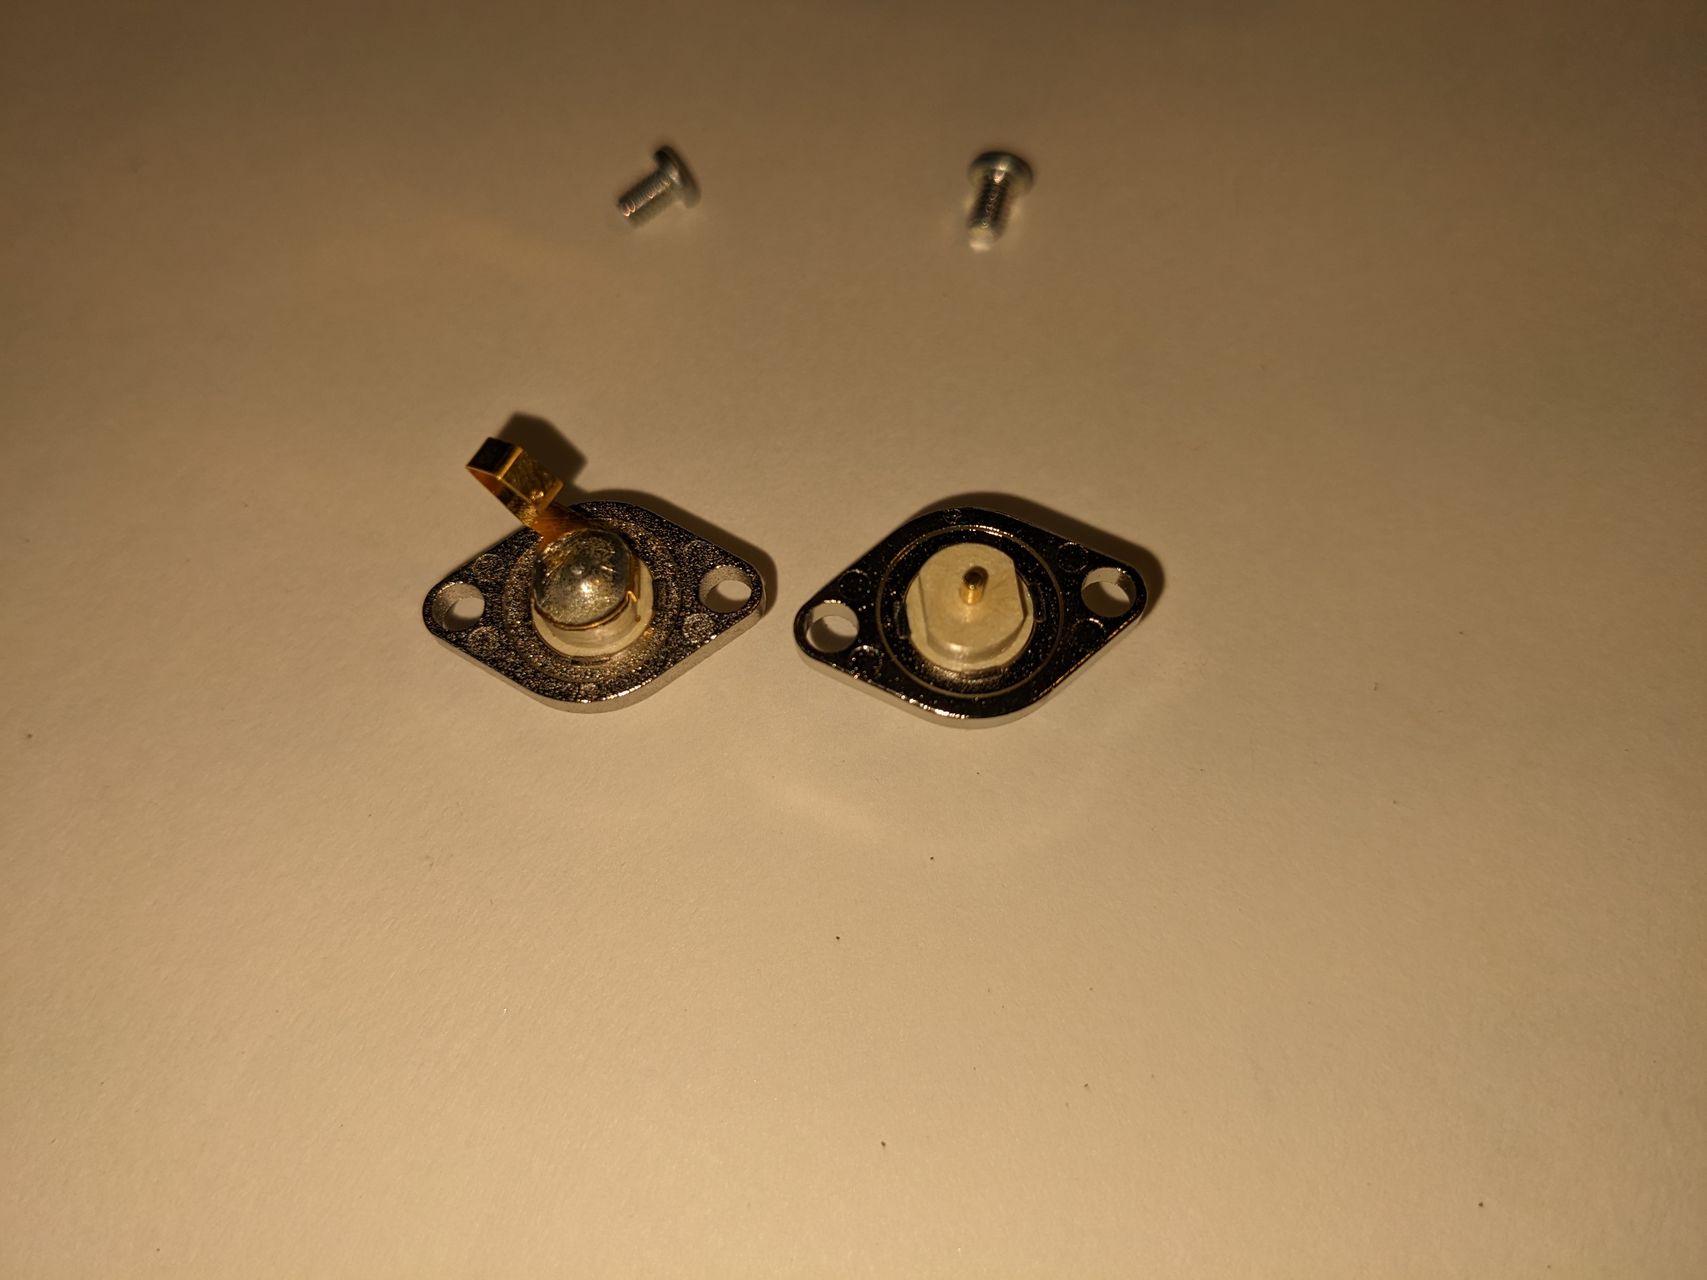
Soldering new connector
This was the trickiest part for me - thankfully the spring and connector have a couple of flat spots that ensure you align the spring correctly. There is a little red-brown plastic pad (blurry second photo below) between the connector and spring that you need to transfer over before soldering the spring on the new connector. I pried it off with a screwdriver after unsoldering the spring, which took a little effort. It appeared to have some kind of loose glue holding it.
Installing and fixing
Putting it back together is roughly the reverse of disassembly. Once the new connector was installed, I put it all back together and tested on my local repeater. I hadn't gotten a call back but I was at least able to key it up from my basement, which makes me think I sufficiently repaired the radio.
Nov 02, 2022
Just a quick tip - if you have a lawn / landscaping irrigation system, easier than repurposing a zone or adding a zone for your garden beds, might be to buy a second controller that hooks up to a tap like this one. I found this in my local hardware store along with all the other sprinkler supplies.
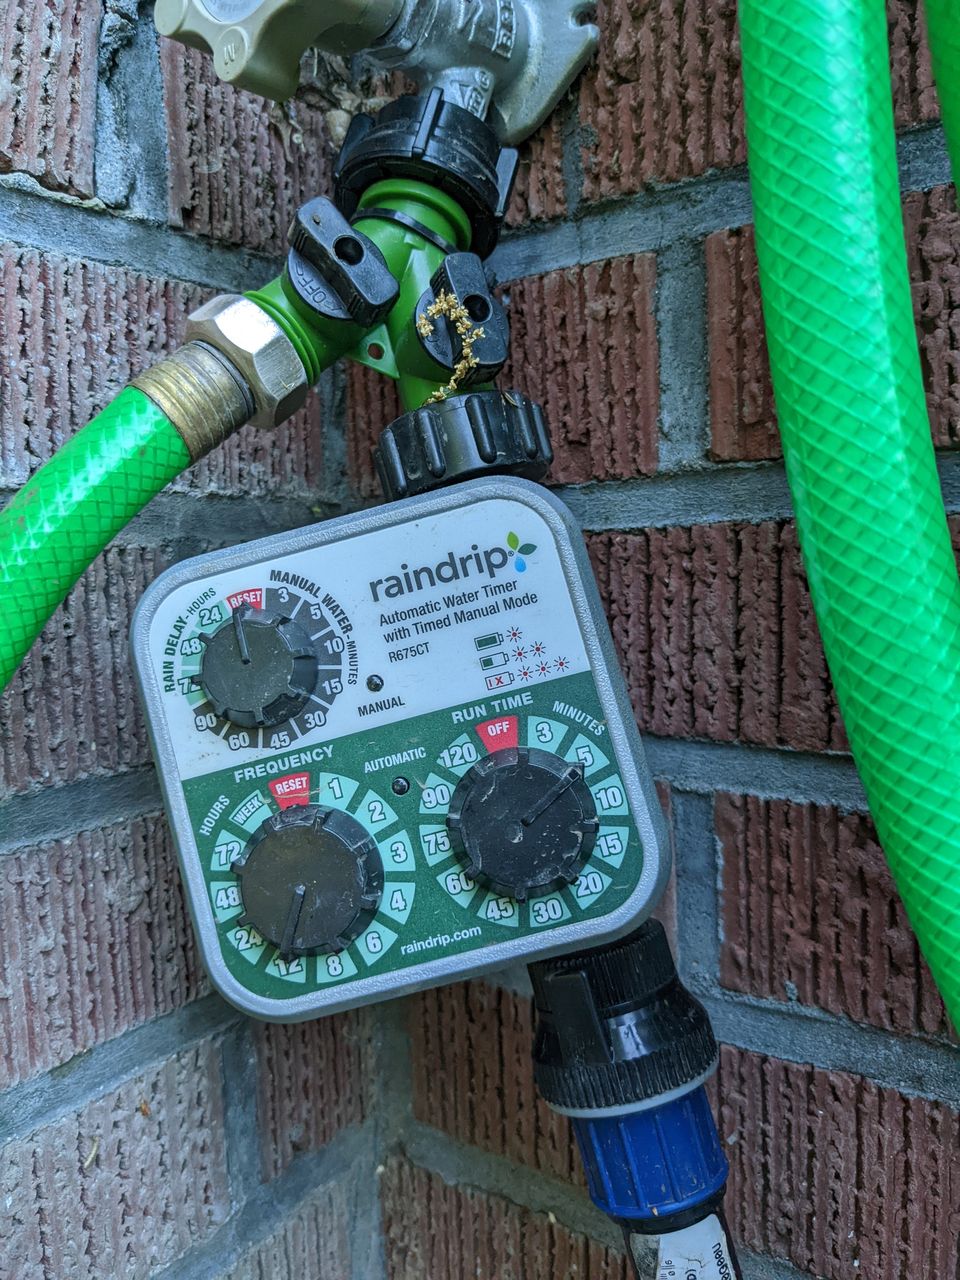
Out of laziness, I previously had my garden beds attached to parts of two separate zones used for the landscaping that was there, and getting a good balance between these was always a challenge. Buying a $40 controller like the one, and running an irrigation line over the ground, or buried in the gravel path, direct to each garden bed above really helped solve that problem this year. The 1/2" main lines run past each garden bed, with two or three 1/4" branches going to adjustable sprayers or drip line for each plant.
Oh, and a couple of tips for using it:
- Use a manifold above it so that you can still use that tap.
- Put a backflow preventer below it, otherwise when the backflow preventer fails, you'll have quite lot of water leaking all day until you notice it. At least by putting it after, it'll only leak when the valve is turned on, hopefully 10-20 minutes per day. Don't ask how I figured that one out!
Nov 02, 2022
Previously...
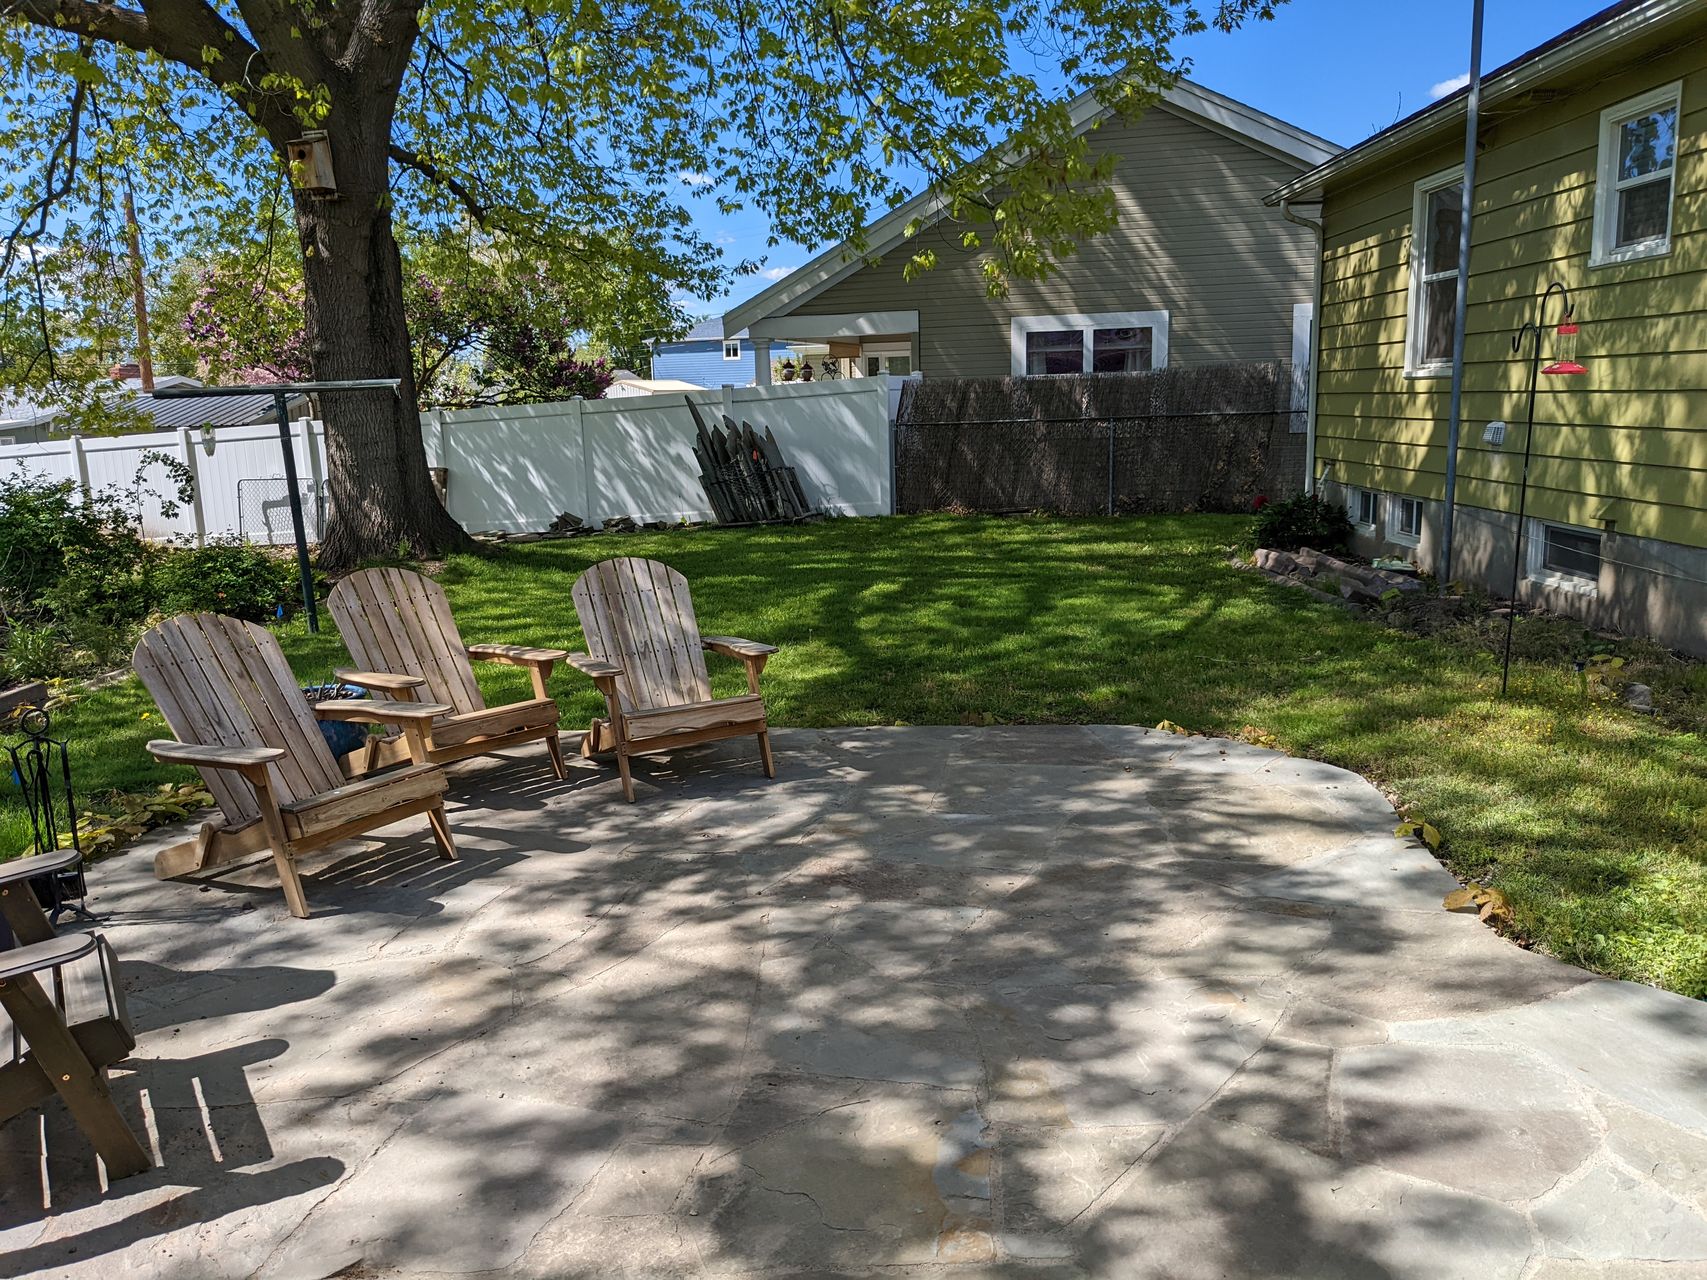
Over the last few years, we've been trying to reduce the amount of lawn on our small quarter acre property and replace it with native plants, plants for polinators and birds, as well as expanding our vegetable and fruit gardens. This has included a 12ft wide strip of native plants along the street, and our raised veggie beds in the front yard. In 2021, we talked to a few landscape designers (who didn't specialize in native plants) to look at getting a whole plan for the middle part of our back yard, but ended up not liking the plans we got back. I ended up hiring a local mason to build a flagstone patio where we wanted it, putting off the native plants until this year.
Plan
For planting a large area (~60 feet by ~30ft), we were going to need a lot of plants, and we wanted to consult with someone before spending a lot of money on plants. Early in 2022, my spouse found Tapteal Native Plants (website | instagram), a nursery that specializes in natives of the Inland Northwest, as well as consulting and design for projects like ours. Tapteal is located in the Tri-Cities, about an hour away from Walla Walla, so the owner, Ann, hopped over one afternoon in the early spring to look at our lot, talked with us about what we were trying to do, and sent us back a plan. Her rates were extremely reasonable, and I would highly recommend her for anyone in the area trying to do something similar. Finally, we were able to order all the plants from Tapteal Native Plants for planting in the fall, before the rains would start in the fall and help get them established before next year's summer.
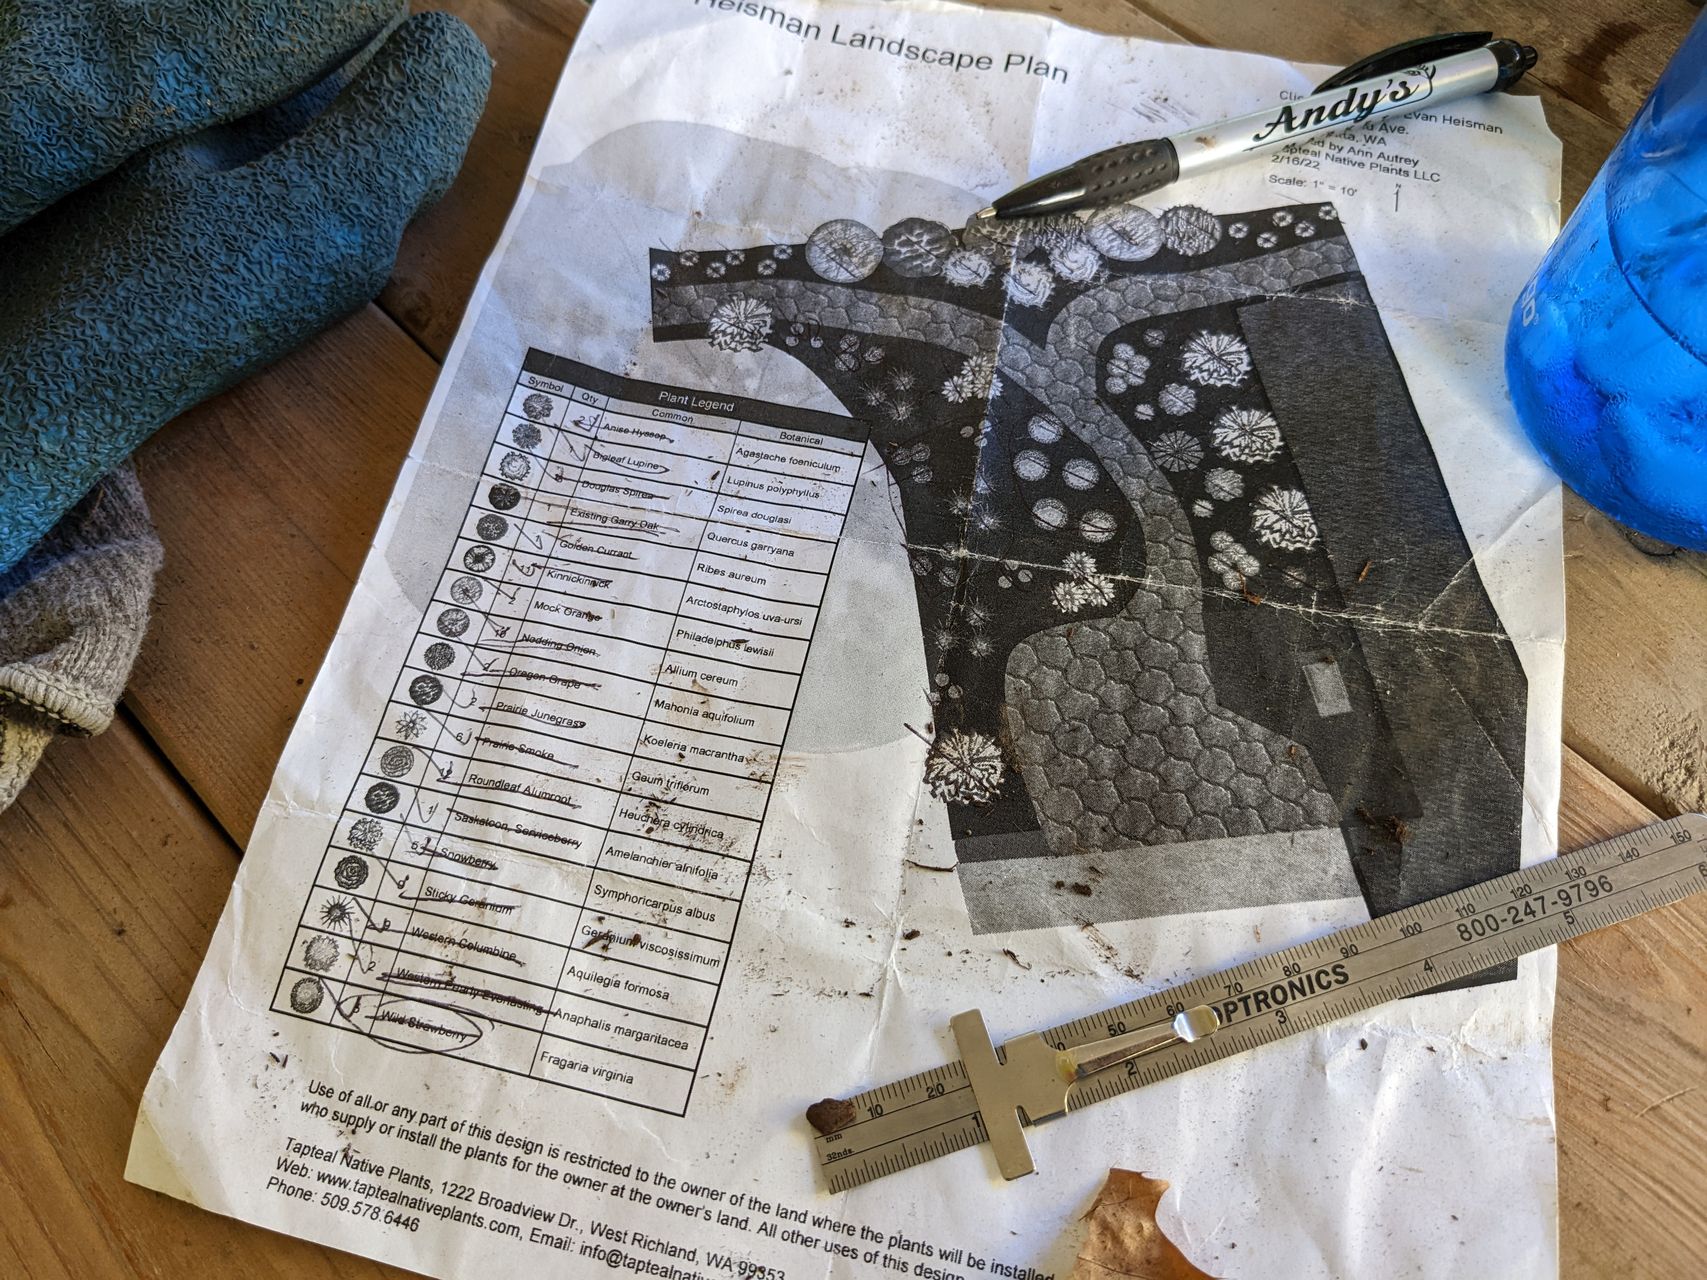 The plan as printed and being refered to while putting plants in the ground.
Preparation
The biggest bit of work for this project was going to be removing the grass! I was initially planning to do this myself by renting a sod ripper and trading some labor with a few friends to get it done. Unfortunately, the price of equipment rentals shot up since I had last looked, and several things came up this summer that prevented me from getting to it. Between the rental costs and time required, we ended up hiring a contractor to remove the grass and put down some mulch. The other driving factor for this was disposing of the sod was going to be expensive as our local landfill charges more for dirt than general compostable debris.
Always, always, always, get a second or third bid folks! I went with the first landscaper to get back to me and he was a nightmare to work with, and expensive. I had marked out and flagged where the path would go to avoid putting mulch there, and the contractor completely ignored for putting down mulch, failed to provide risers for a few of the sprinklers that I had to locate and recap, and didn't remove a couple of metal poles for a clothesline.
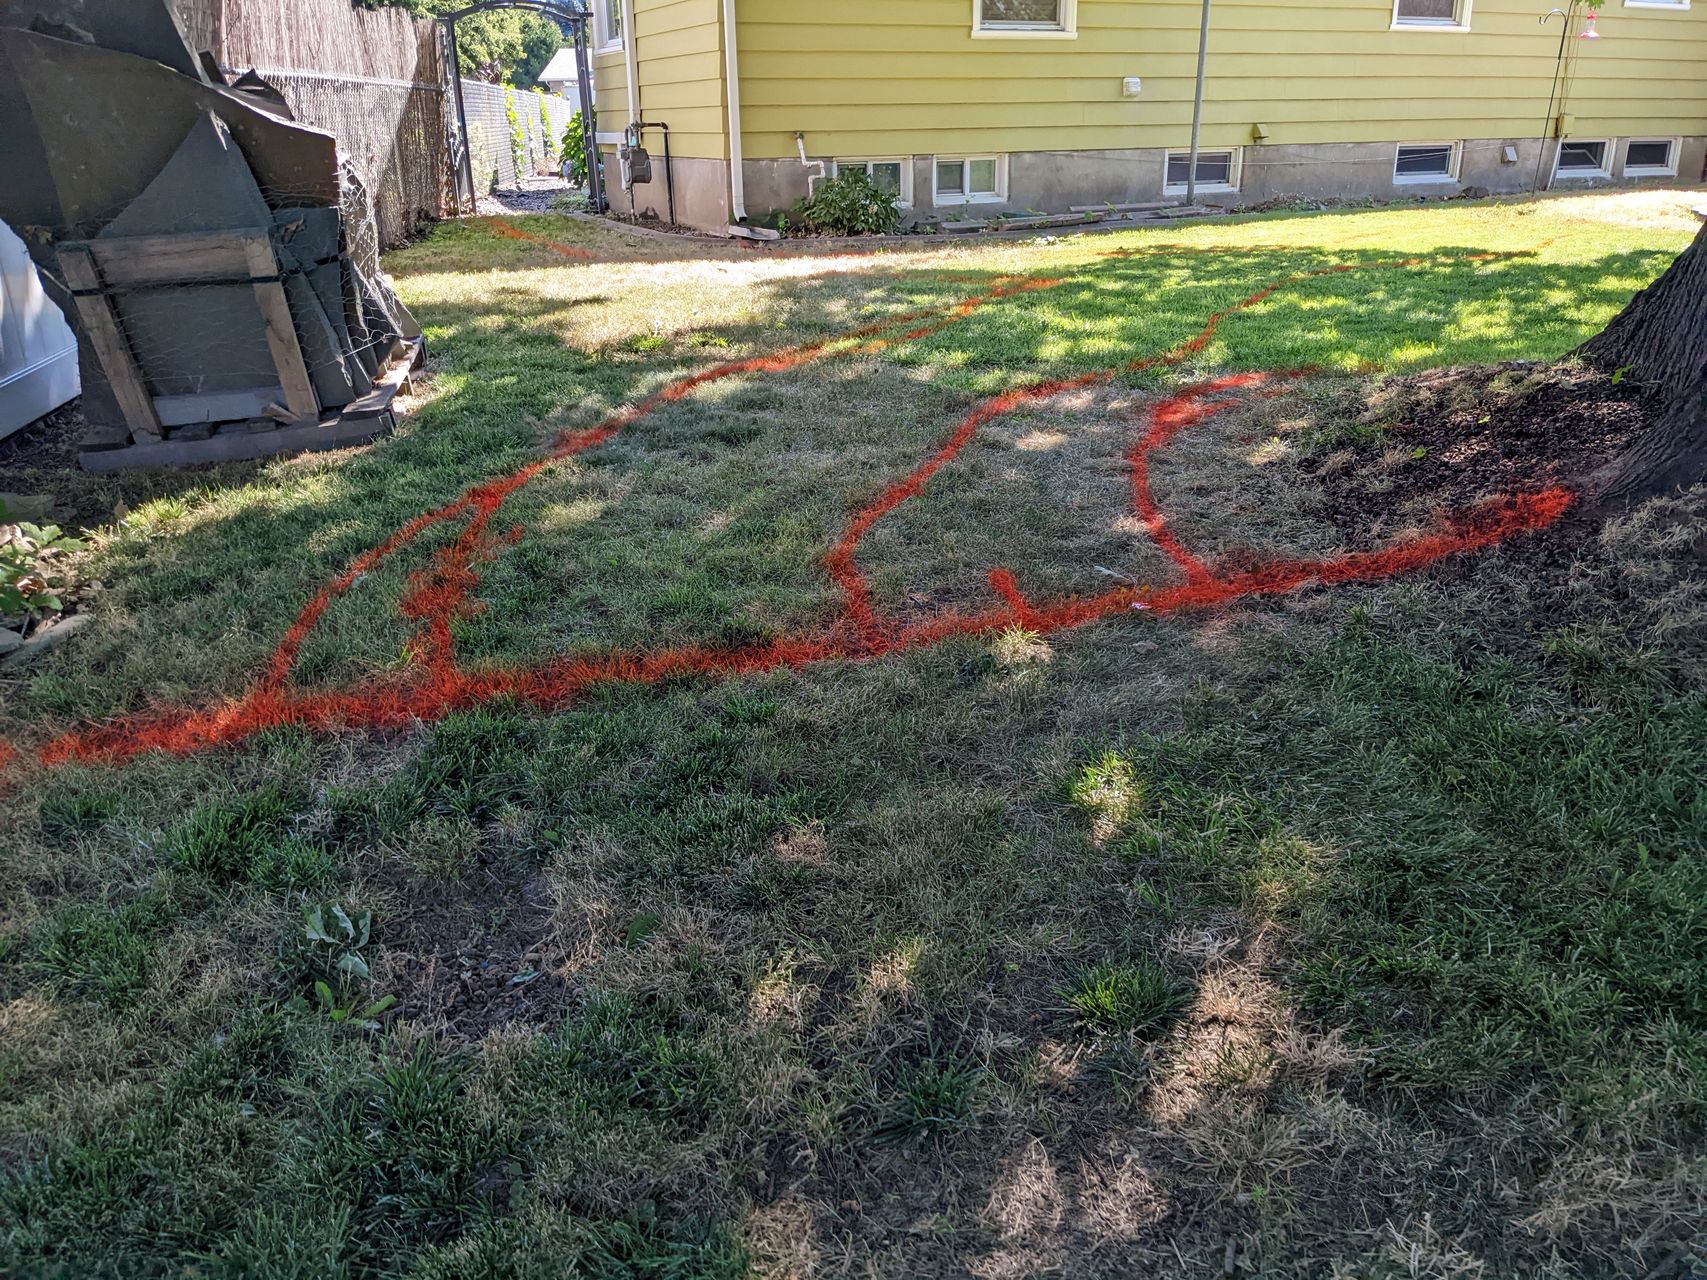
After our contractor removed the sod and put down a bare minimum of mulch, I ended up ordering more mulch, scraping up his mulch, and putting a layer of cardboard under it. I knew this project was coming for the last few years, so I've had a pandemic's worth of old boxes broken down in the garage. This should provide a biodegrable layer that will help keep weeds to a minimum. Punching a hole through the cardboard was supposed to be easy! I had done this with our last set of native plants in a landscaping bed.
Getting the plants
Okay, so we ordered all these plants, and then I have to go pick them up from an hour away. A friend was also working with Tapteal Natives, so we scheduled the same pickup time for our orders and I rented a small moving van. I was concerned that we were going to need a big box truck for some 70 plants of ours and 80 of theirs, but as many of the plants were in 4" containers or smaller 10cu plugs, a full sized pickup bed would have been enough for both of us. We brought a few boxes to help organize the smaller plants, and made unloading pretty quick.
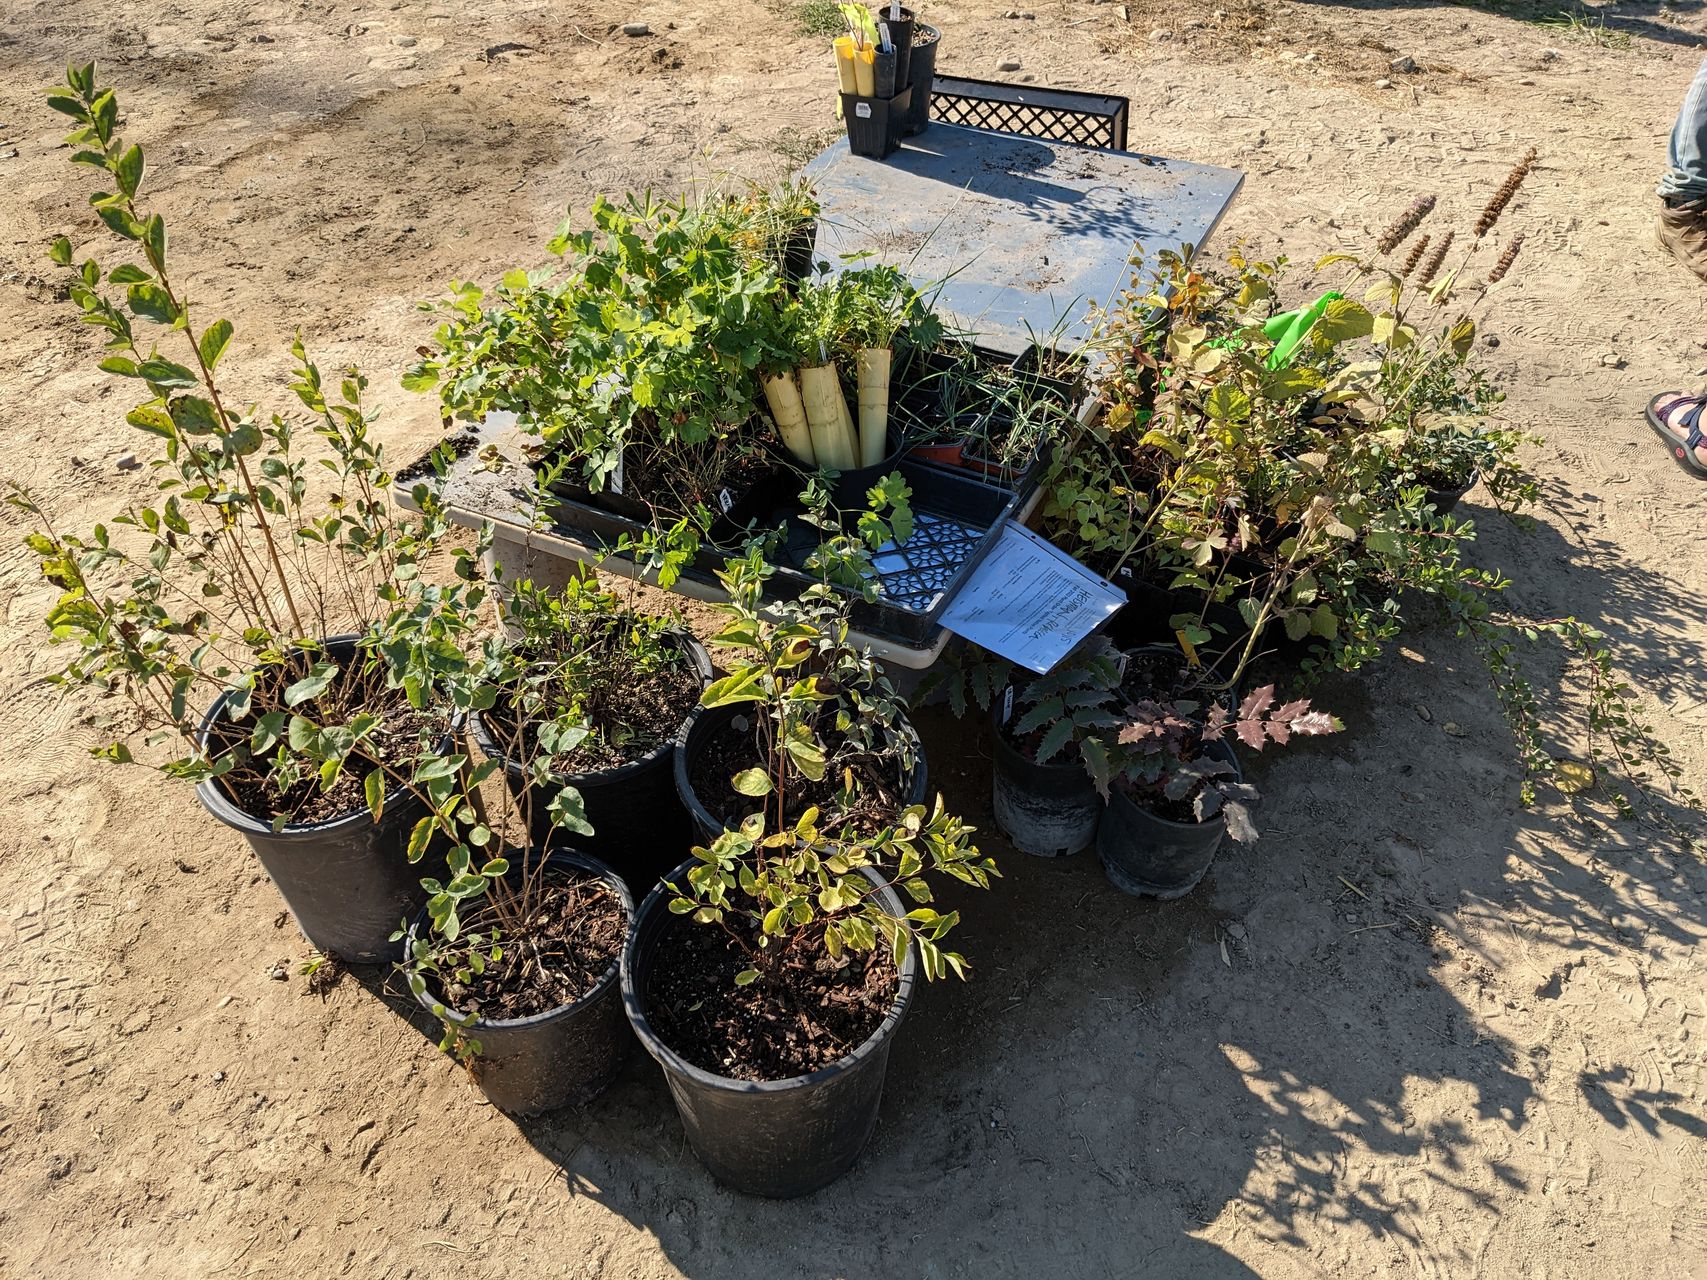 I should have taken a photo of transporting the plants, not just the group of them at pickup day!
Planting
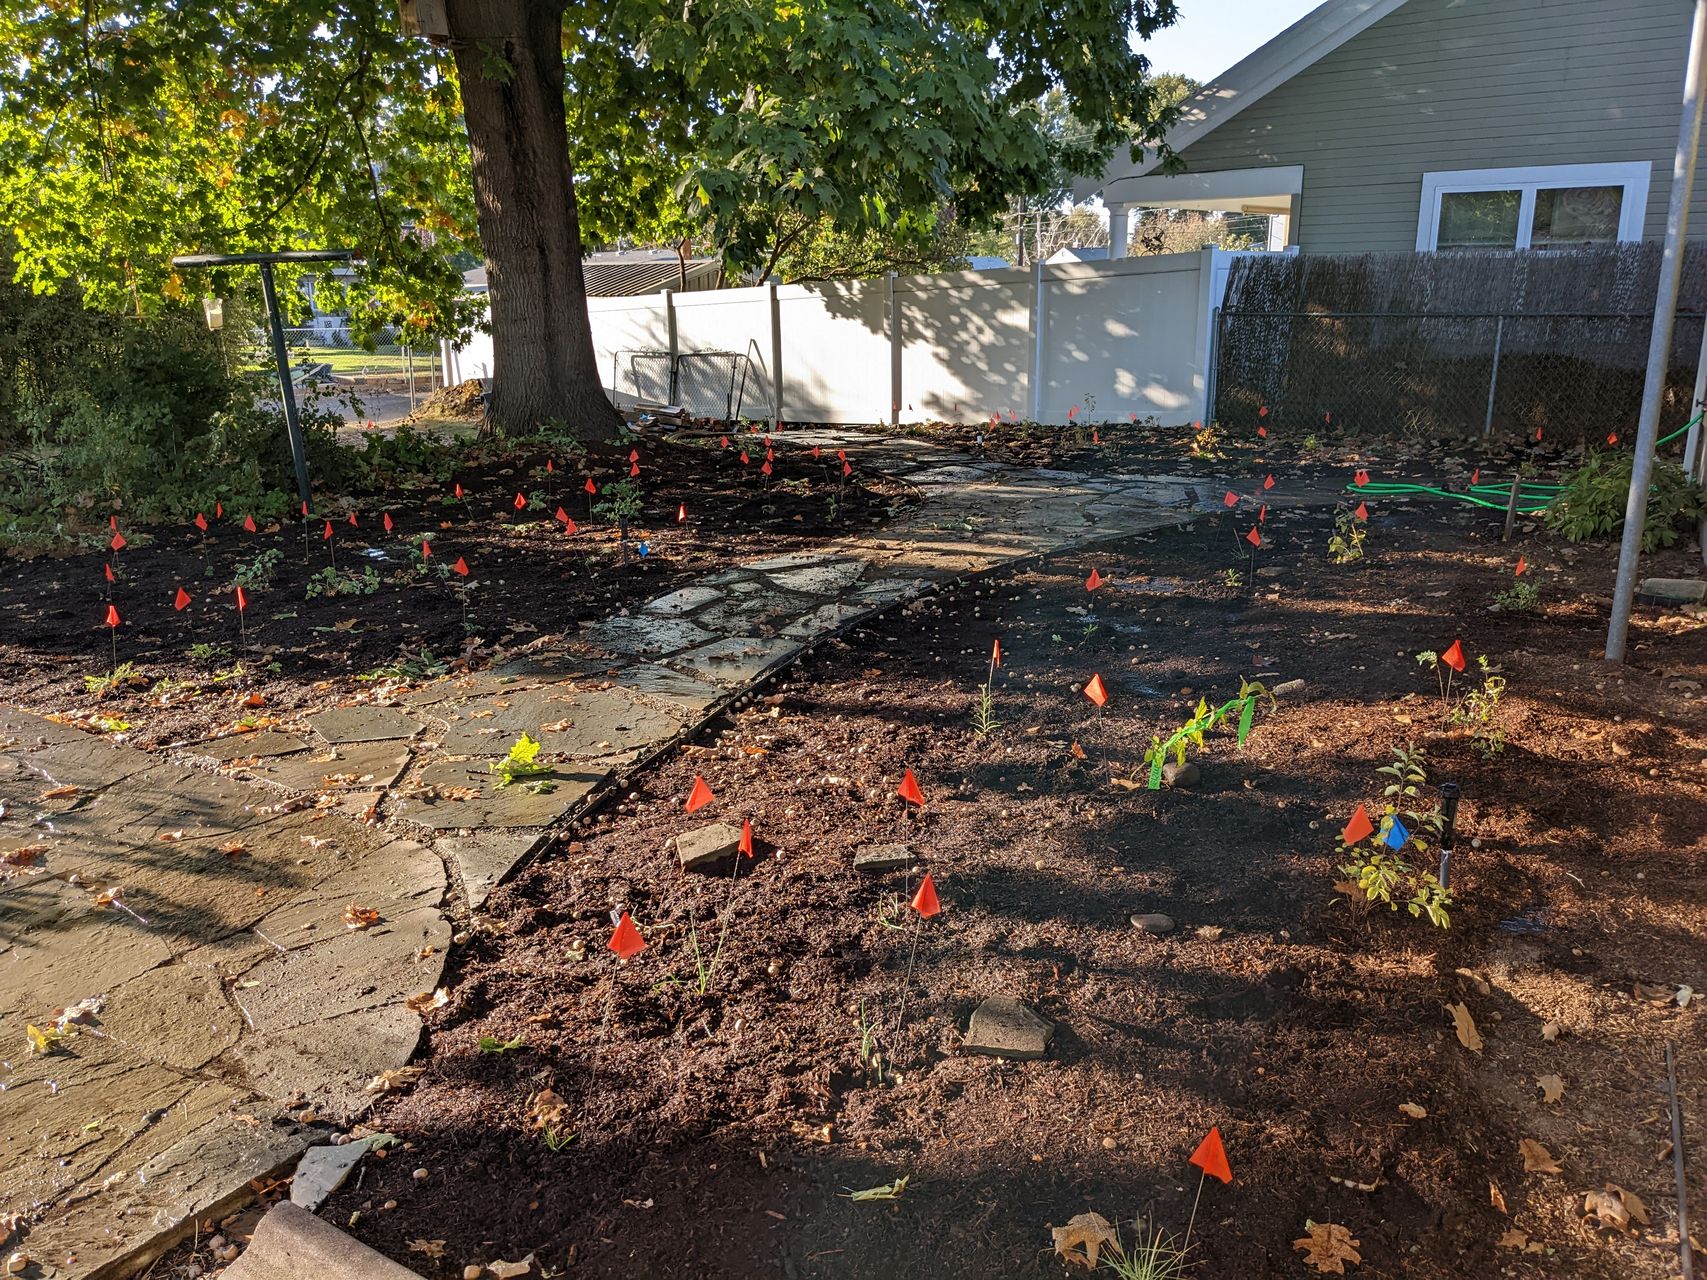
The 12 foot strip of native Palouse prairie plants that we planted in the front as an early COVID lockdown project had about 80 plants, but all in small plugs. This was a much larger operation with some 1-gallon and 5-gallon containers! Our property is on an alluival fan and clearly in one of the ancestral channels of Mill Creek, so digging more than a few inches down quickly gets to packed cobbles. I had known this from our previous plantings in the front yard, but was worse here as the sod had been removed! On top of that, I had to deal with all the roots from our grand old oak tree that is the centerpiece of the yard. After picking up the plants Saturday morning, it took me a couple of hours in the afternoon to get the first section planted, and much of Sunday to do the others.
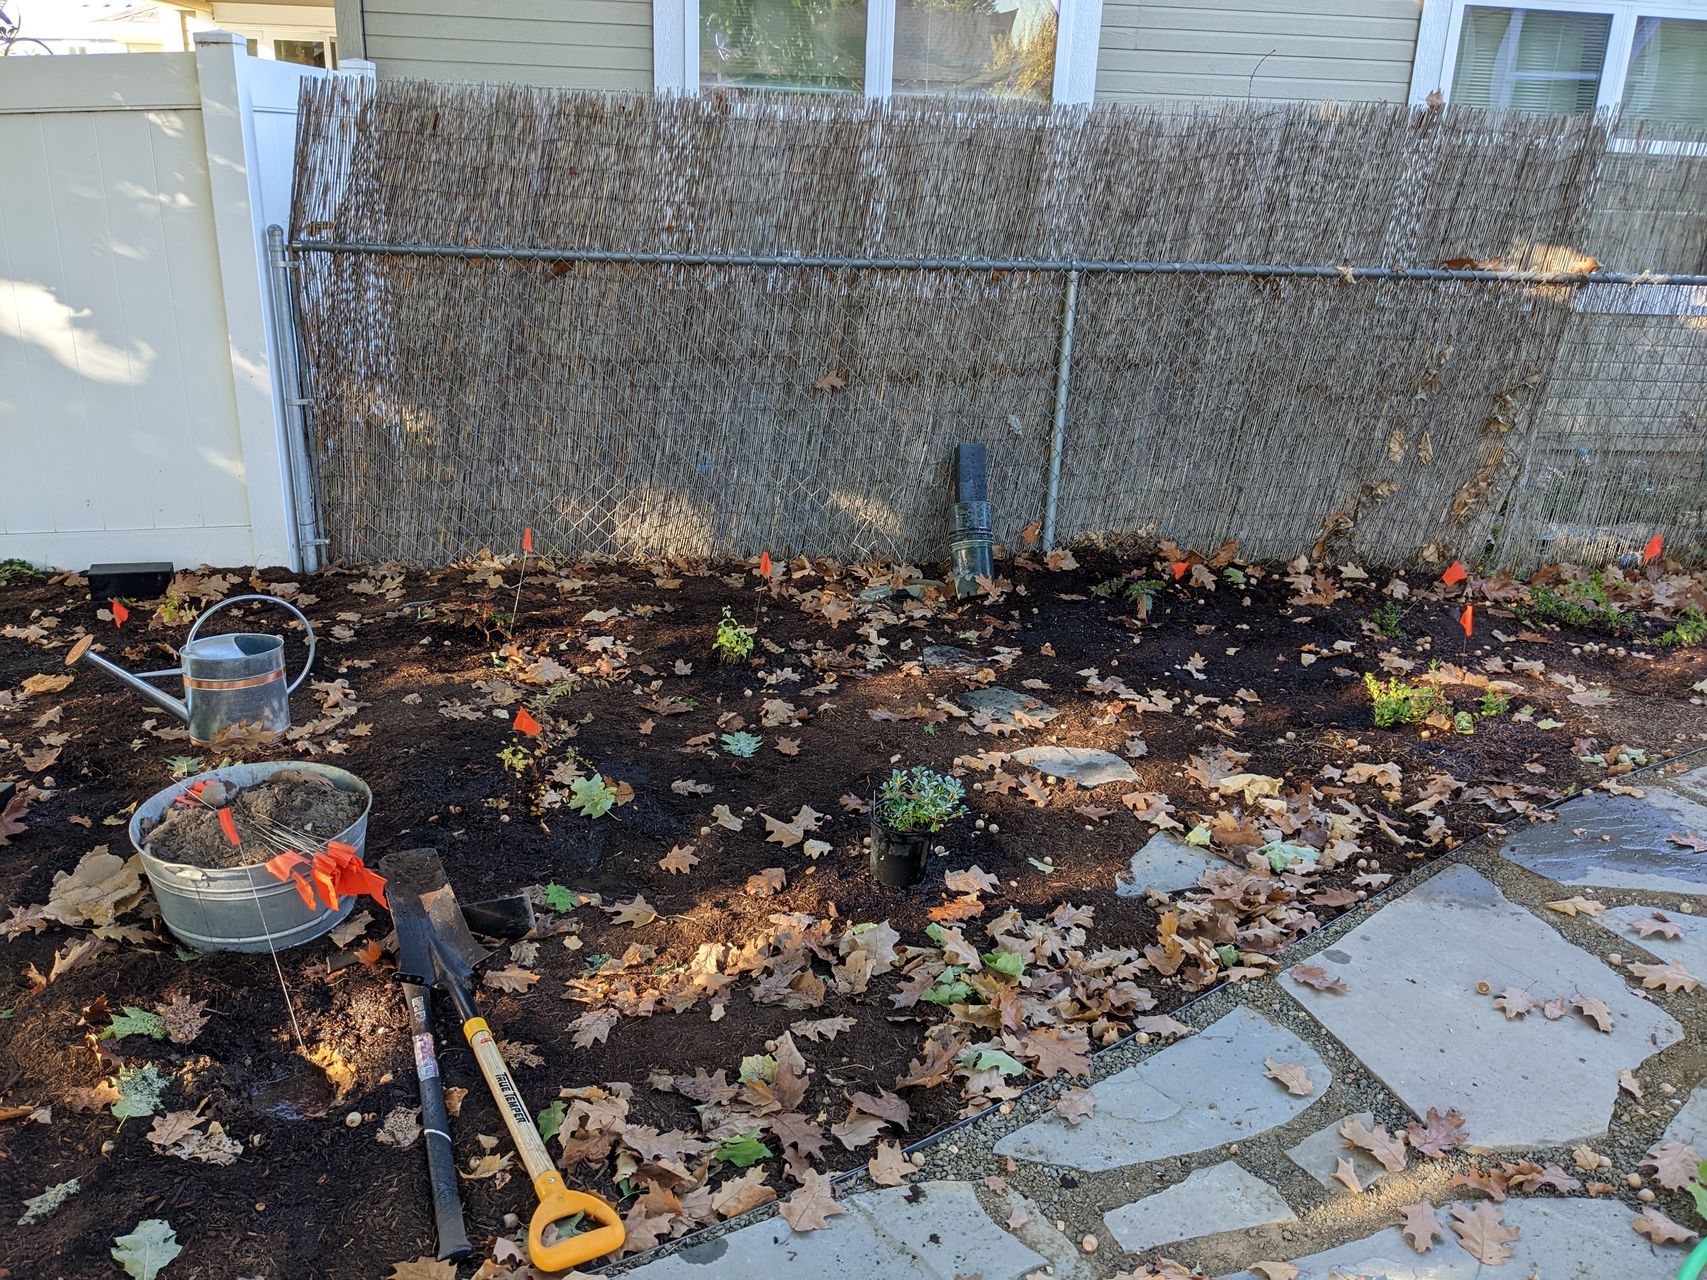 I marked each plant with a flag from the hardware store so that any that loose foliage over the winter are easy to locate next spring. Some of the plugs have only a few small leaves exposed above ground, so hopefully we won't lose any this way.
Resources
Many of our initial efforts were informed by plant lists and guides from the Audubon Society (for birds) and the Xerces Society (for pollinators). Audobon maintains a website that recommends plants to bring birds to your yard, based on your zip code, which was our starting point for our overall native plant project.
 Our front yard in full bloom with a sign from the Xerces society proclaiming it as pollinator habitat. This front yard patch of natives brings all kinds of fun insects, including many different kinds of butterflies, bees, wasps, and tachinid flies.
For those in the inland Northwest:
It's difficult finding varieties of native species that are for the inland northwest, as most native plant nurseries are region specific, and may only focus on wholesale plants for ecosystem restoration projects. If you're in the inland Colubmia valley or on the Palouse, a few places I'd recommend are:
-
Tapteal Native Plants (website | instagram), who provided the plants, planting plan, and advice for this project! I would highly recommend working with them!
-
Plants of the Wild (website), who primarily works with larger ecosystem restoration projects but sells to the public. We've done mail order with them (and at least one pickup order) to fill parts of our front yard with their Palouse Prarie pack and a few other plants from them. As a result, from March through November we have had a variety of native wildflowers adding color to our yard.
-
Columbia Basin Native Plant Society (website | facebook), based out of the Tri-cities area, occasionally runs plant sales, where we got a few sage and rabbitbrush plants.
Aug 28, 2022
Purpose
I bought a DDS-60 VFO board from Midnight Design Solutions almost a decade ago, with the intent of using it to build a HF antenna analyzer. I built an Arduino shield to hold it, but never got around to the RF power meters required to use it as an antenna analyzer.
In the summer of 2020, during wildfire season and sociall distancing due to COVID, I was assembling a KD1JV Tri-Bander CW tranceiver kit that a neighbor had bought and not finished. I am not sure that the upper and lower band filters were working correctly, as the radio was totally deaf and putting out zero power. I briefly got out the Arduino DDS-60 sheild that I had built to help diagnose the issue, and wrote a control program to switch between bands.
Details
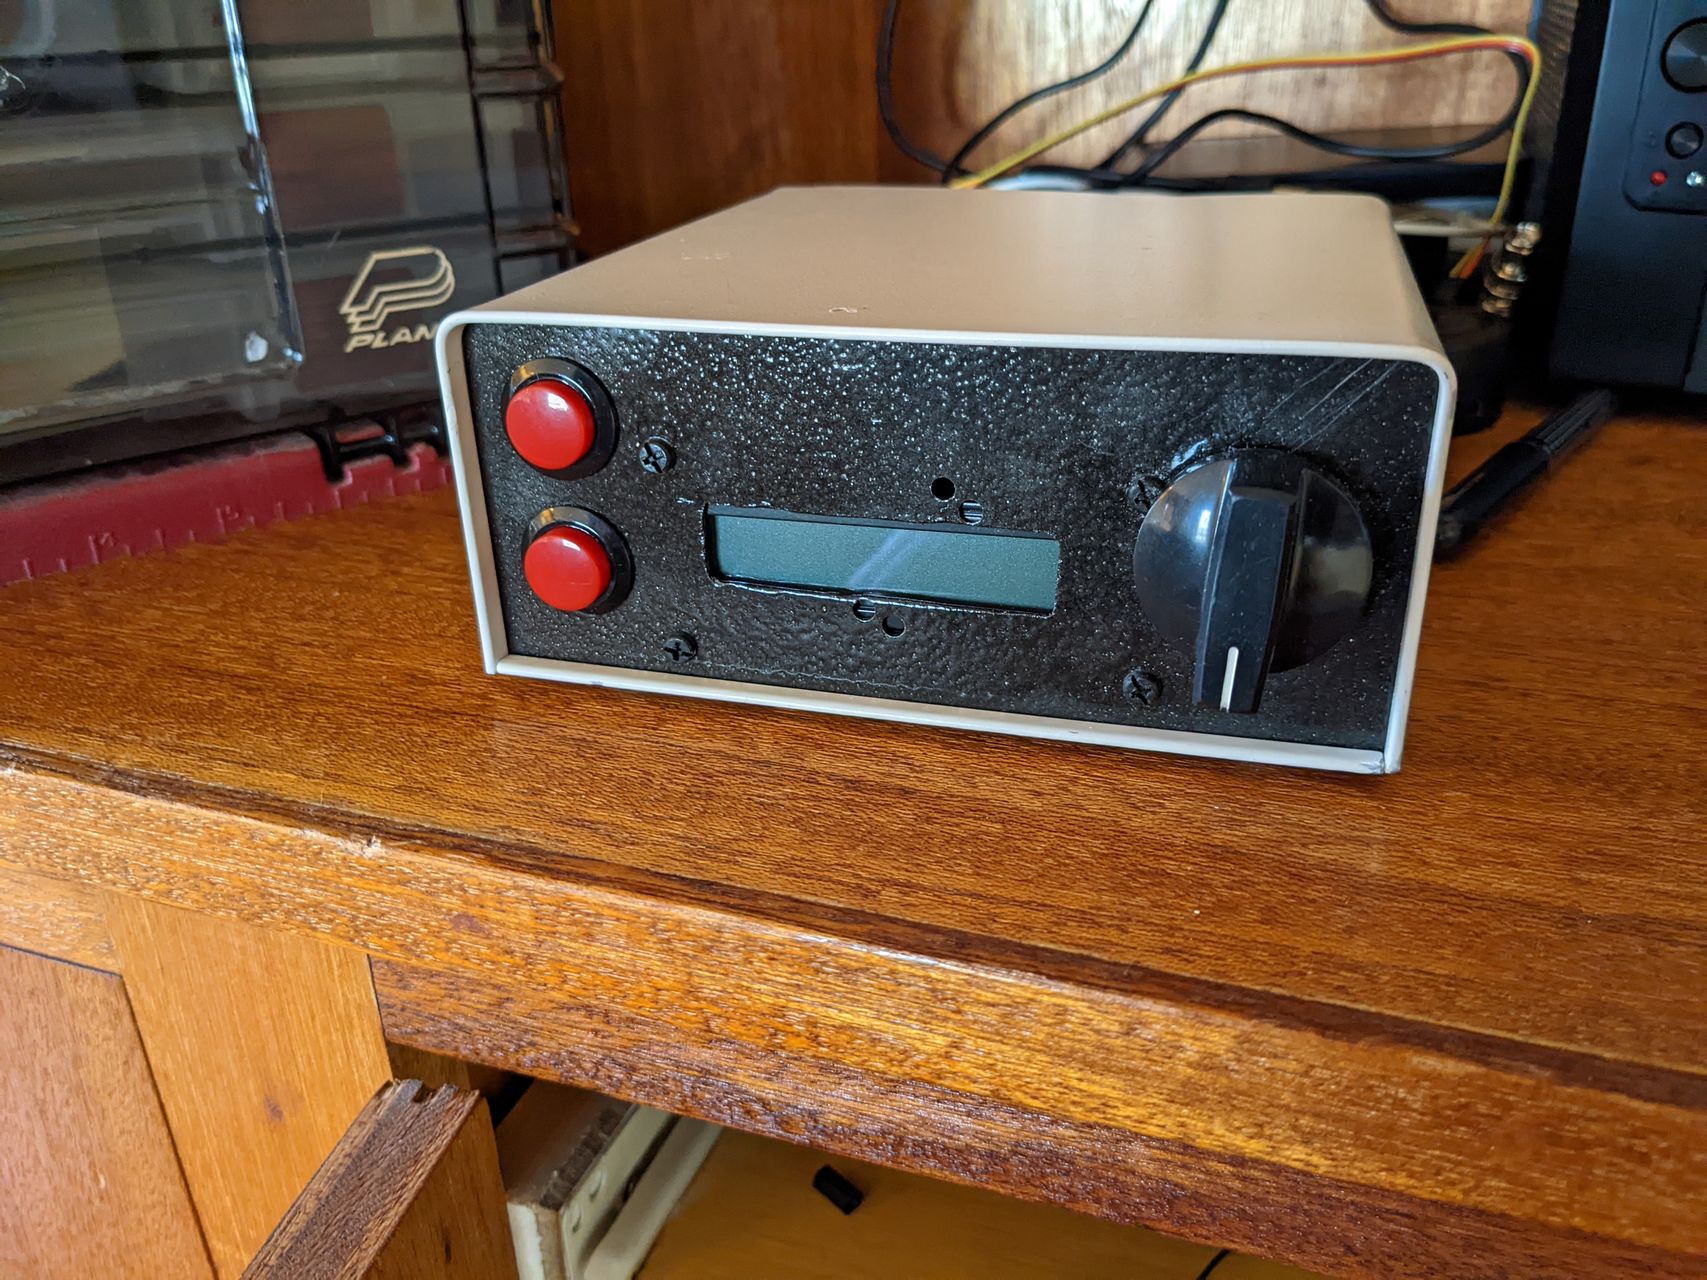
The front panel has room for two buttons, a rotary encoder with a push button built in, and the display. The two buttons and push button on the rotary encoder. On the rear panel, the Arduino's USB port and power supply are available, along with three of the analog pins broken out with RCA connectors for future use.
I designed four modes for the device, selectable by using one of the push buttons.
- Signal Generator: Produces a output at a single frequency.
- Sweep: Sweeps across a range of frequencies automatically.
- VFO: same as signal generator mode, but limited to ham bands, with a button to jump between bands.
- Memory: recalls specific frequencies from the EEPROM. These can be saved via a serial protocol (untested).
The rotary encoder changes the frequency, or the start for the sweep mode. Pressing the button on the rotary encoder changes the step size when the encoder is turned.
The second push button can provide an additional function for each mode. In VFO mode, it switches bands, while in signal generator mode, it increments the frequency by 1 MHz.
Current State
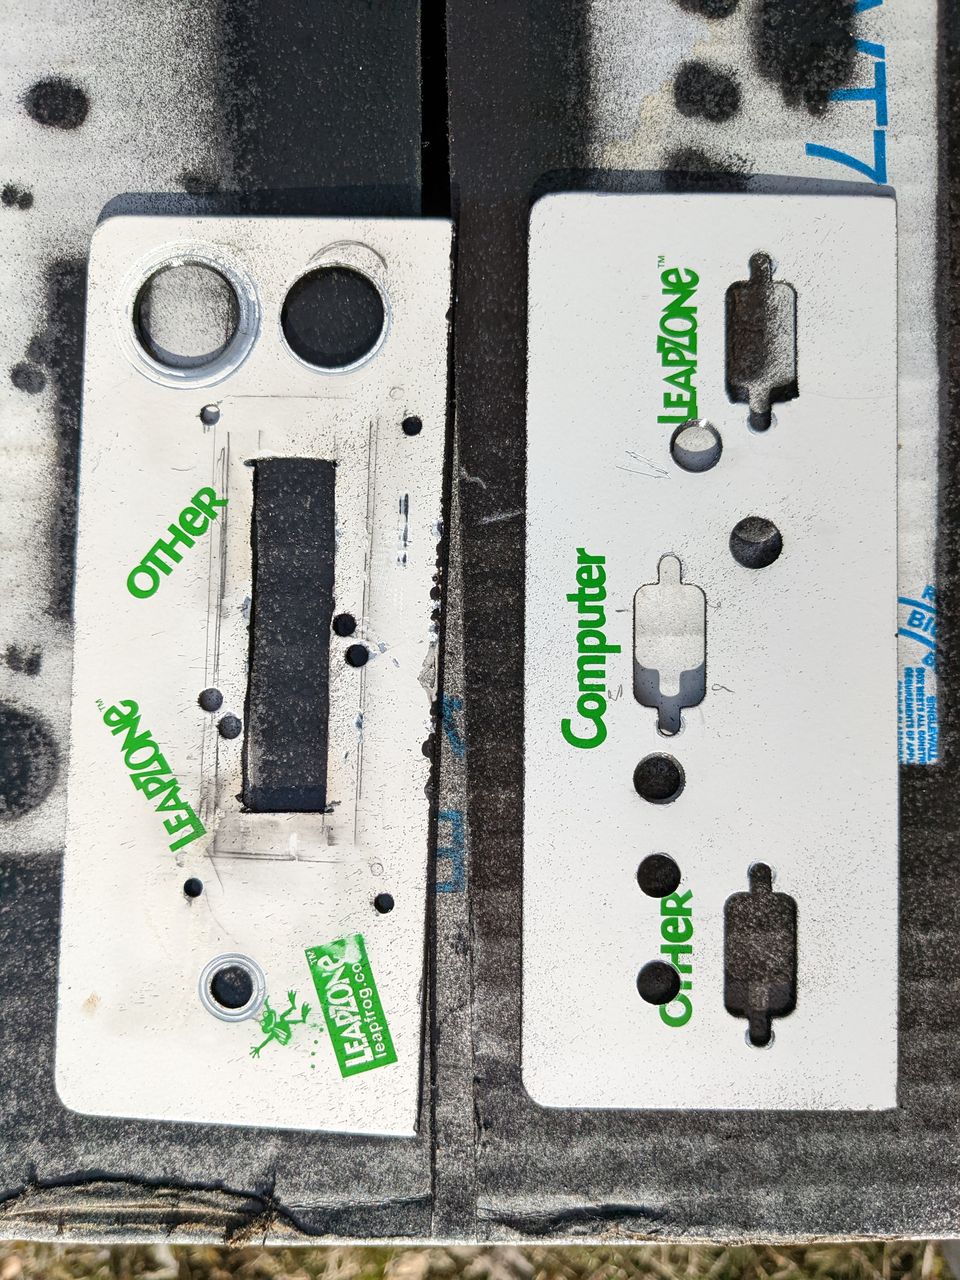
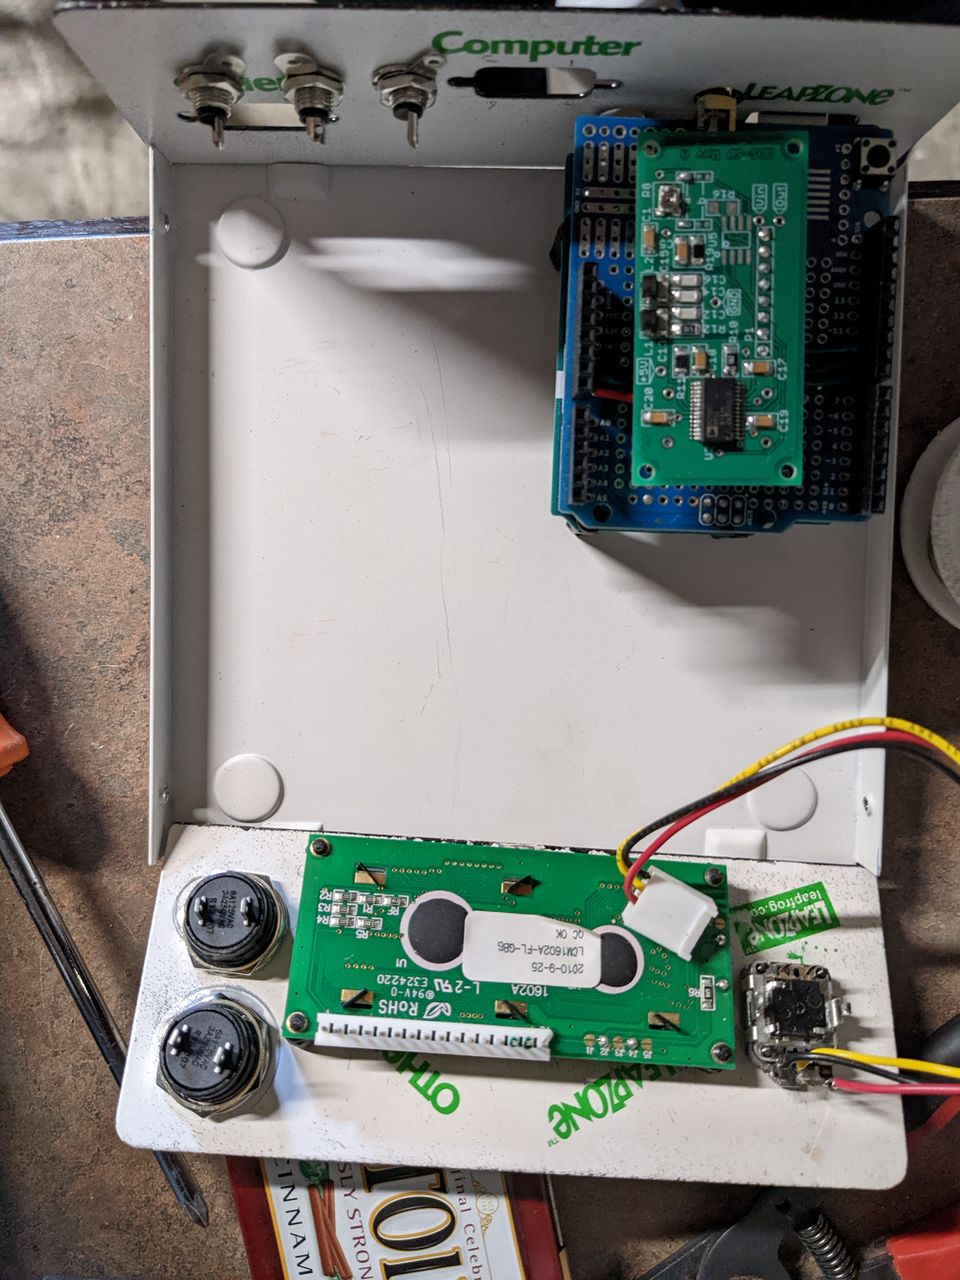
A couple of months ago, my ham neighbor who gave me the tranceiver kit was also clearing out his shack and gave me a number of items, including an old serial port switch that was just the right size to turn into a case. This box came with front and back panels that could be removed entirely from the case, making them particularly easy to work with, and I initially had planned to just flip them around to hide the text. I manually laid out the panels by tracing the panels on a sheet of paper and then trying to trace the components in their locations, trying to reuse or expand existing holes where possible.
The holes I drilled are sloppy, as I am not much of a machinist, but they'll work for this. Particularly cutting out the square hole for the screen was difficult, using a dremel tool cut-off blade to quite a while. After drilling, I took a light grinding bit and buffing bit to clean up any sharp edges.
I spray-painted the panels a black paint that I had sitting around, unfortunately, it beads up to create a hammered metal look, and that resulted in a splotchy looking finish. Maybe not the best look for this panel, but it's the paint I had on hand and was better than the scratched up white paint from my amateur machining.
Before adding leads to the components, I test fit it all in the case. At this point, I managed to mess up the finish a tiny bit by needing to drill an additional hole for the pin that keeps the rotary encoder in place.
August 2022 Update:
I took this project back off the shelf to work on the software and rewired some of the interface elements. After burning out the first display I had planned to use, I had decided to try a standard 16x2 LCD display. I found a couple in a box of parts my neighbor gave me, and ended up ordering an I2C for it from Jameco to make the wiring a bit easier. I seem to have incorrectly wired the rotary encoder as it will only register increasing values - after trying three different Arduino libraries, I realized it must be a hardware thing, I am pretty sure I grounded the wrong pin on the rotary encoder. Having the display has helped me test the UI elements.
I've been maintaining a github repo with the sketch, a few design files, and the test sketch.
The code still needs a bit of work - I am doing something wrong with type casting, as soon as you start turning the dial, the display frequency goes haywire. Maybe this is only an issue with me using sprintf, but I expect it is deeper than that. Once I have the rotary encoder fixed, this'll be the next thing I address.
Jun 20, 2022
(This post is very much a work-in-progress when posted, and I mostly wrote up from my notes on configuring the box)
I've been wanting to set up a couple of projects that would be best served by something like a Raspberry Pi - lightweight processes that are always on. Unfortunately, they're impossible to find. I had been considering replacing my TV computer (really my spouse's old laptop) with an Android/Chromecast device, and after a little research I found a review of one sold by Walmart for $20. That lead me to the question every nerd should ask when they see a device that cheap... does it run Linux? I didn't find an answer to that question, but I found many similar generic Android TV boxes for sale on various websites. Surely those run Linux, and of course they do.
(Side note: I've variously tried to run my ham projects on WSL and not had much luck on my old Windows 10 machine. Remote GUI was a pain, and Linux audio is always a difficulty. So back to a dedicated Linux box.)
There are a variety of these, powered by a number of SoC processors, but the Amlogic S9xx series seems well supported by the Armbian project, and readily available. (Note: After ordering this board, I found some concerns about Armbian's practices.)
After searching for various devices and comparing specifications with prices, I decided to buy one for around $30 that included 64GB eMMC storage and 4GB RAM, but only 100M ethernet. For $30, this should be sufficient for my ham shack machine, and maybe enough to run a few other services. Following their instructions, and these extra steps to configure booting.
Boot configuration
My model wasn't specifically listed (Sunisery H96 Max, says s905x2 CPU with 4G RAM), a similar sounding "X96 MAX" was available, so I ended up trying this dtb file: meson-g12a-x96-max.dtb. It seems to work. When trying to reboot the TV box into linux, don't forget to hit the reset button (inside the AV port) to enable multiboot.
Next Steps
Now that I have Linux booting on this device, I can work towards the following
- WSJT-X configuration with SDR for 6m/VHF reception
- Shack Control box to remotely turn on radio and run remote antenna switch.
- APRS iGate with KISS TNC, GPS module, old 2m radio?
Concerns
- Ethernet not functional: Have not investigated this one yet.
- Unable to change passwords: Solution - I just needed to use
sudo passwd from my account.
- Long term support of Armbian?: Armbian states that their mission is to extend support for these unsupported ARM SoCs, which I greatly appreciate. I feel like I've been burned on dev boards going out of support before, so I'm still a little worried.
- Power draw from small power supply: Plugging in my Griffin iMic USB sound card works fine. A beefier USB sound card (with RCA inputs and several more channels) appeared to draw too much power. I have a powered USB 2.0 hub that I should test it with.
May 24, 2022
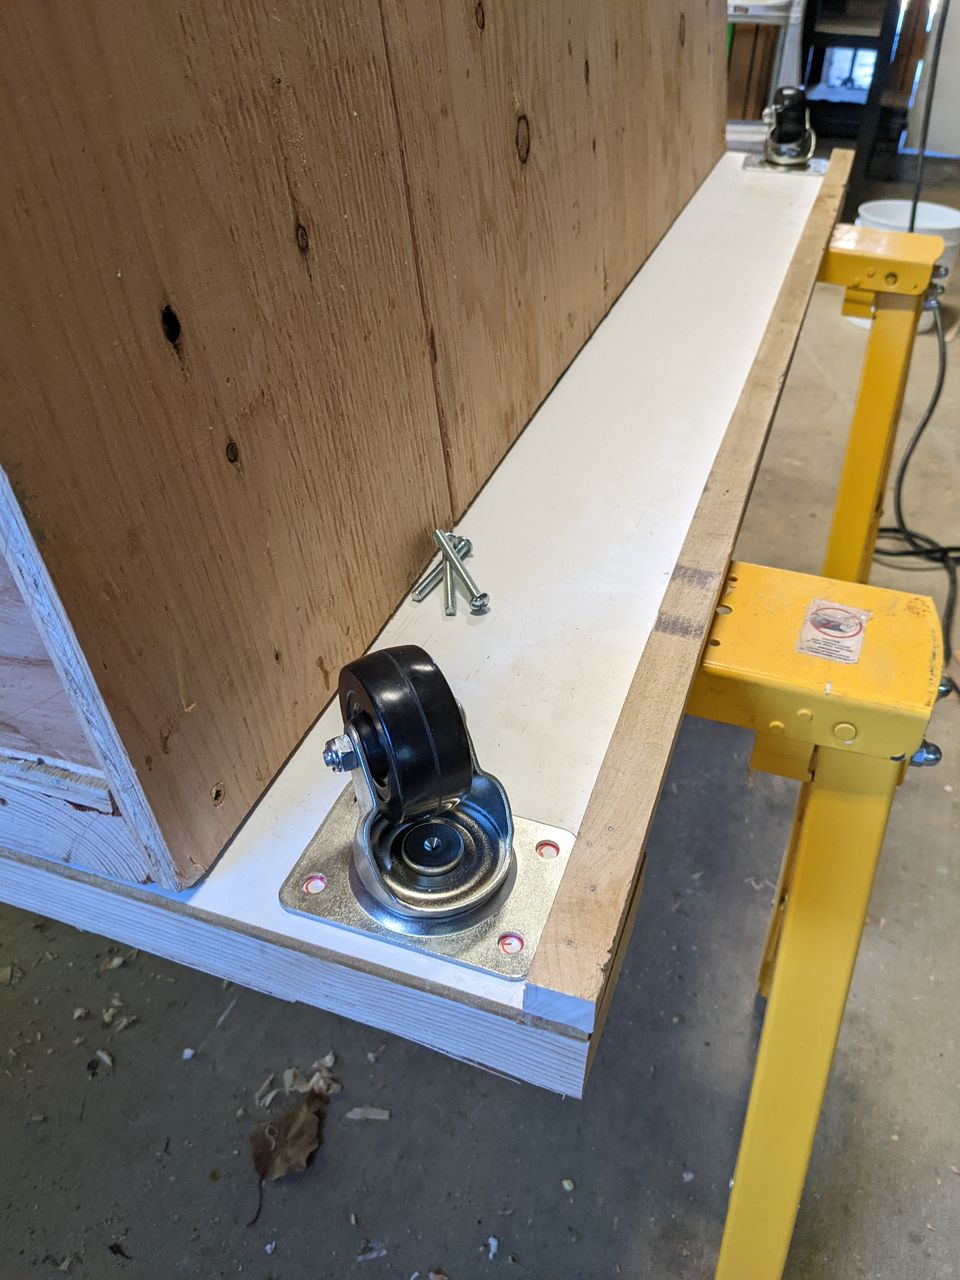
Here's a quick (short) post about an easy lumber rack I knocked together from an extra sheet of plywood and some scrap lumber I had laying around. I needed a better storage solution than the wire-racks I had bought years ago for camping gear and other stuff. It was fine to hold things, but difficult to sort through and impossible to move if I needed to get it out of the way. The sheet of plywood is the only 'new' piece of lumber, which I had originally planned for another project but decided was too rough to use, and I bought some decent quality casters from a local hardware store.
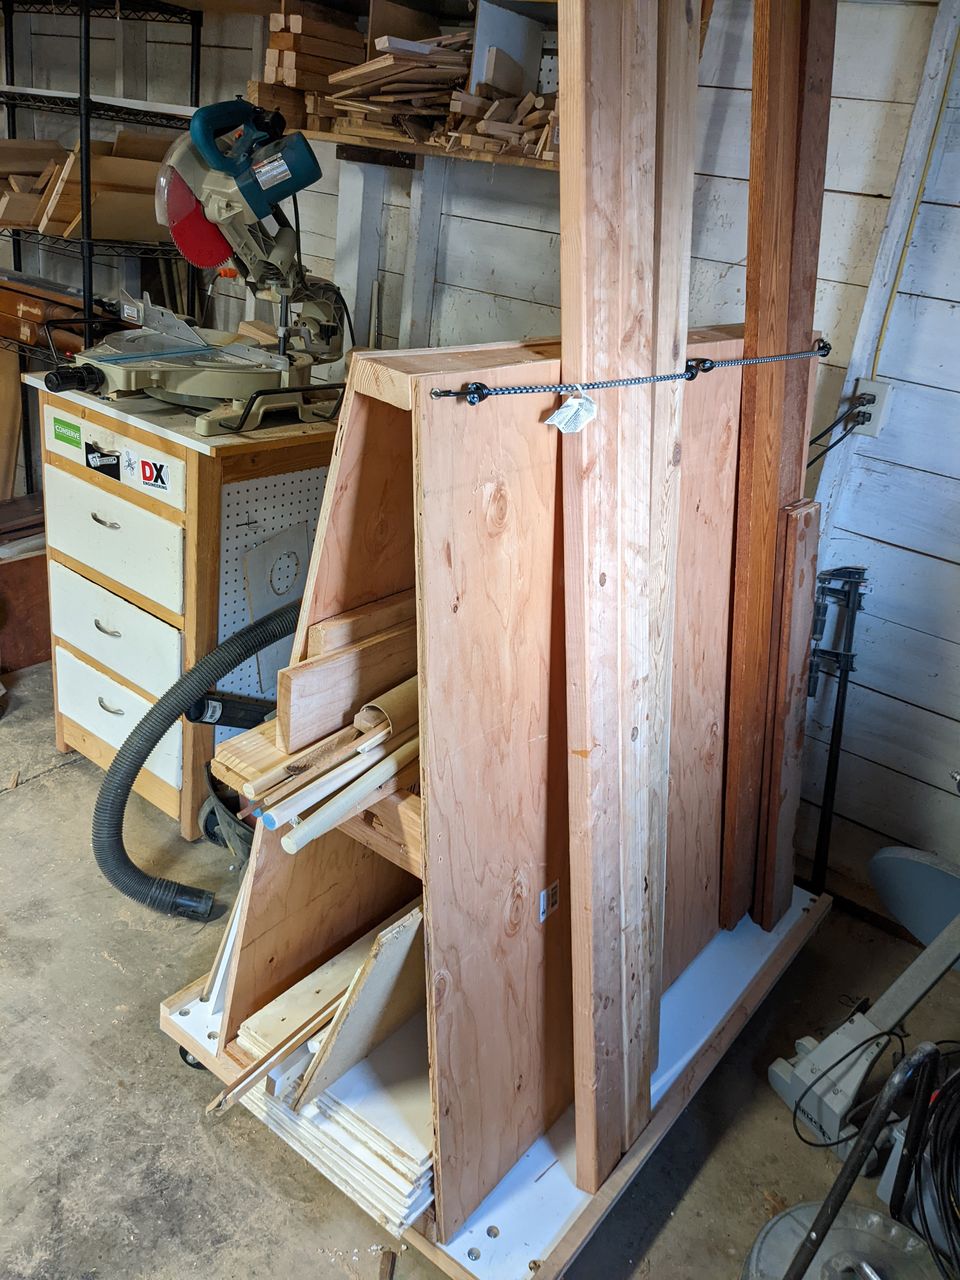
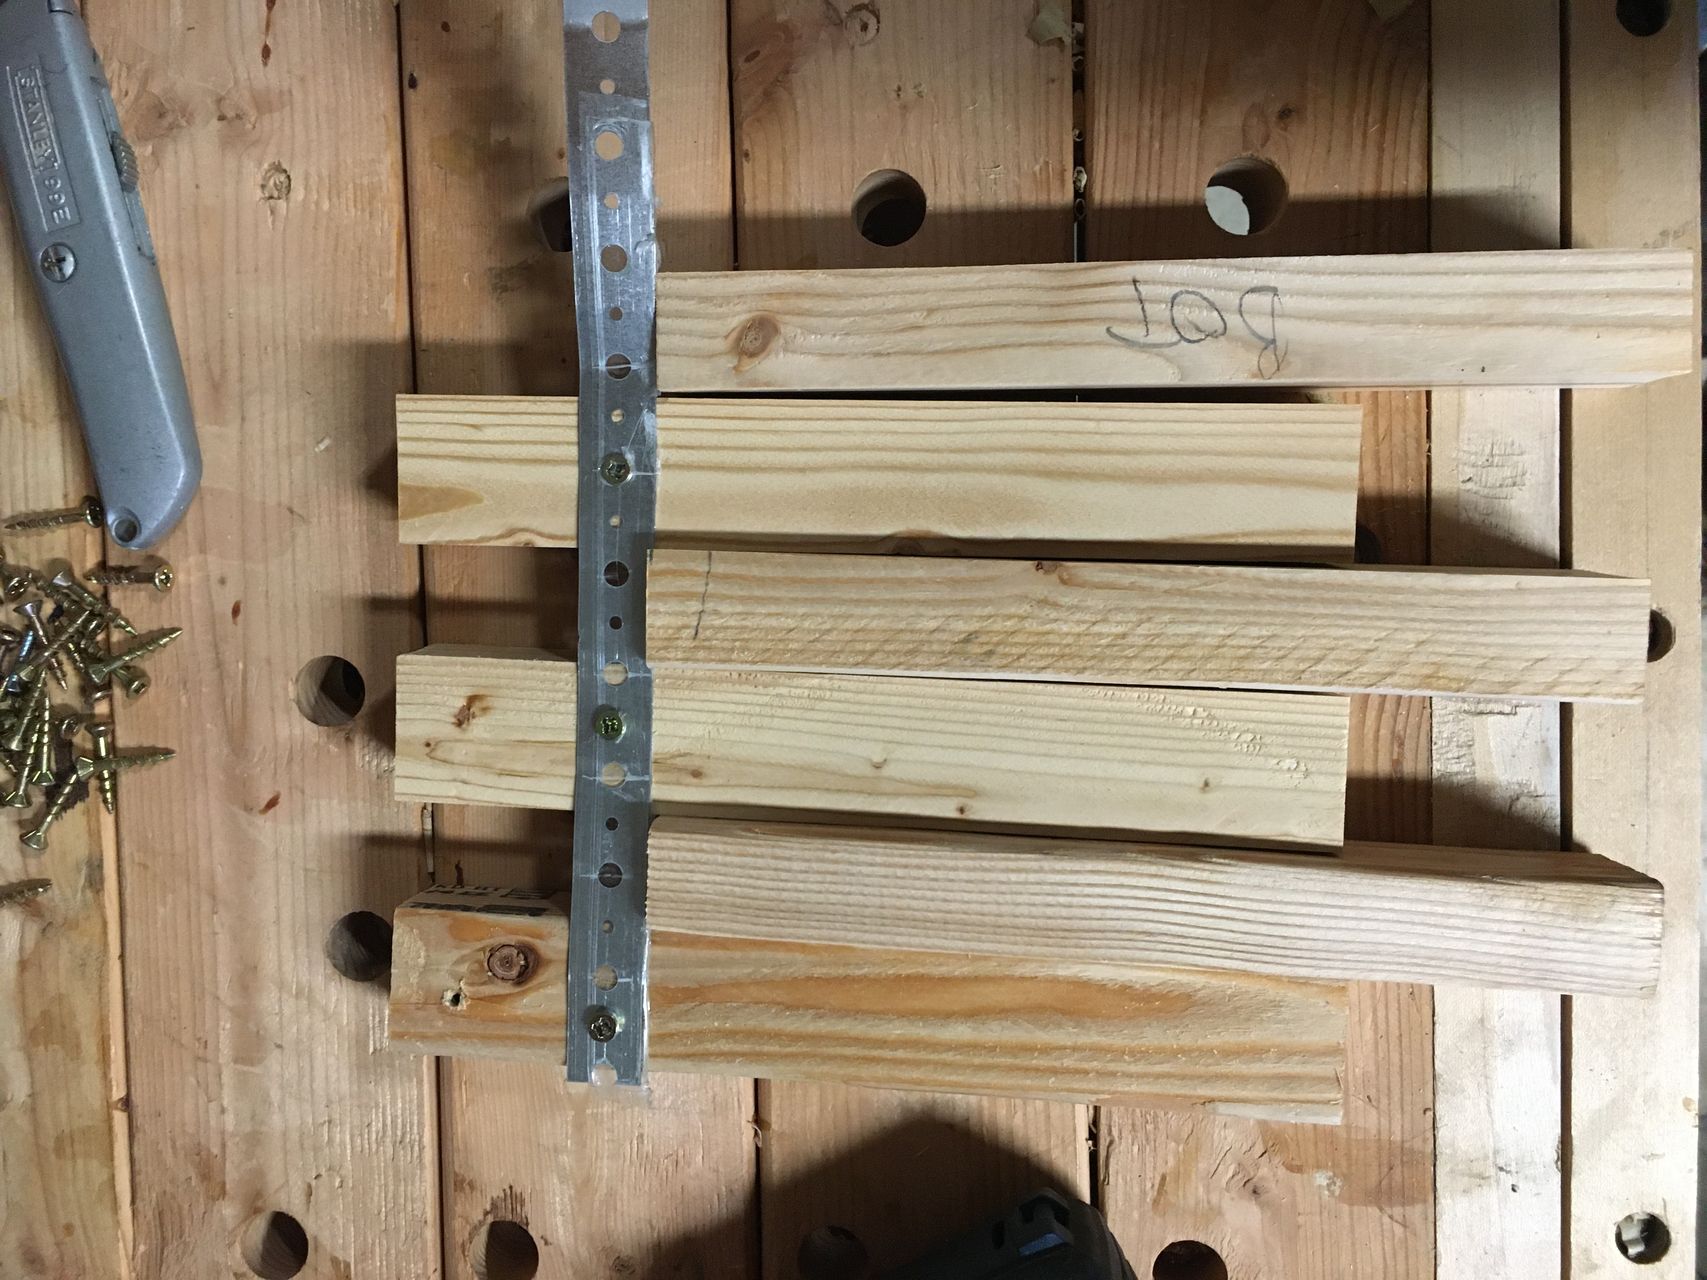
The extent of the plan I had going into this was to cut the plywood into two 4 foot squares, and arrange them in an A-frame using some 2x4s I pulled off of my old workbench top. I cut the more beat up ends off of these, and found a few scraps for the rest of this. I cut a bevel on the 2x4s that would hold it together using my table saw, but these wouldnd't have been too hard to do by hand with a scrub plane and some patience.
I ended up using fewer of the 2x4s than I was initially expecting. If I had thought it through, the plywood at the bottom of the triangle could have been saved with only the 2x4s holding the bottom together. I think having it there will help with strength and gives me a good shelf to put additional lumber on.
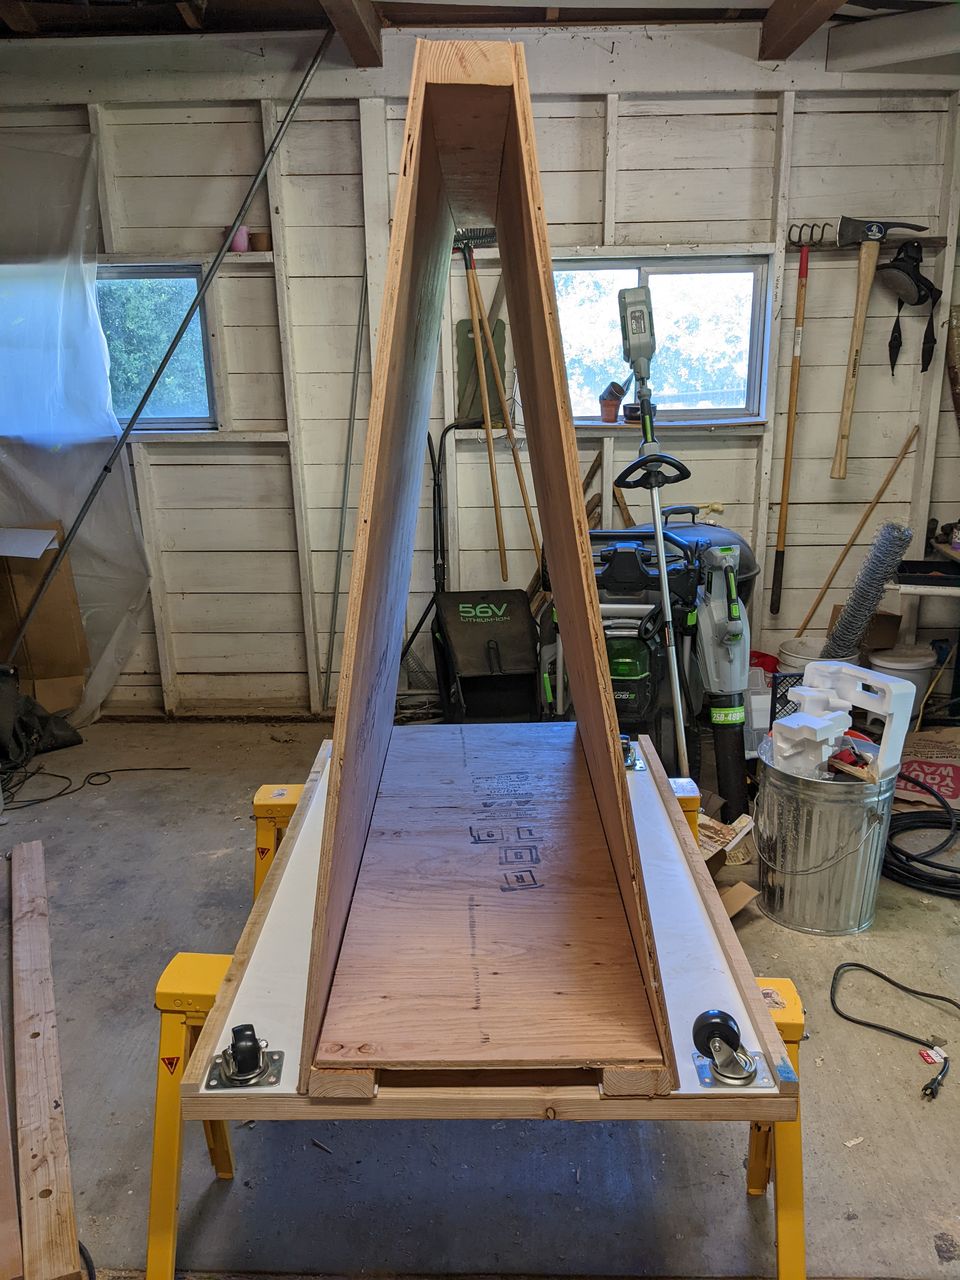
I added a small scrap strip of hardwood as a stop to keep the lumber from sliding off the bottom, tacked it down with brad nails. Later I attached these wheels under it, boltling them through the 2x4s that cross the bottom. I put a couple of crossmembers inside to add an inside shelf and strenthen the plywood a bit if anything really heavy gets leaned on them.
Finally, I addded some eyebolts and a couple of bungie cords to keep the long pieces of lumber from tipping over. This was after having my kid help with attaching the wheels (well, dusting and attempting to tighten the bolts for me). I noticed with wheels that moving it around would definitely cause the lumber to slide around and fall
over. Not something I want to have happen to myself or anyone else.
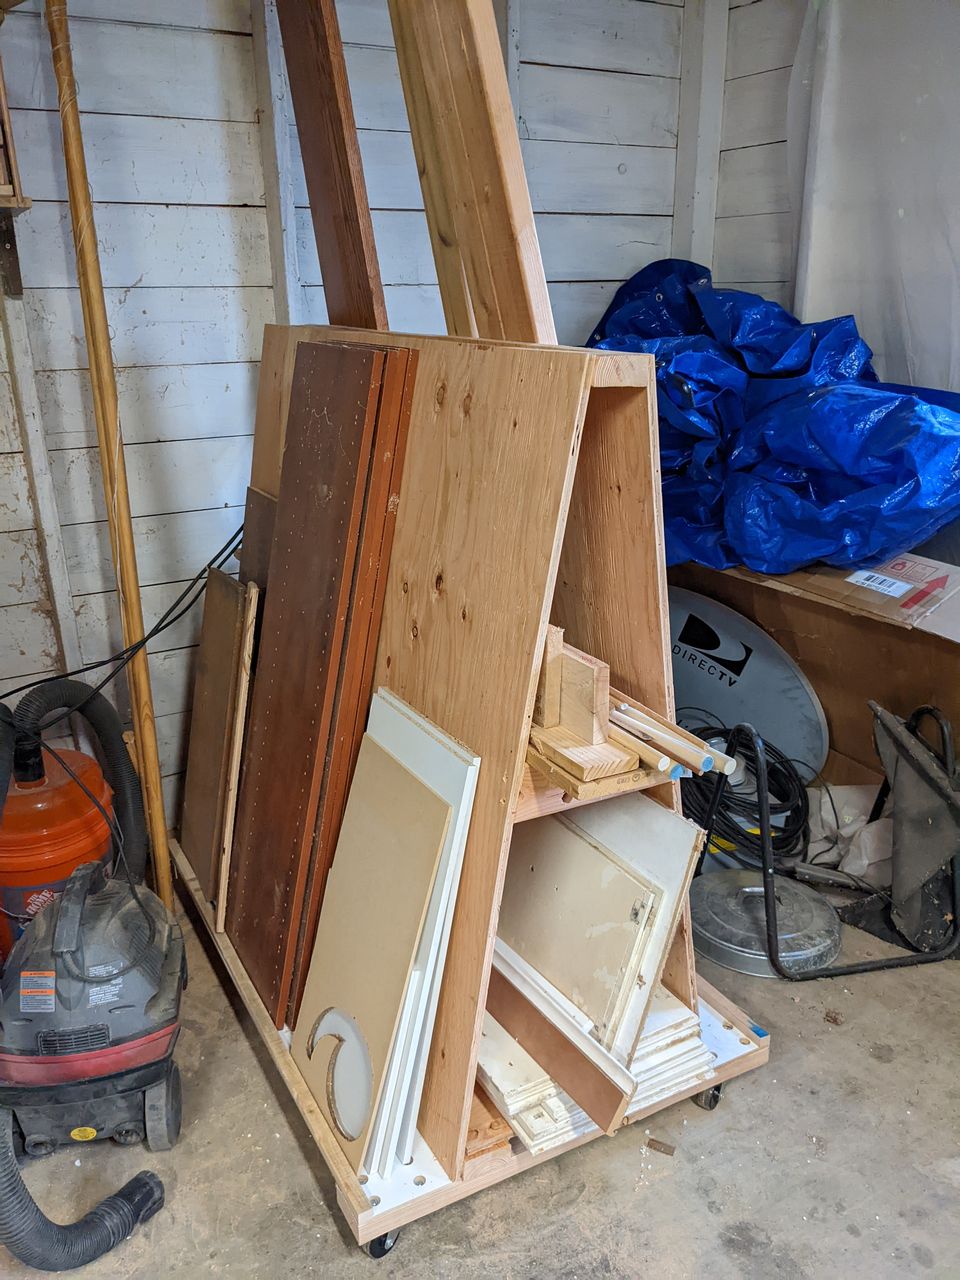
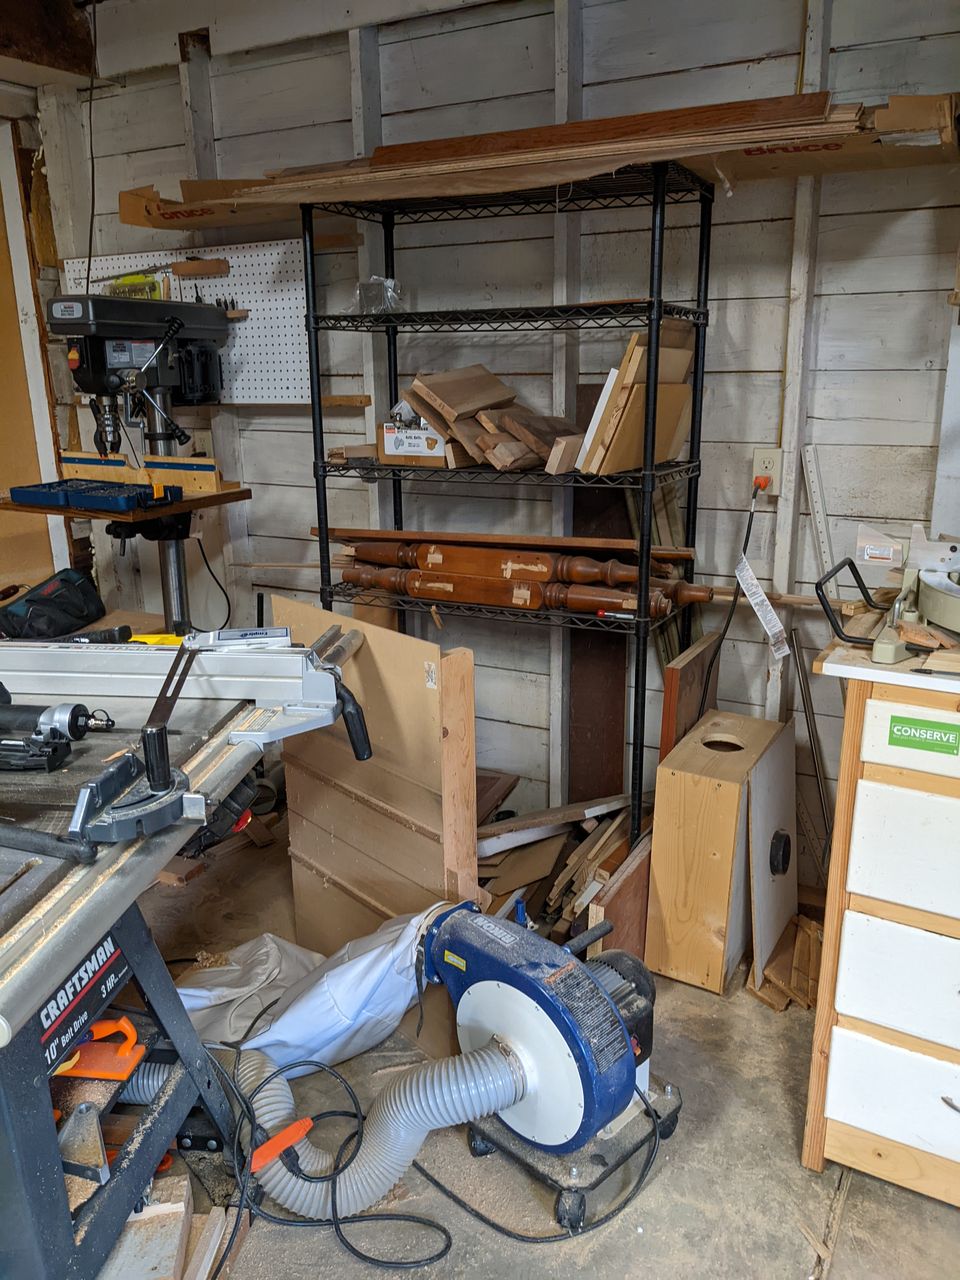
Finally, I got to start putting lumber on it - for comparison, part way through moving lumber, you can see my messy old lumber rack here with some of the lumber removed. Still a mess, but much better than it was.
May 01, 2022
Concept
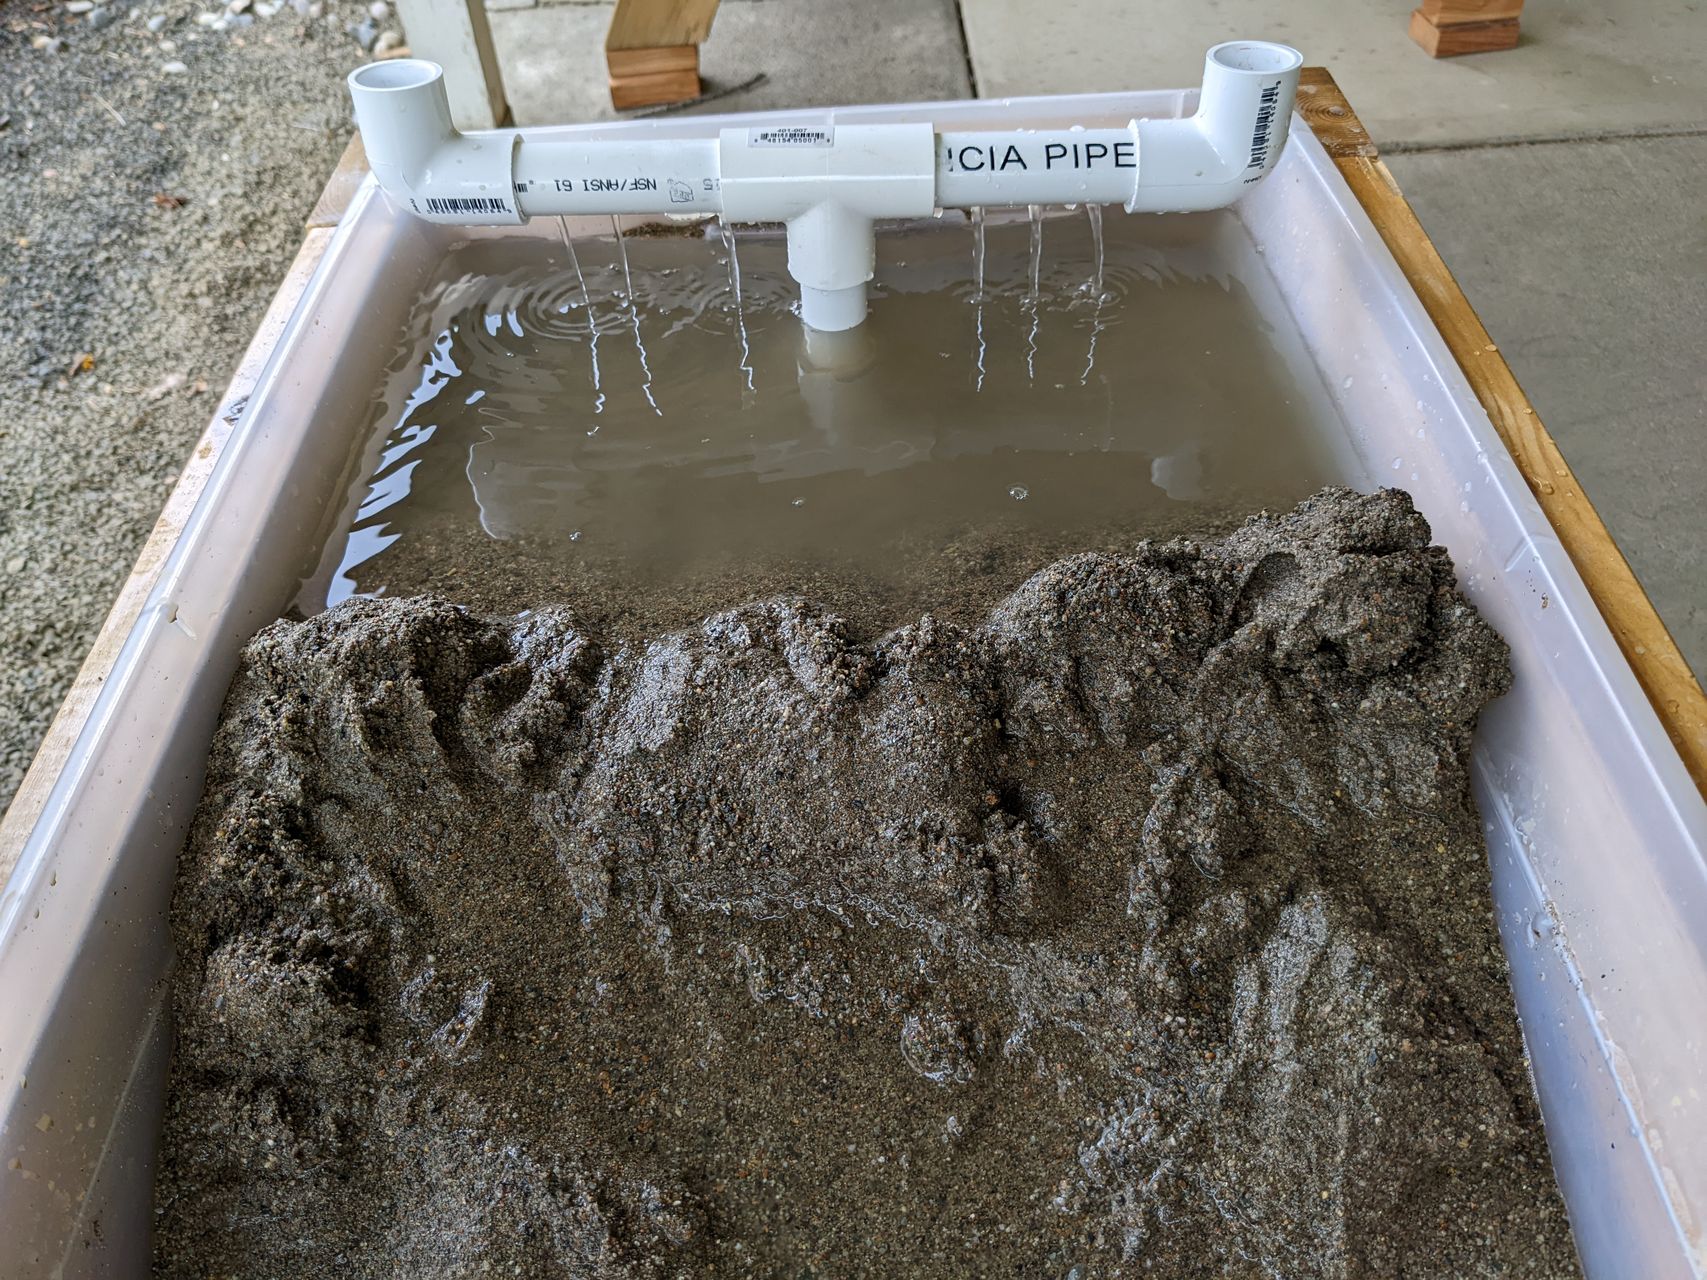
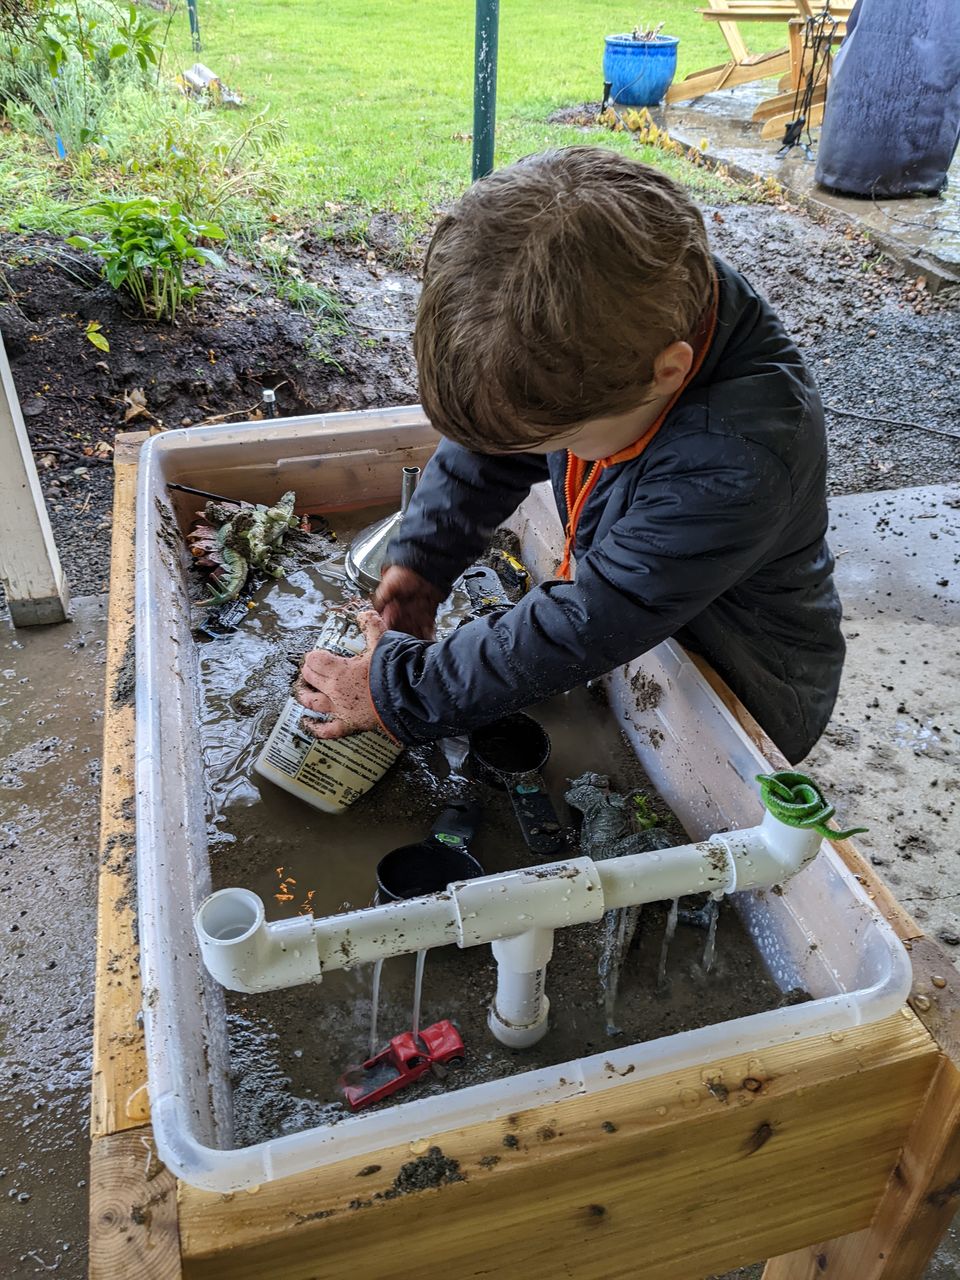
I set about to build myself a sediment flume my kid a mud table, which he asked for his birthday. We had discussed giving him a corner of our yard as a mud pit to play in, but I felt like this would be easier to clean up after and give him a little bit more fun with a recirculating pump to keep water flowing through it.
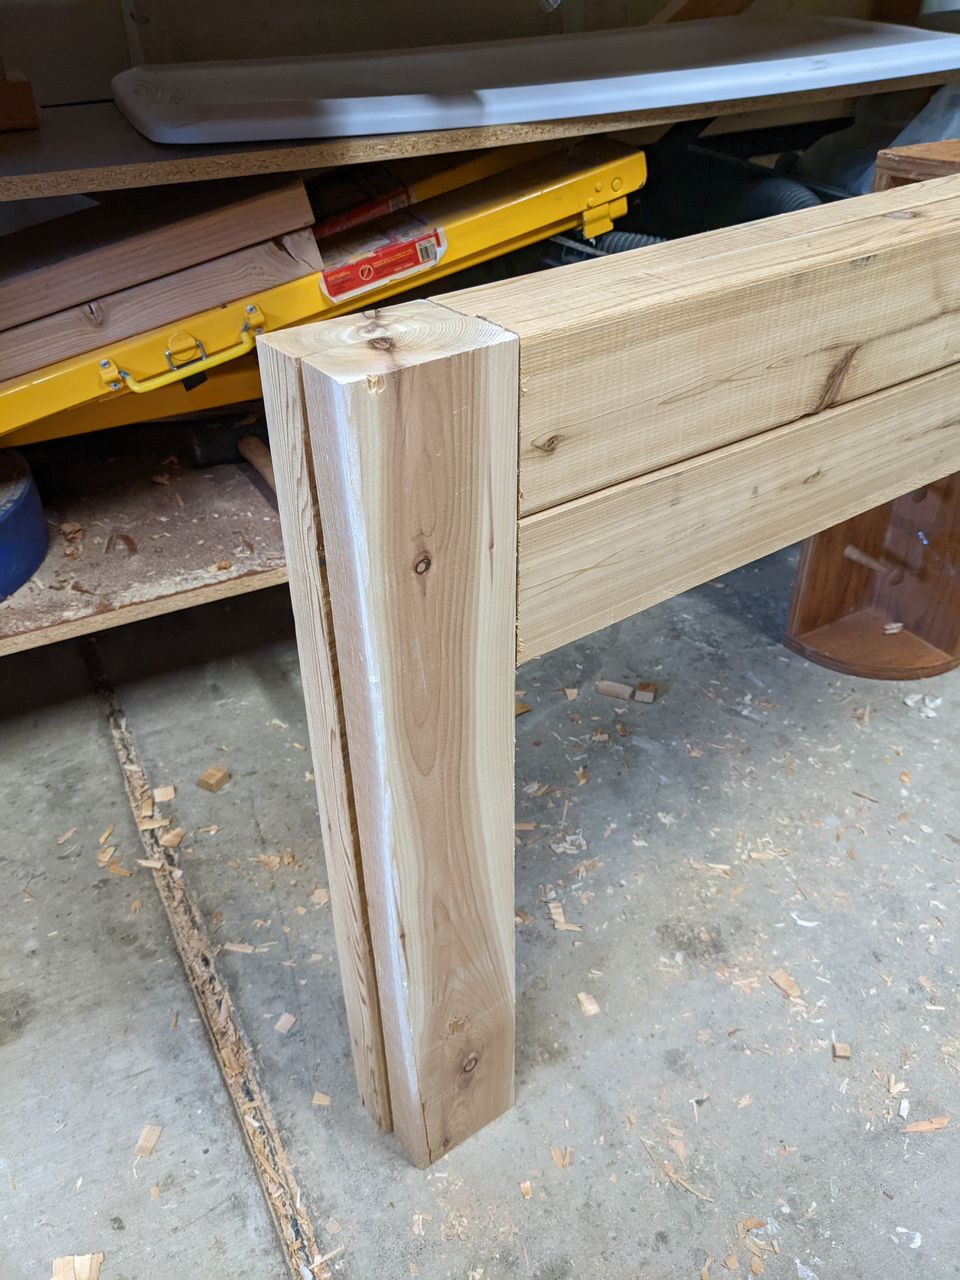
I set about designing something to hold an old under-bed storage container I had, approximately 35 inches long by 16 inches wide. I realized if I was going to fill it with play sand, I would need it to be strong enough to hold the weight and not fall apart. This seemed like a good use of my router table to try making some mortise and tenon joints. I decided to build the frame from 2x4 cedar that I purchased at the big orange store, and coated with a couple of heavy coats of spray polyurathane to help make it water resistant. I puchased PVC piping and joints, a pond pump, and hose to complete the water recirculating system.
Construction
I used my router table to cut both the mortises and tenons, taking several test cuts in each configuration to make sure the pieces would fit together.
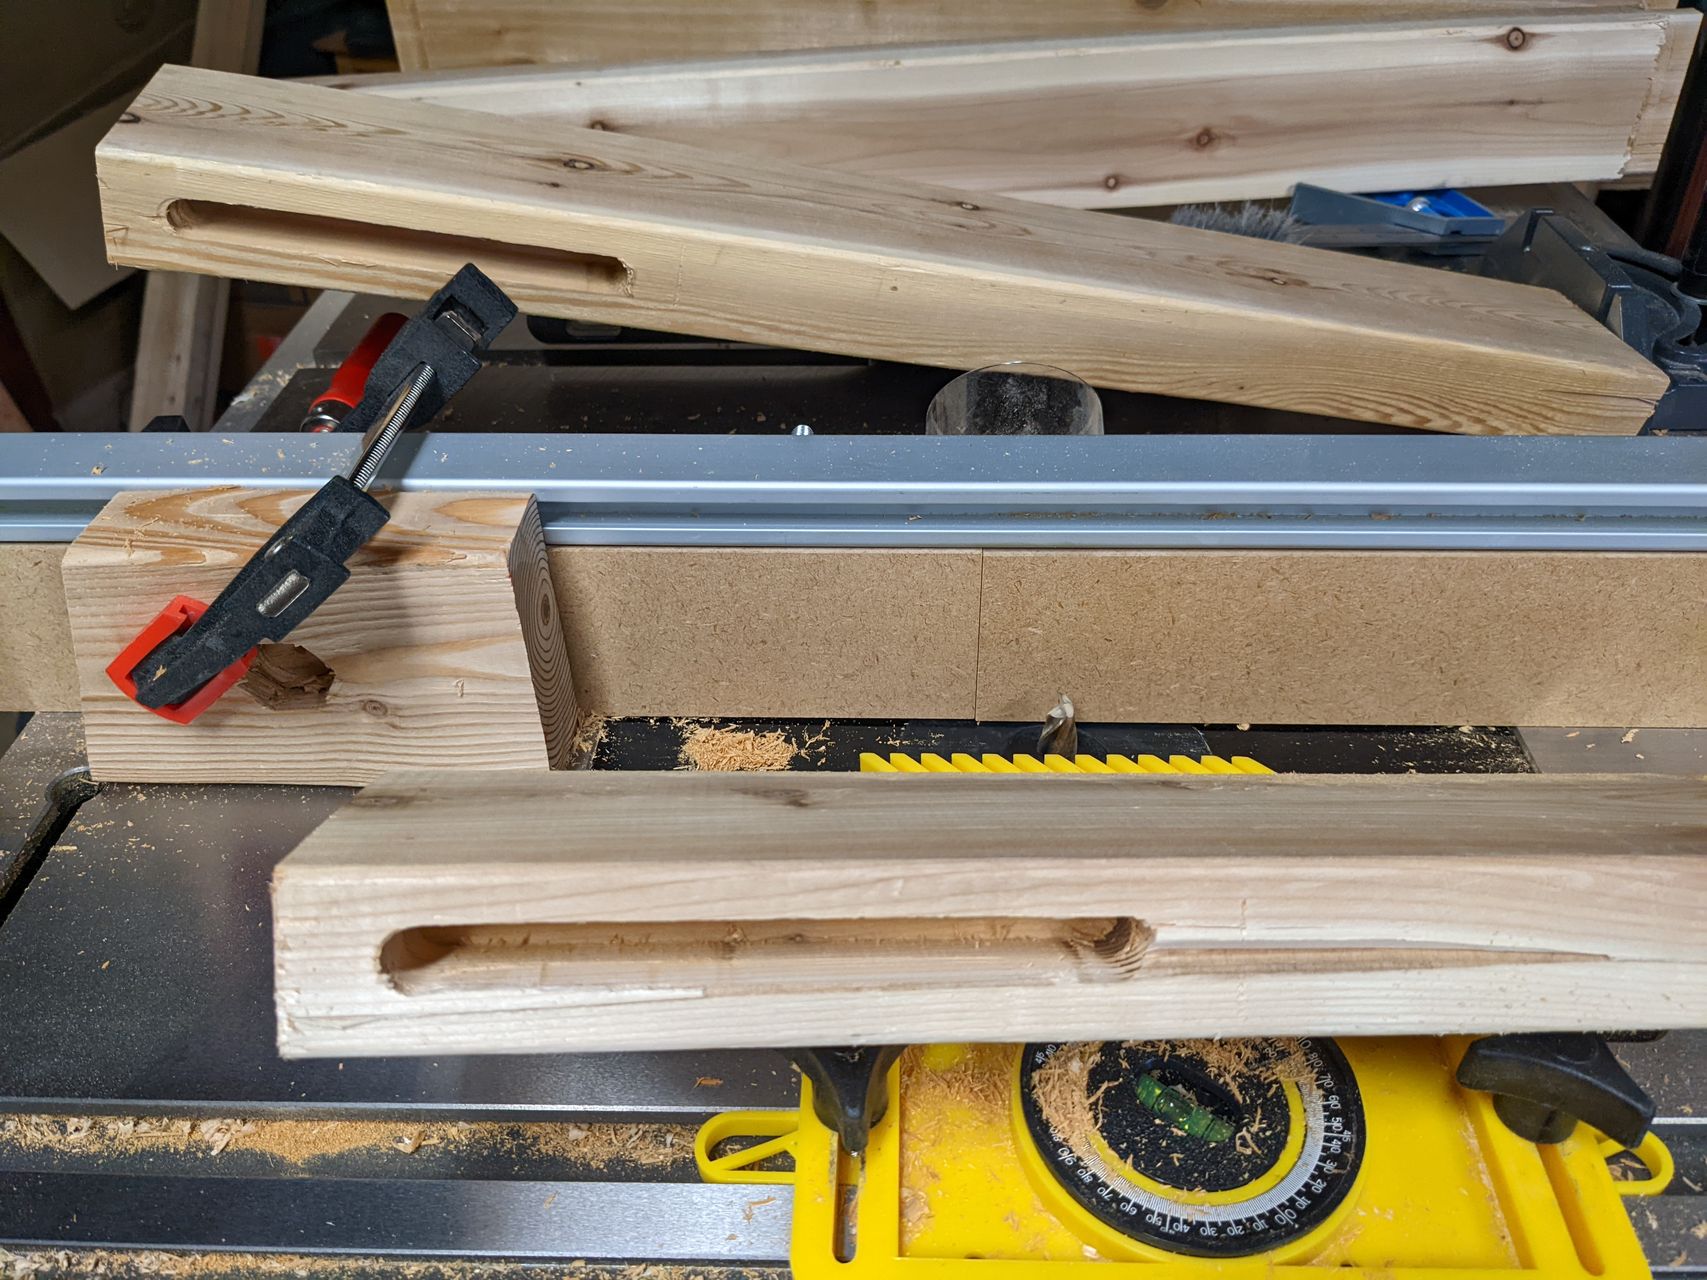
Above you can see the stop block and feather board I used to get consistent mortises on my router table.
These tenons were cut with my miter gauge and the router table, adusting the bit height until I got the thickness I wanted.
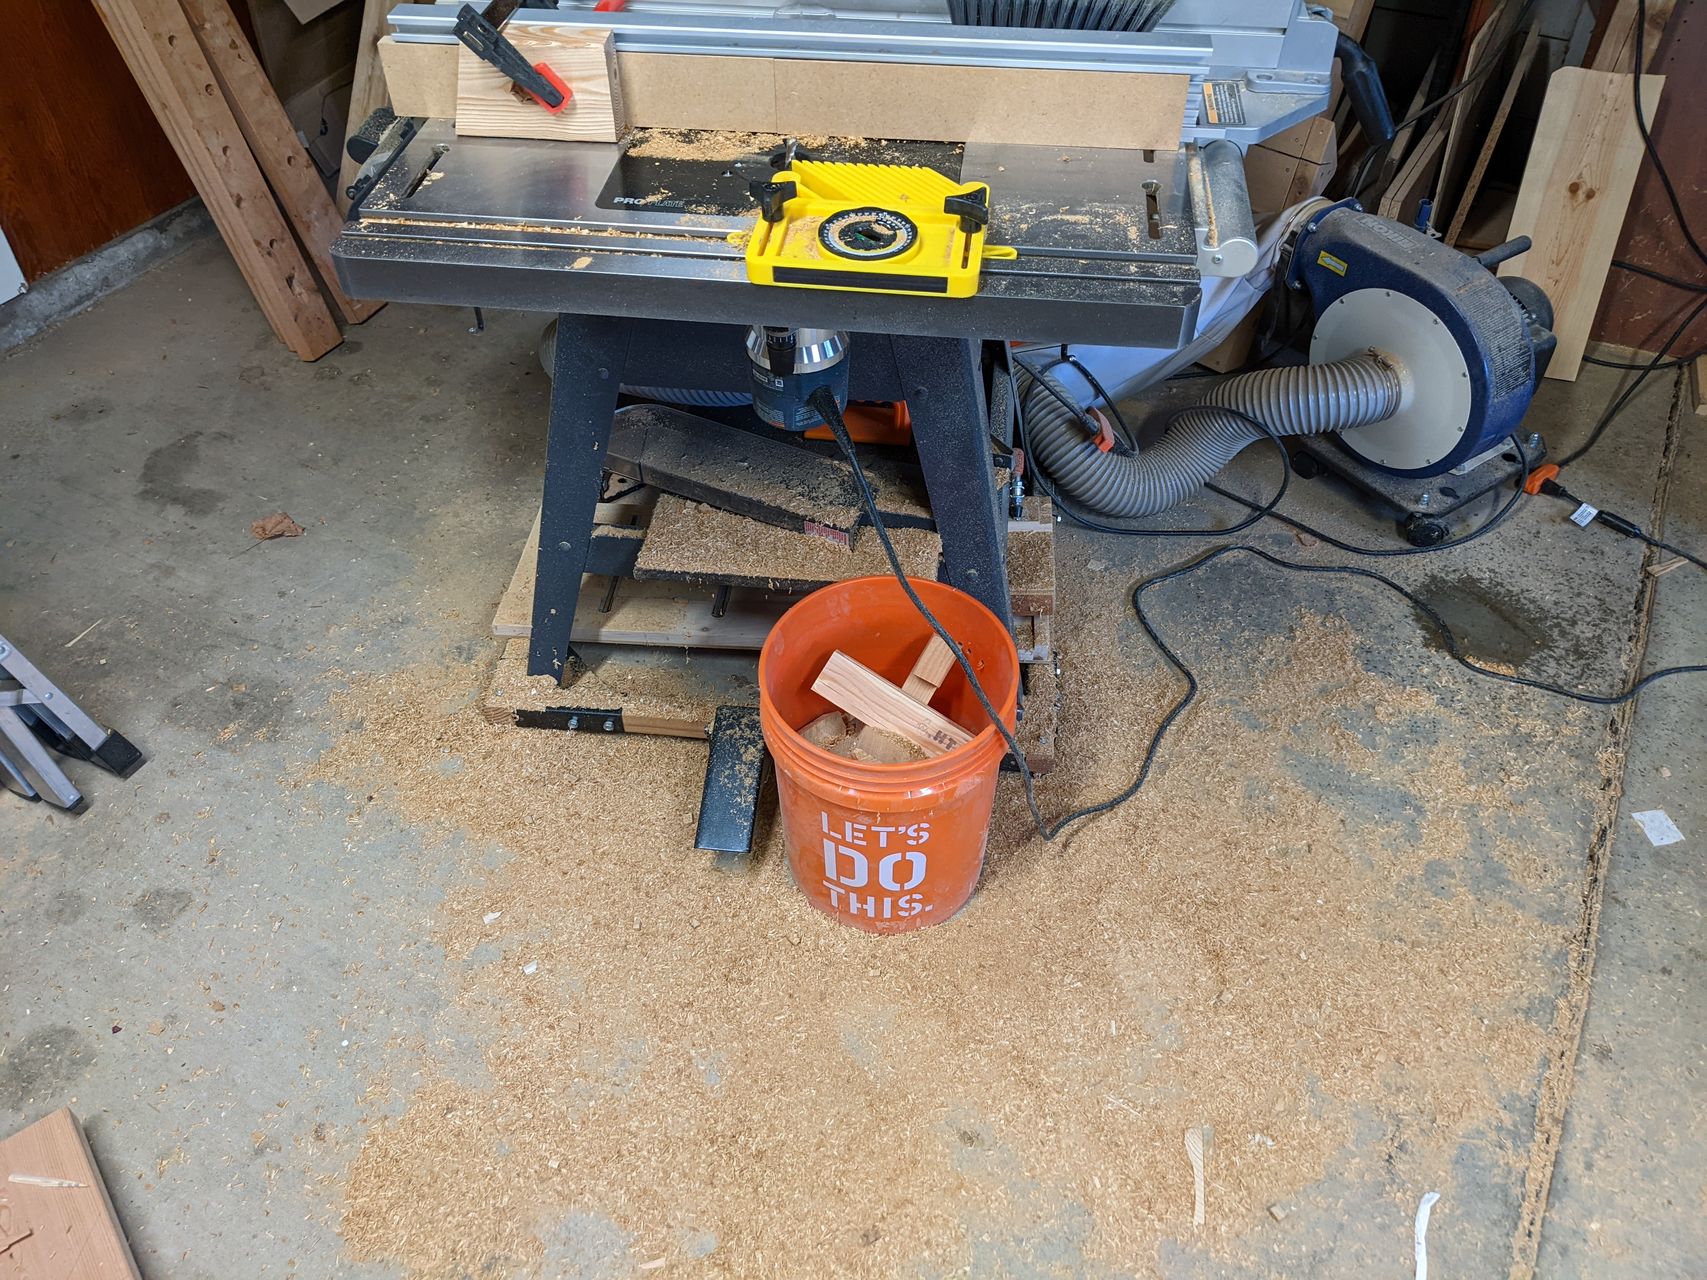
This was a really messy process, and without some kind of enclosure for my router, it left a huge mess of cedar sawdust under my table saw / router table.
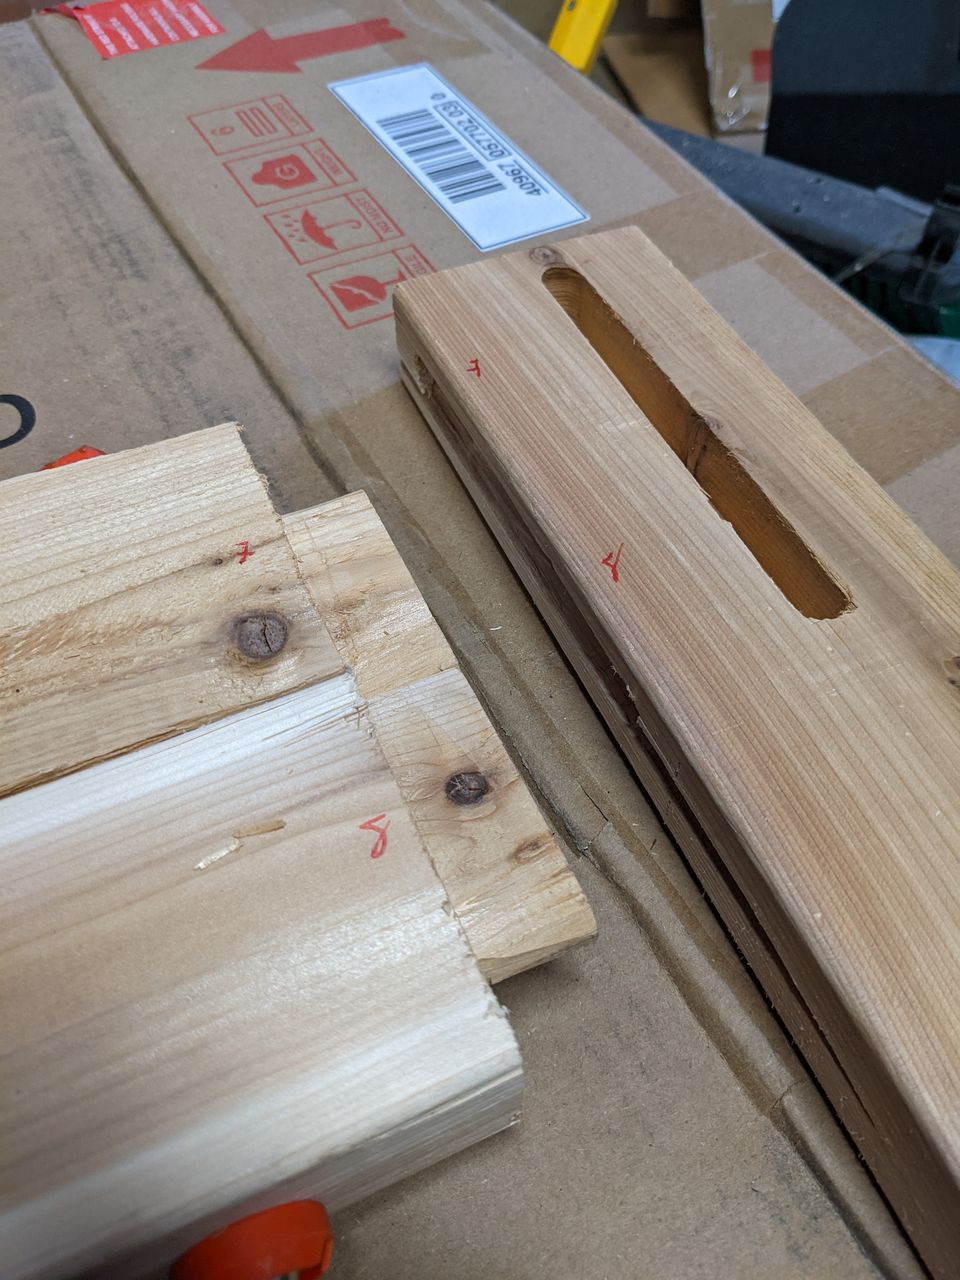
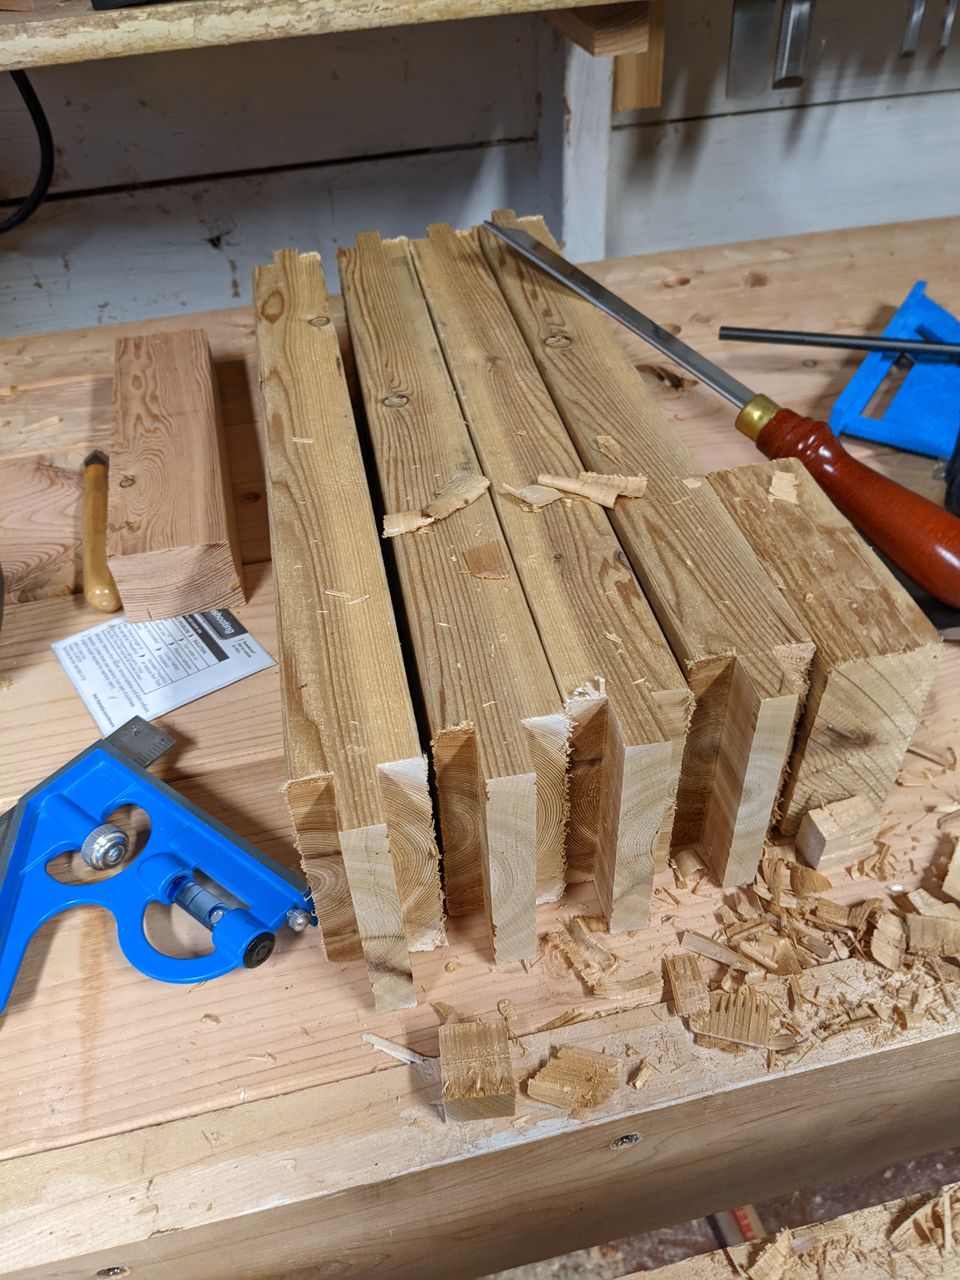
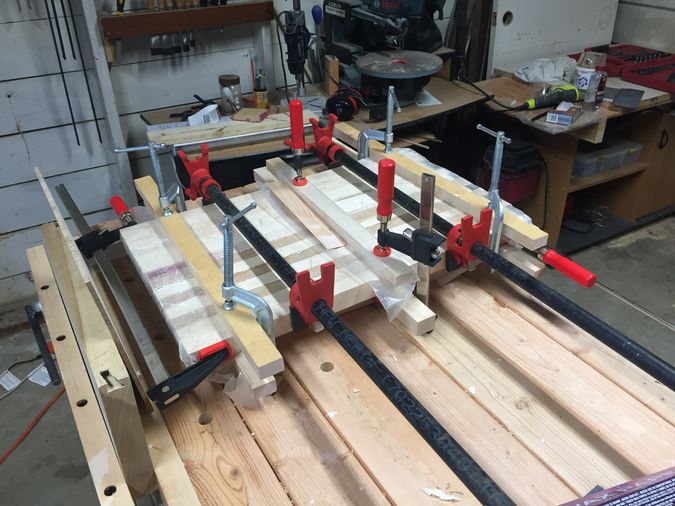
Assembly after cutting the morises and tenons wasn't too difficult. I tied to align the nicer sides of boards out, but also to compensate for wider or narrower mortises and tenons. After a test fit of each joint, I numbered each joint to help final assembly. I did have to use my chisel to help refine a few of the morises and tenons that didn't quite fit. Where needed, I rounded over the tenons with a few quick slices using my chisel, not trying to get a perfectly rounded joint, but just something that would fit.
After assembling the two sides, I glued the whole thing together, using what clamps I could, along with my brad nailer to add some hidden brads to help hold things in place while the glue dried. To hold the frame together, I used a couple of tie downs as a band clamp for final assembly.
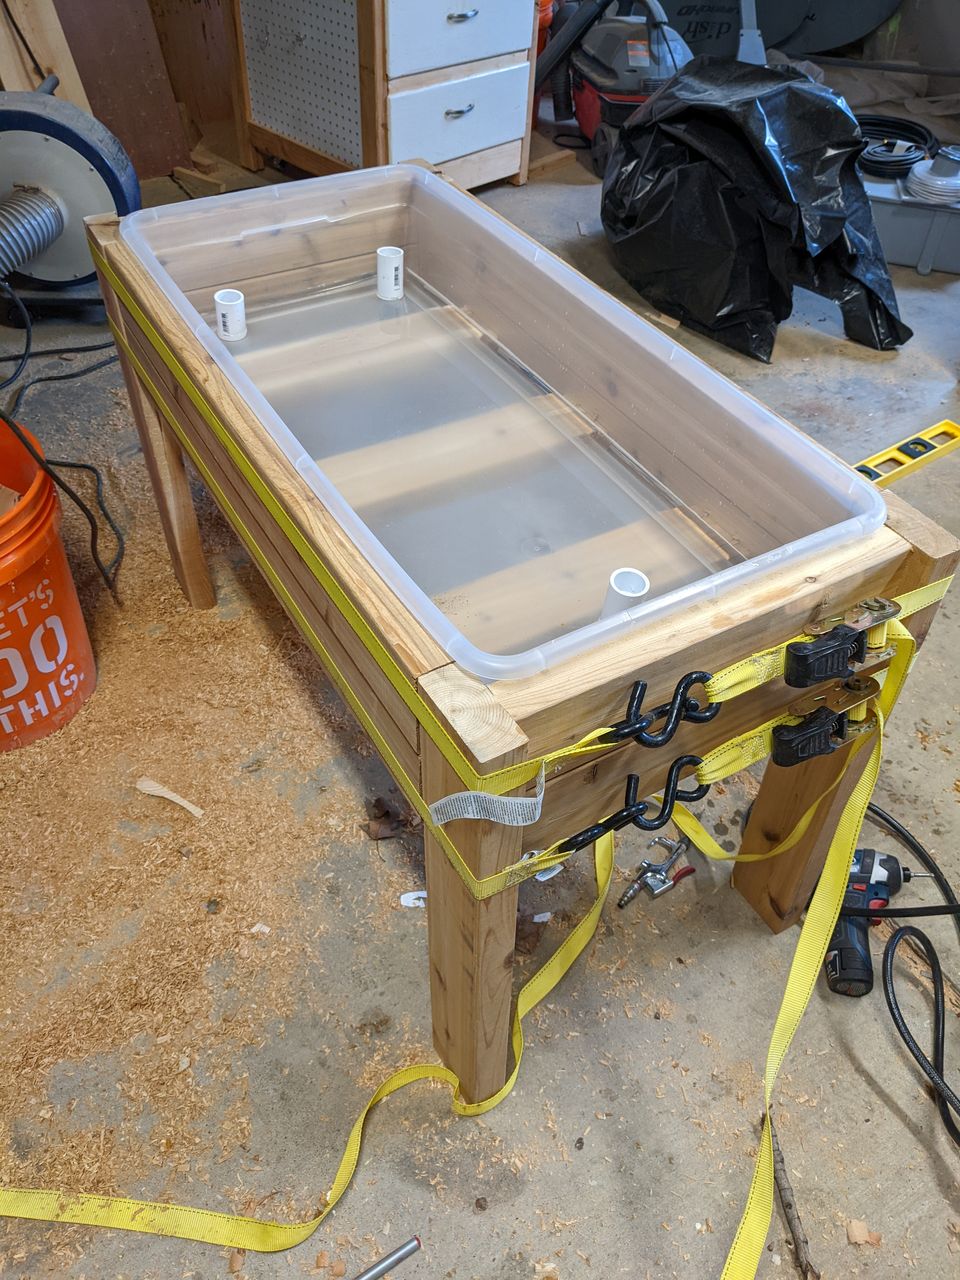
After the outside frame was assembled, I attached 3 additional pieces of 2x4 under the mud container with a couple of deck screws angled in either end. This will provide support for the weight of the sand in the container
Testing and Pump Problems
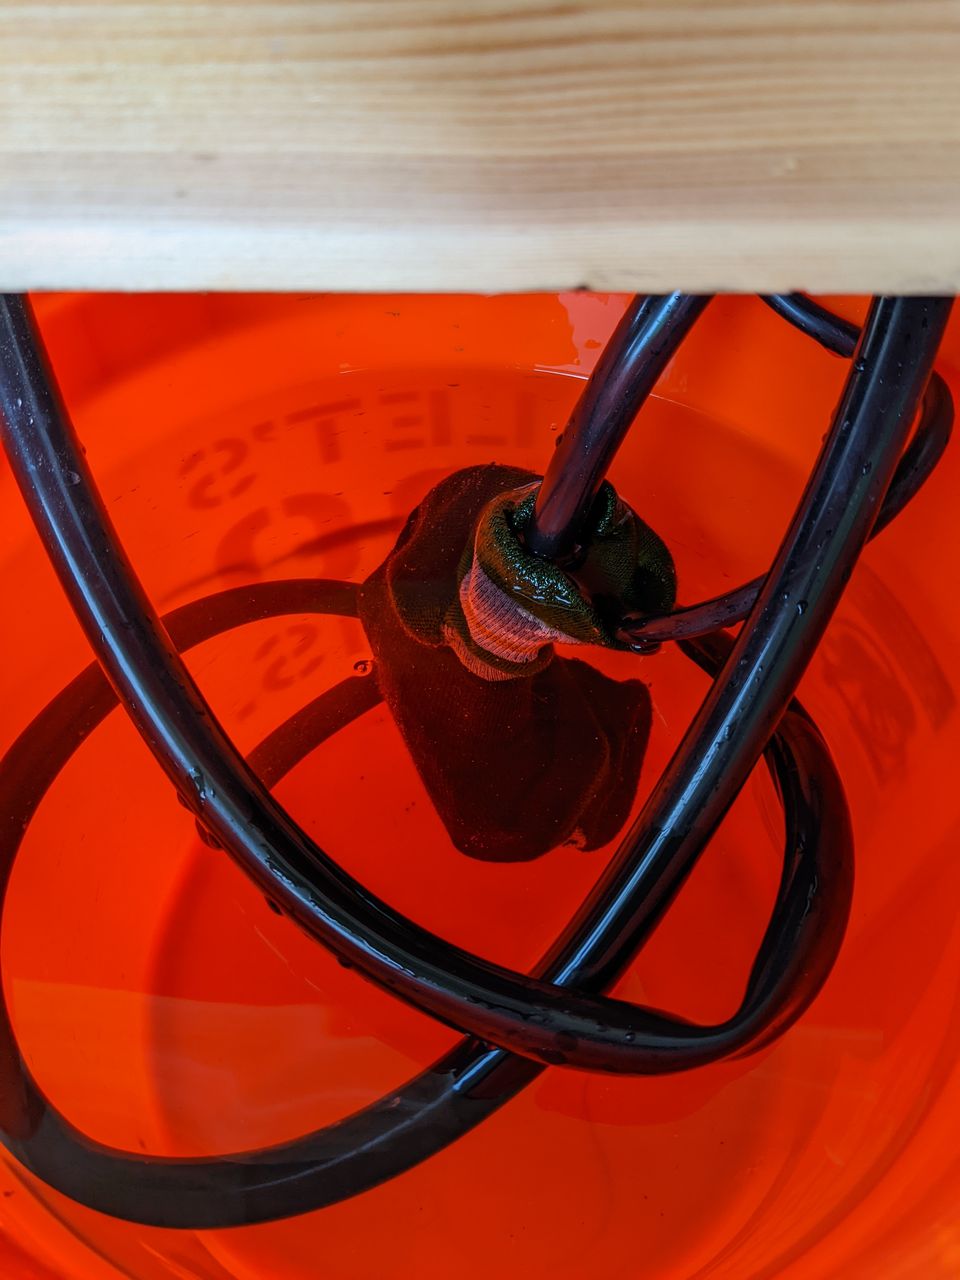
To circulate water through the system, I purchased a 55 gallon per hour pond pump that plugs into 110V AC. This small pond pump is perfect for running water though the system. With a 5-gallon bucket under the table holding the pump and a reservoir of water, I don't need to worry about the system overflowing. It puts about 2 gallons into the container before the outlets are submerged and water begins returning to the bucket. This gives some space at the bottom of the bucket for any sand entering to settle out.
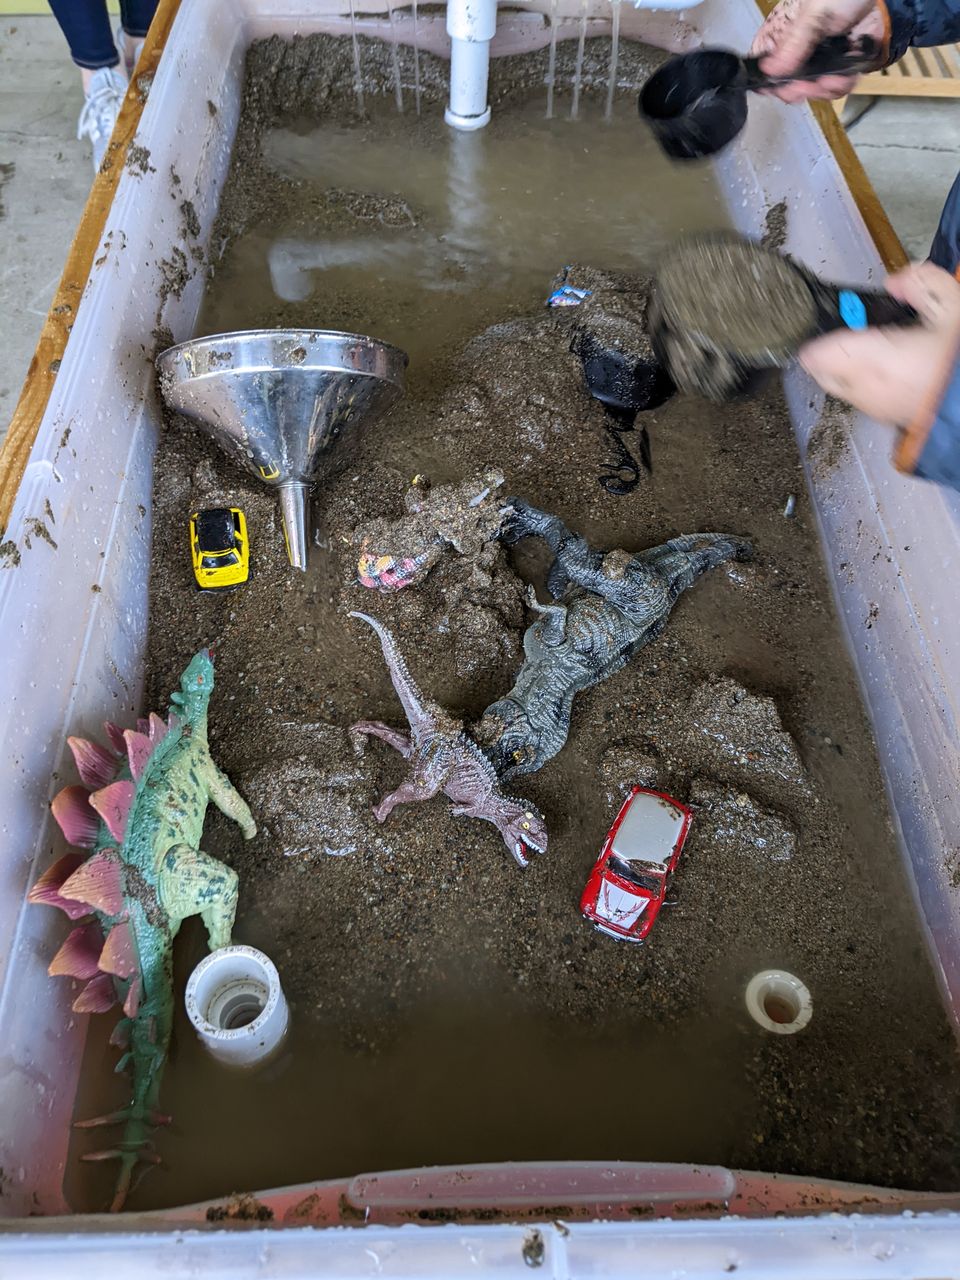
After drilling holes and attaching the PVC pipe inlets and outlets to hose under the table, I tested for water tightness and then added sand. I quickly discovered the play sand, while not made from silica sand, is still pretty messy and has a lot of silt in it.
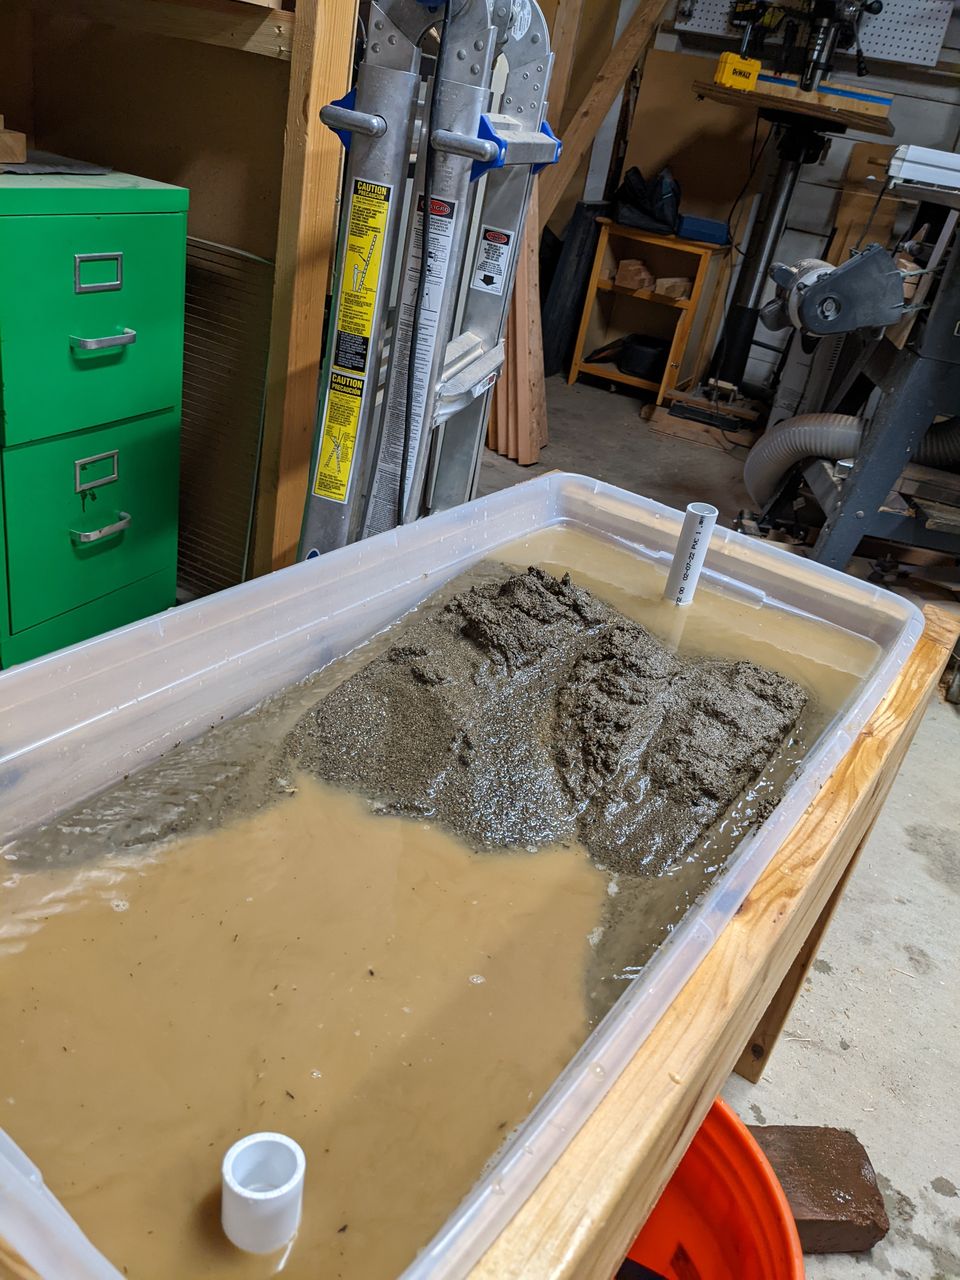

I had initially planned to place a smaller 2 gal bucket inside of a five gallon bucket, with the pump inside the smaller bucket and it's lip serving as a baffle to help keep sediement out. This didn't work and I quickly found the pump making a strained sound. I ended up fixing this by spending several hours running clean water from a hose into the bucket, and letting the outlet drain off the side of my patio. This helped clear up the water running through the sand, but I still wanted to keep the pump from clogging. I was looking for a material to use as a filter when I found some tight knit old synthetic hiking socks. I wrapped the pump in these, and let it hang in the bucket rather than sitting on the bottom to avoid picking up the heavier sand particles. This seems to work great.
The inlet
I had planned to include not just a single inlet to the system, but something to distribute water to either side. I cut a few pieces of PVC and bought a couple of elbows, with the plan that I will make these loosely fit and my kid can reconfigure them as needed. For the unveiling for his birthday, I setup two pieces of PVC as a 'dripper', with a few small holes drilled on either side.
Playing with it
This Saturday I got to reveal the mud table to it's rightful owner during his birthday party. He played with it for a couple of hours while his friends participated and variously found other things to do. I think this table will be a mainstay of our summer outdoor activities, and I am going to have to resist using it for my own experiments.
Apr 22, 2022
I wanted to come up with a good activity to do with my kid that we could enjoy together. A couple of months ago, I found Jack McKee's Woodshop for Kids at my local library and after renewing the maximum number of times, ended up buying a copy. It has a few dozen project ideas as well as some good recommendations about how to make tools safe for kids, starting as early as age 4. Well, my kid's birthday is right around the corner!
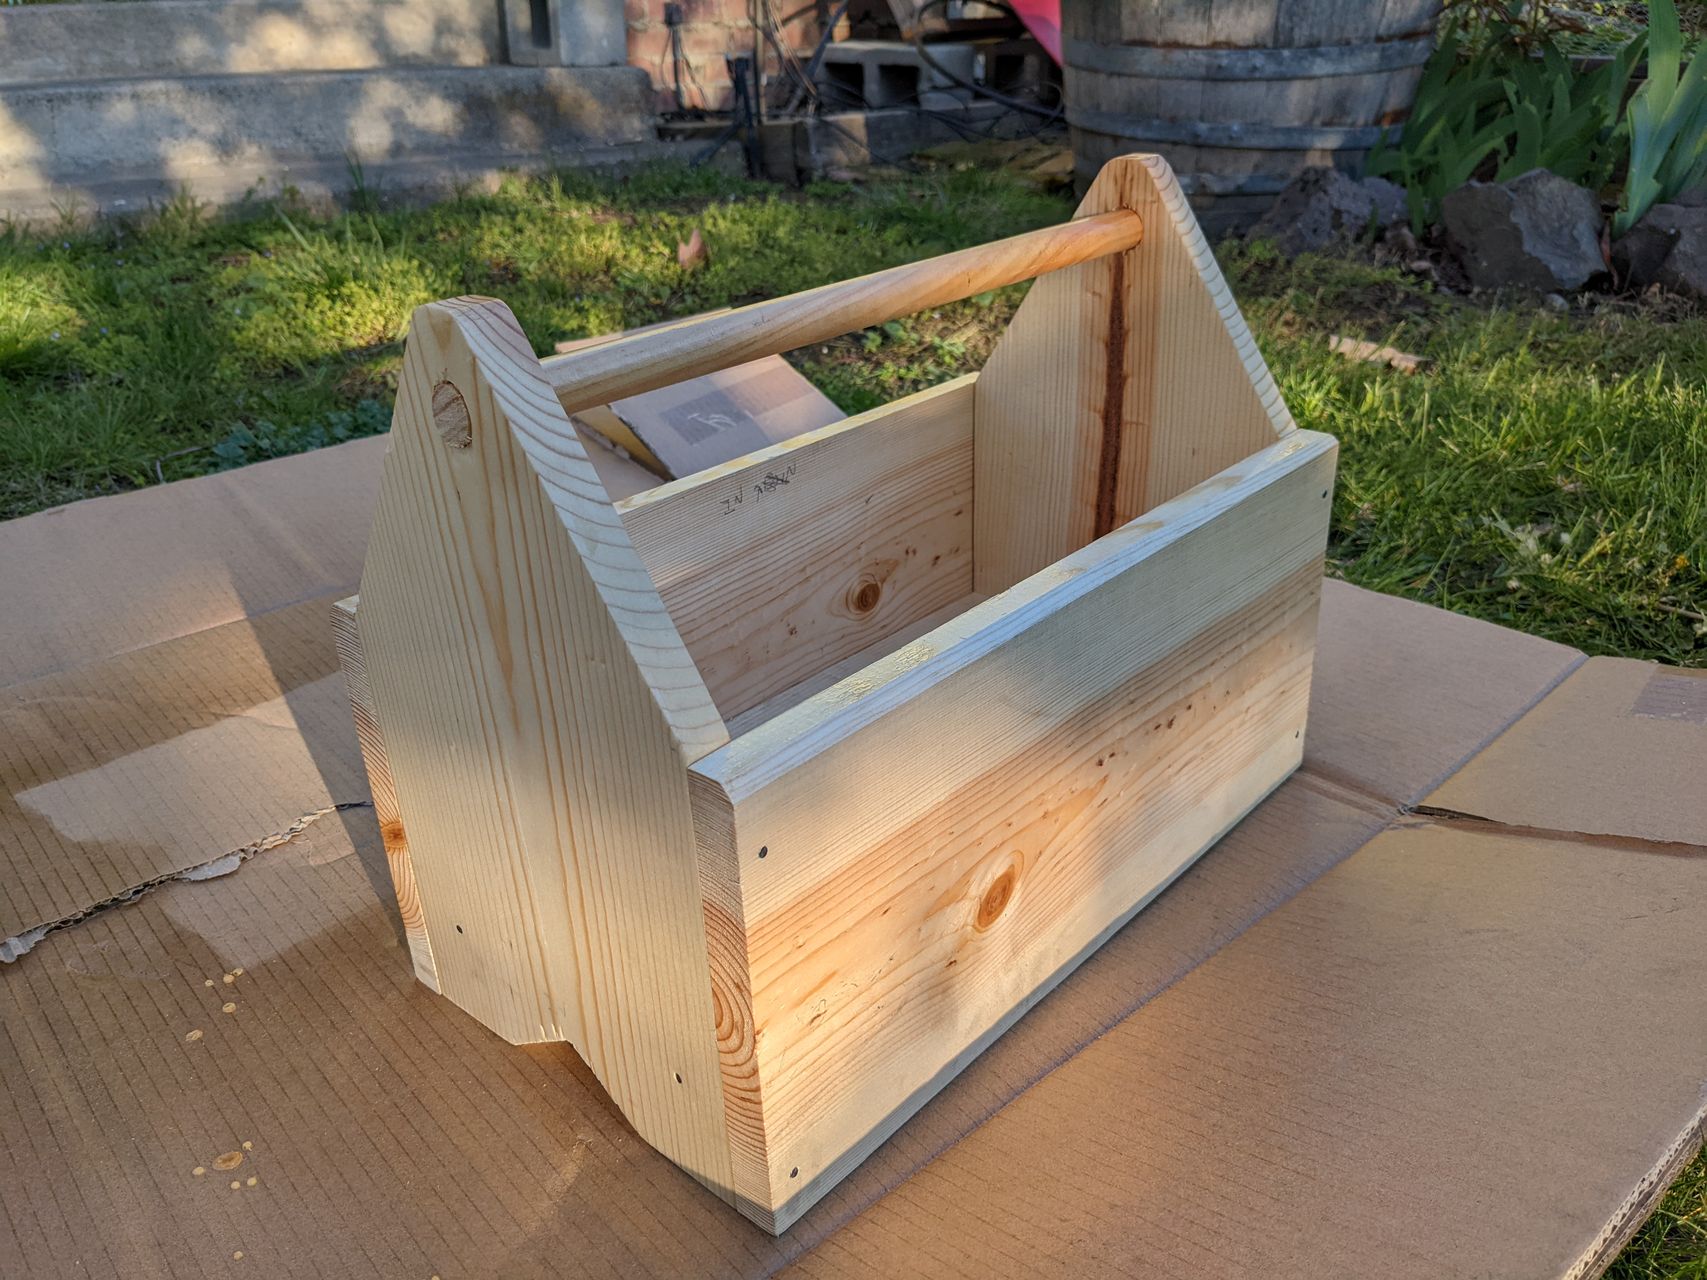
I built a toolbox for my kid, based on plans in Rex Krueger's Everyday Woodworking. Building the toolbox was pretty quick asended up using my tablesaw to make the parts. I had my kid help assemble it, using the hammer and nails I purchased to put in it. He did about 10% of the hammering and left me to do the rest. I might need to add some glue, as the nails don't seem to hold every joint as well as I had hoped. I finally sprayed it with shellac, which really helped bring out the woodgrain and gave it a little bit of protection.
I purchased some handtools for him to use, based on the recommendations in McKee's Woodshop for Kids, and that I felt were safe enough that he wouldn't send himself to the hospital:
- Safety glasses (I added an adjustable strap to help hold these on his face)
- Coping saw
- Tape measure
- "6-in-1" screwdriver
- Small 10oz Hammer (replaced a 7oz hammer I had in my toolbox I keep in a kitchen cabinet) and small wire nails
- Speed square
- Surform plane for smoothing and shaping
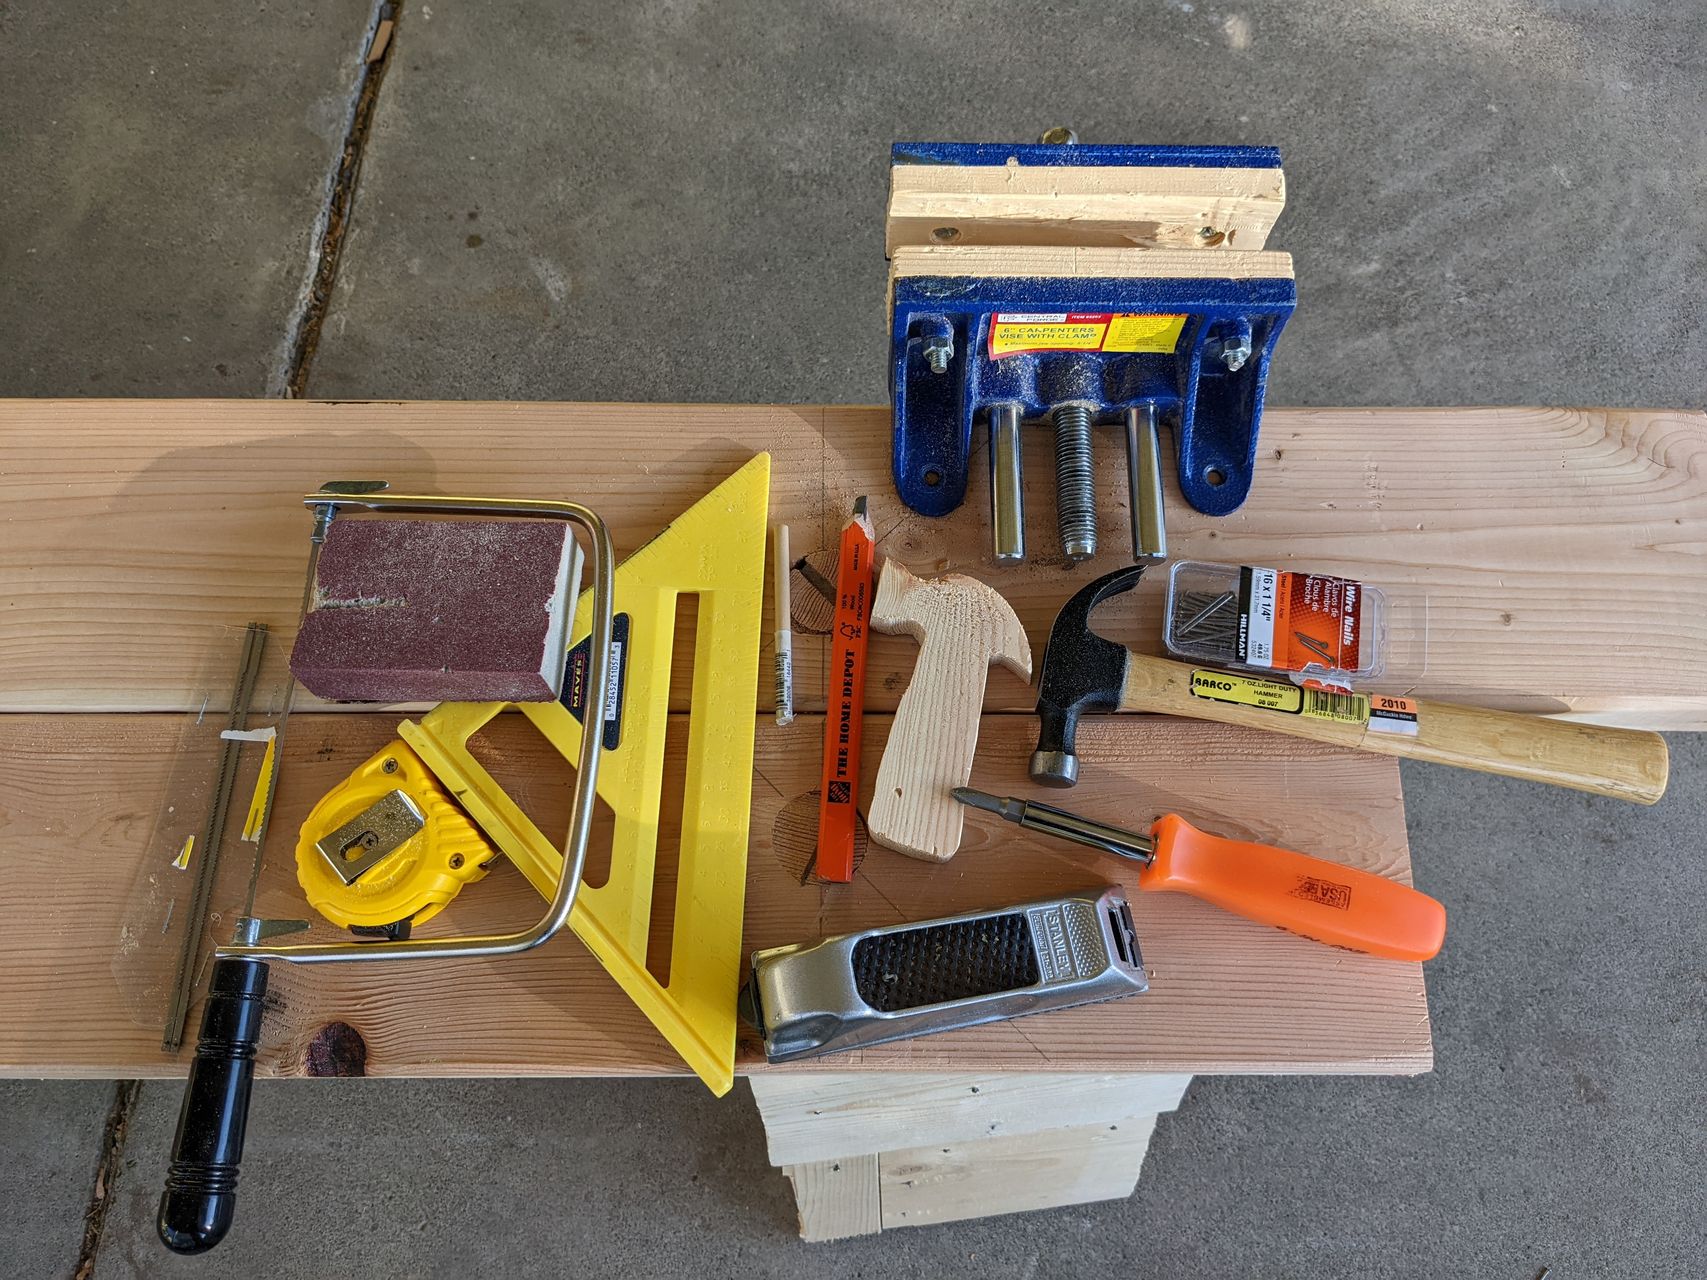 Tools spread out on workbench.
So far my kid has been really enjoying cutting out shapes with the coping saw (or at least telling me what to do when he gets tired) and then nailing them together (or at least telling me how to put them together). He seems to be developing some of the skills to saw a board, although he gets tired of doing it quickly. It's been a good outdoor activity as the weather gets nicer. He knows which tool parts are sharp and is careful with them, and he's been learning to measure out and mark his cuts. He has clearly developed a sense of what he wants to do in each session, although putting it all together takes some help from me.
Since we had been using the bench of our picnic table, I finished building the other project from Rex Krueger's Everday Woodworking that I had alreaedy planned for myself to keep it from getting damaged. I had built the bench top on my own, and then my kid helped me bore out the mortise holes, mostly with him dusting up the woodchips at the end. Carving down the tenons on the legs was easy enough to do while he was occupied sanding some wheels for a toy car, and then he helped me do the final assembly.
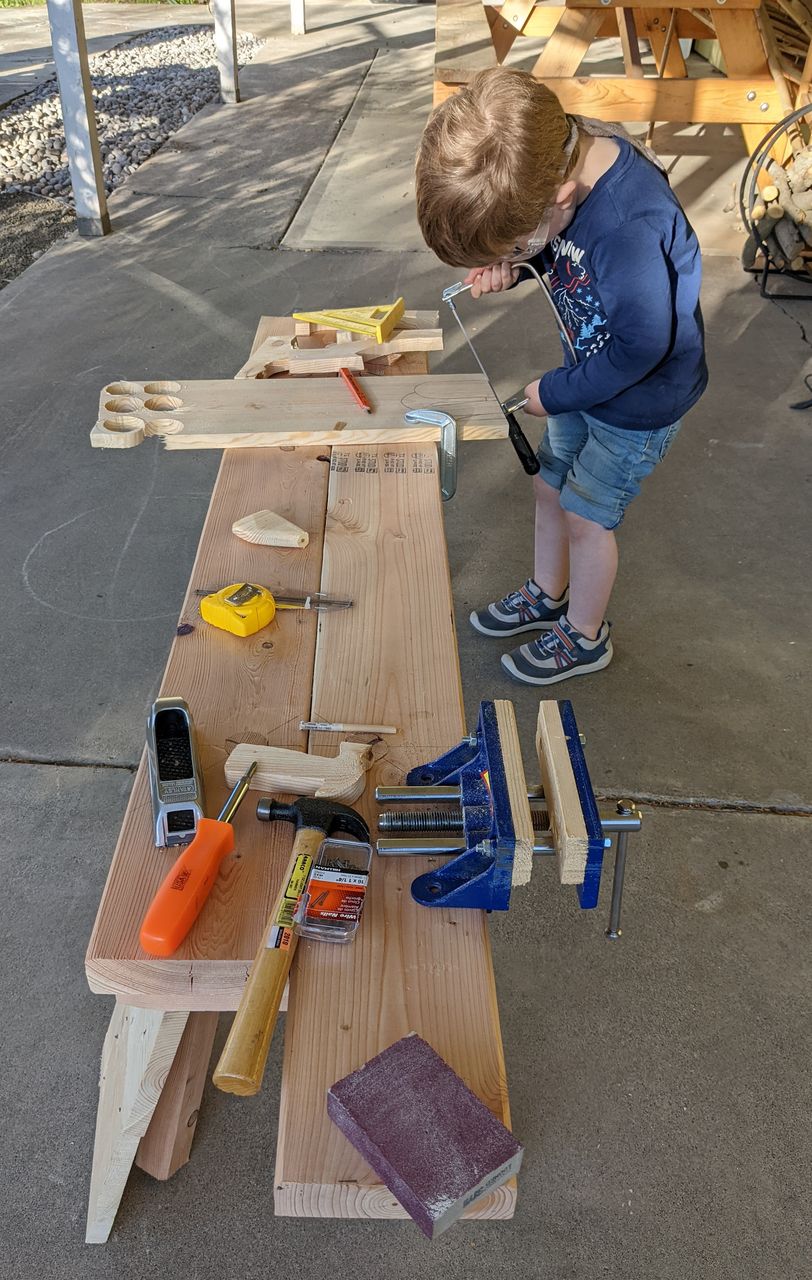
This evening we finally used the finished workbench together to help finish assembly of his toy car. He can use it to hold wood to saw or sand, either with his clamp or the carpenters vice that I sometimes get out. I can sit on it to help while not having to sit on the ground or squat the whole time.
Apr 17, 2022
I have been trying to run my ham radio programs in WSL lately. I've poked around with WSL in the past to run a media servers, but never looked into it much in regards to hardware or porgrams with a GUI. Unfortunately, I haven't found a good SDR receiver software for Windows that will interface via audio with "soundcard" mode software, such as the WSJT-X.
So, I'm running my shack on an old (circa 2010-2012) gaming desktop that is stuck on Windows 10. I'd still like to play games on it, and I currently use the Windows side as a fileserver for backups. As a result, I don't want to boot into Linux just to keep a ham receiver running overnight.
Of course, an easier answer would be put move all this to a remote linux box running on a lower powered SBC. The downsides to that are that it costs money (and boy are Raspberry Pis expensive these days), and it's one more device to administer, whereas this experimentation only costs time.
I figure I'll need to make the following WSL features work to use it for ham radio:
I've tested these on my Windows 11 tablet, where I'm now stuck on SoapySDR/CubicSDR finding the RTLSDR receiver but not appearing to actually pull data from it. Now I need to try these steps again on my Windows 10 desktop. I'm stuck on the GUI working from there, I think I need to experiment with X Forwarding next.
Once I have those features working, I plan on testing WSJT-X and CubicSDR (which relies on SoapySDR).
Feb 12, 2022
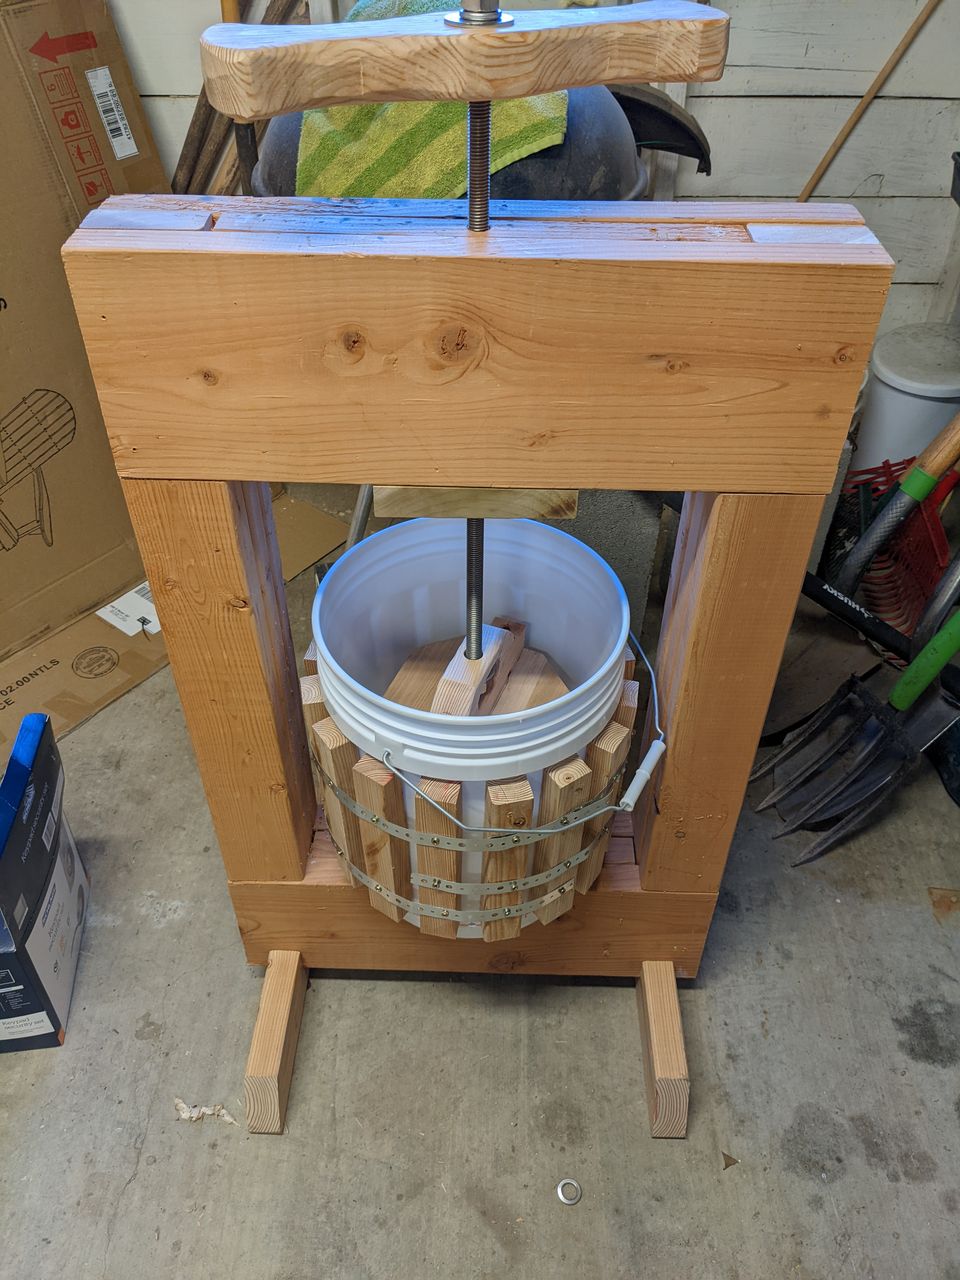
My house came with a beautiful old apple tree in the yard, probably dating to around the time the house was built (1950), which is incredibly prolific, meaning we get more apples than we can ever turn into baked goods and apple sauce in one year. Several times I have tried making some kind of apple cider with the fruit from the tree, using various methods to avoid renting a press.
Living in a winemaking region, I have a number of friends with expertise, but most fruit presses available to me are for 20 or more gallons of fruit at a time. It feels silly to pay to rent one of these, so I wanted to make something a little better scaled for my personal needs.
Here's my account of building a (not-so) quick and dirty cider press. My goal isn't to build the most elegant fruit press ever, just something functional.
Improvising a press screw
I figure this is one of the more critical pieces, and where I was willing to spend the most money, but also wanted to avoid spending as much as a commercial press would cost to buy. I started building the frame for a press years ago, with the idea to use a scissor jack to provide compression, but discovered that the one in my car wouldn't extend when a five gallon bucket was placed under it. For several years I had considered buying a cheap bench screw online, but most of the ones for sale were too short, 18 inches long or less, which doesn't provide enough depth for this. This weekend I finally broke down and ordered a few critical parts: a 24" 5/8-inch 11-tpi threaded rod made from stainless steel and accompanying nuts and washers.
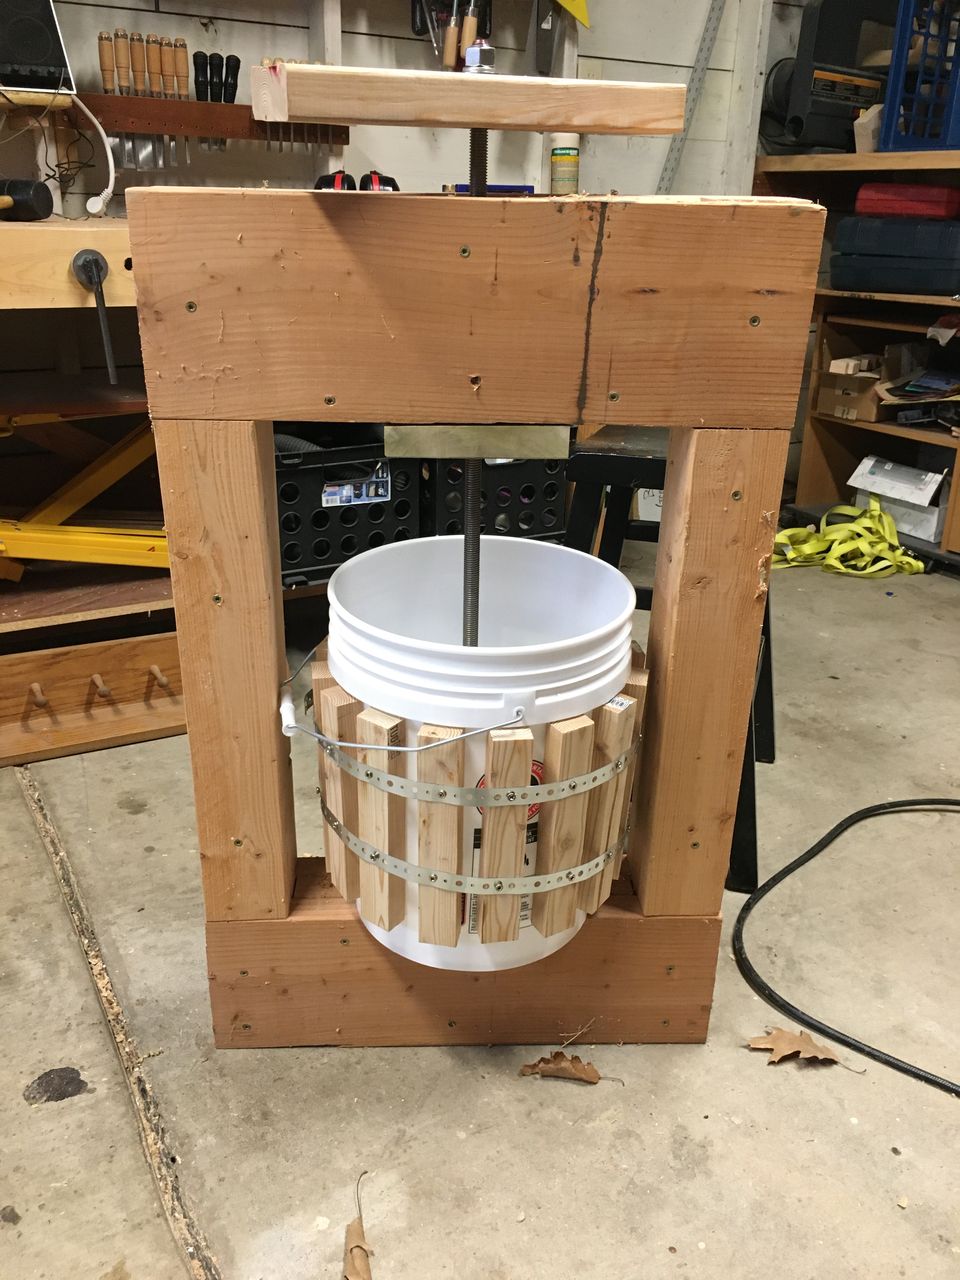
The resulting press mechanism appears to work really well, or at least more smoothly than I was expecting. One key thing I did was making sure the nut was well aligned with the hole that the threaded rod would go through. I squeezed the nut that sits in the thrust block by first placing the rod in the nut, and then putting this through the thrust block on top of the pre-drilled frame. This gave me a good ~8 inches or so of hole that helped align the whole mechanism as I used a mallet to force the nut into the slightly undersized hole I had drilled and chiseled out for it. Note, don't use too much force here, the first thrust block was made of some cheap construction lumber and split during this step. I made the second one with a piece of heavy elm.
I mounted the thrust block with six countersunk screws, pre-drilling each hole to avoid having this piece crack.
Building the bucket
I took a five gallon bucket and attached some wooden staves and metal banding to strengthen it. The staves were made from 1/3 width pieces of 2x4 and spaced evenly around the bucket. The staves were attached to one piece of metal banding while laid out on my workbench, using a strip of wood as a guide to provide even spacing. I then rolled around the bucket before straightening and attaching the second band. These were then pressure fit over the bucket by gently tapping on a mallet until they were snug - I had sized the bands to give about an inch between the rim of the bucket and the top of the staves, giving me some space to tighten it this way but should still be removable.
I drilled holes about every inch around the bottom to let juice out - pretty much one under each stave and between each stave. After testing on another HDPE bucket, I settled on using a brad point bit and taking it really slow. That still produced a few rough edges, so I came back with a countersink bit to help clean those up. The final holes aren't amazing, but clean enough for this use.
Adding feet
Whoops.
I cut out the notch in them using the table saw and chisel. The ends were done on the miter saw. After getting it wrong the first time (see above), I took these off, recut the ends, and attached with glue and screws through the bottom. The bottom of the frame is not very level as you can see in the photo, so I am hoping that these add much needed stability.
Carving the handle
I had tested the press screw with a piece of 2x4 that I carved a spot for a nut into, but I wanted the handle to be a little more ergonomic than that. I started the handle by freehanding some curves (well, tracing part of the bottom of the 5-gallon bucket) into each end, and took a 1-1/2" chisel to pare down to the line. I had to cut a few relief cuts to help, trying various saws. I found the wide-kerf rough-cutting one that came with my cheap miter box was the fastest at this, but I also overshot a few times.
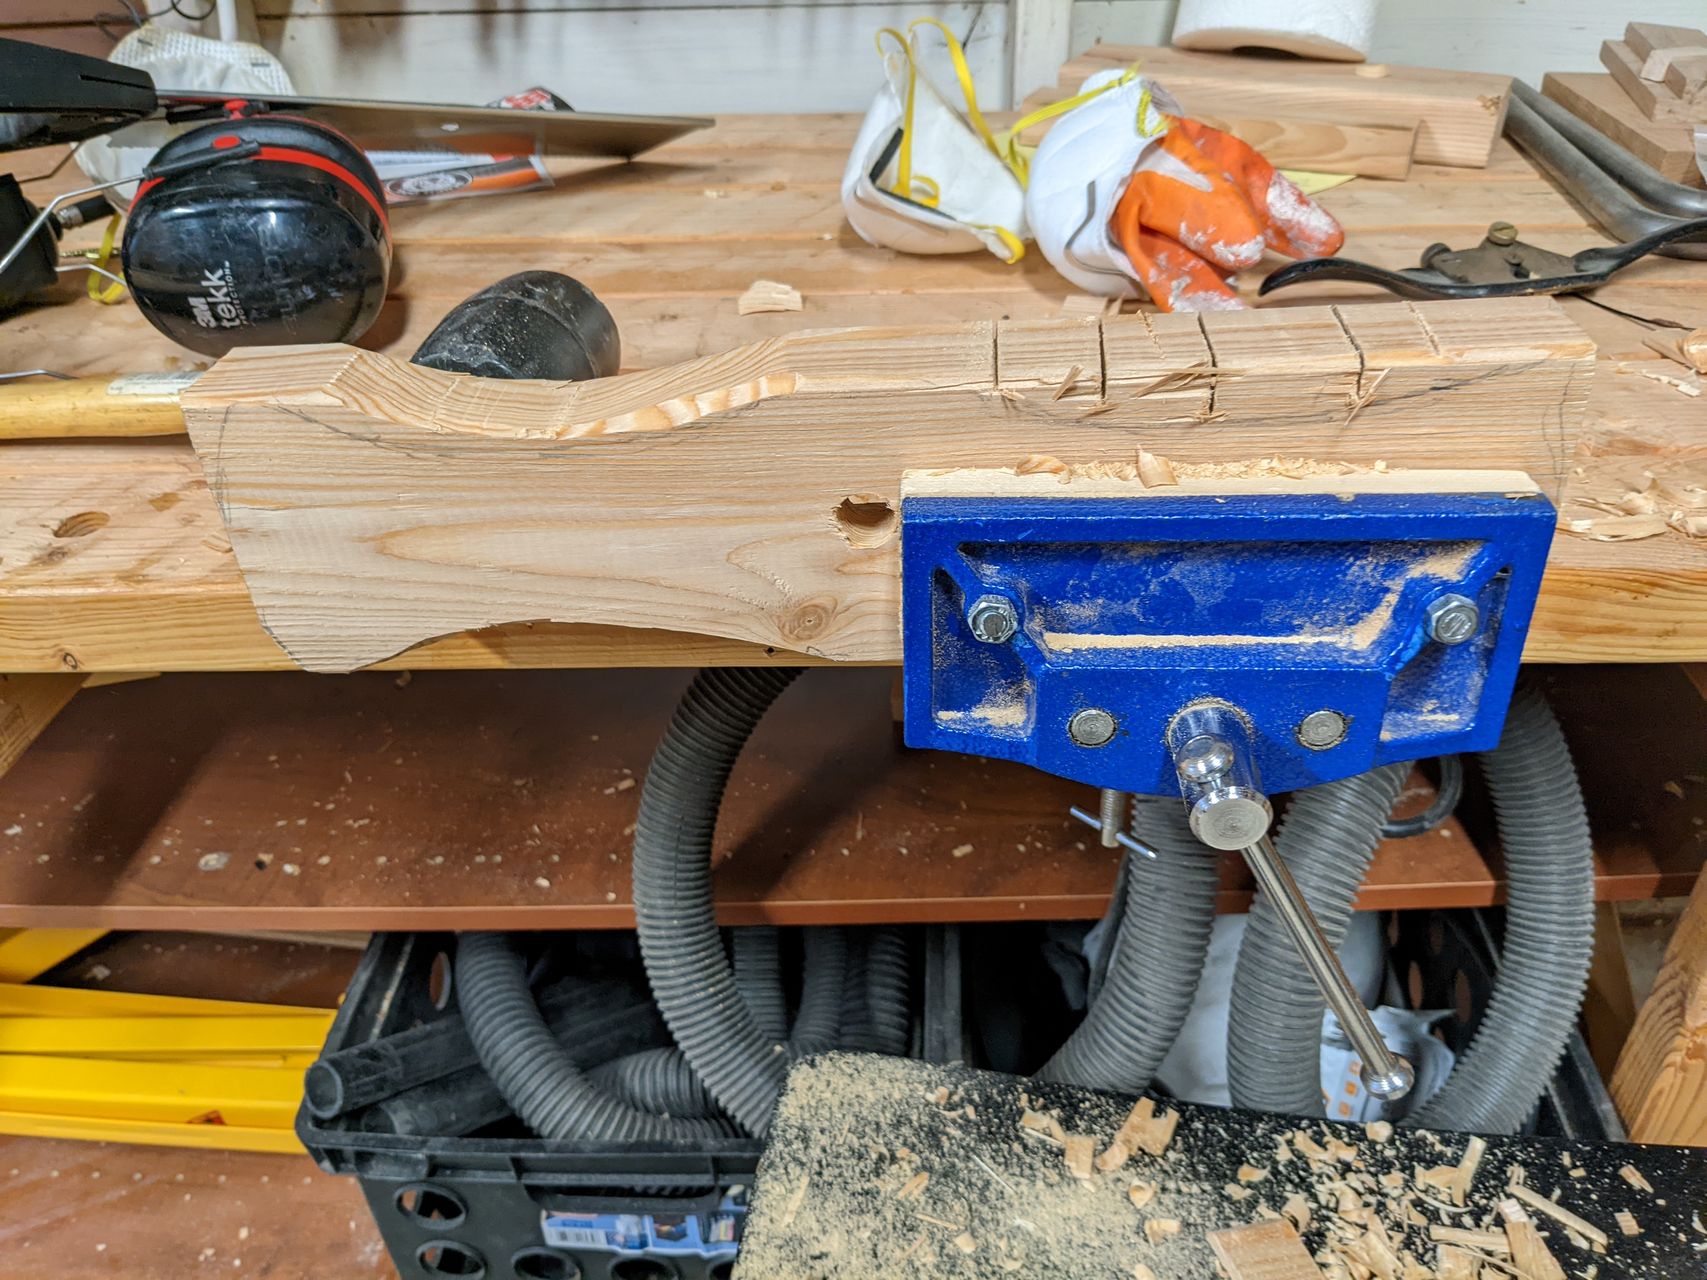
To clean it all up, I took a belt sander clamped to my workbench and worked over all the surfaces I had carved with 100 grit sand paper before applying paste wax.
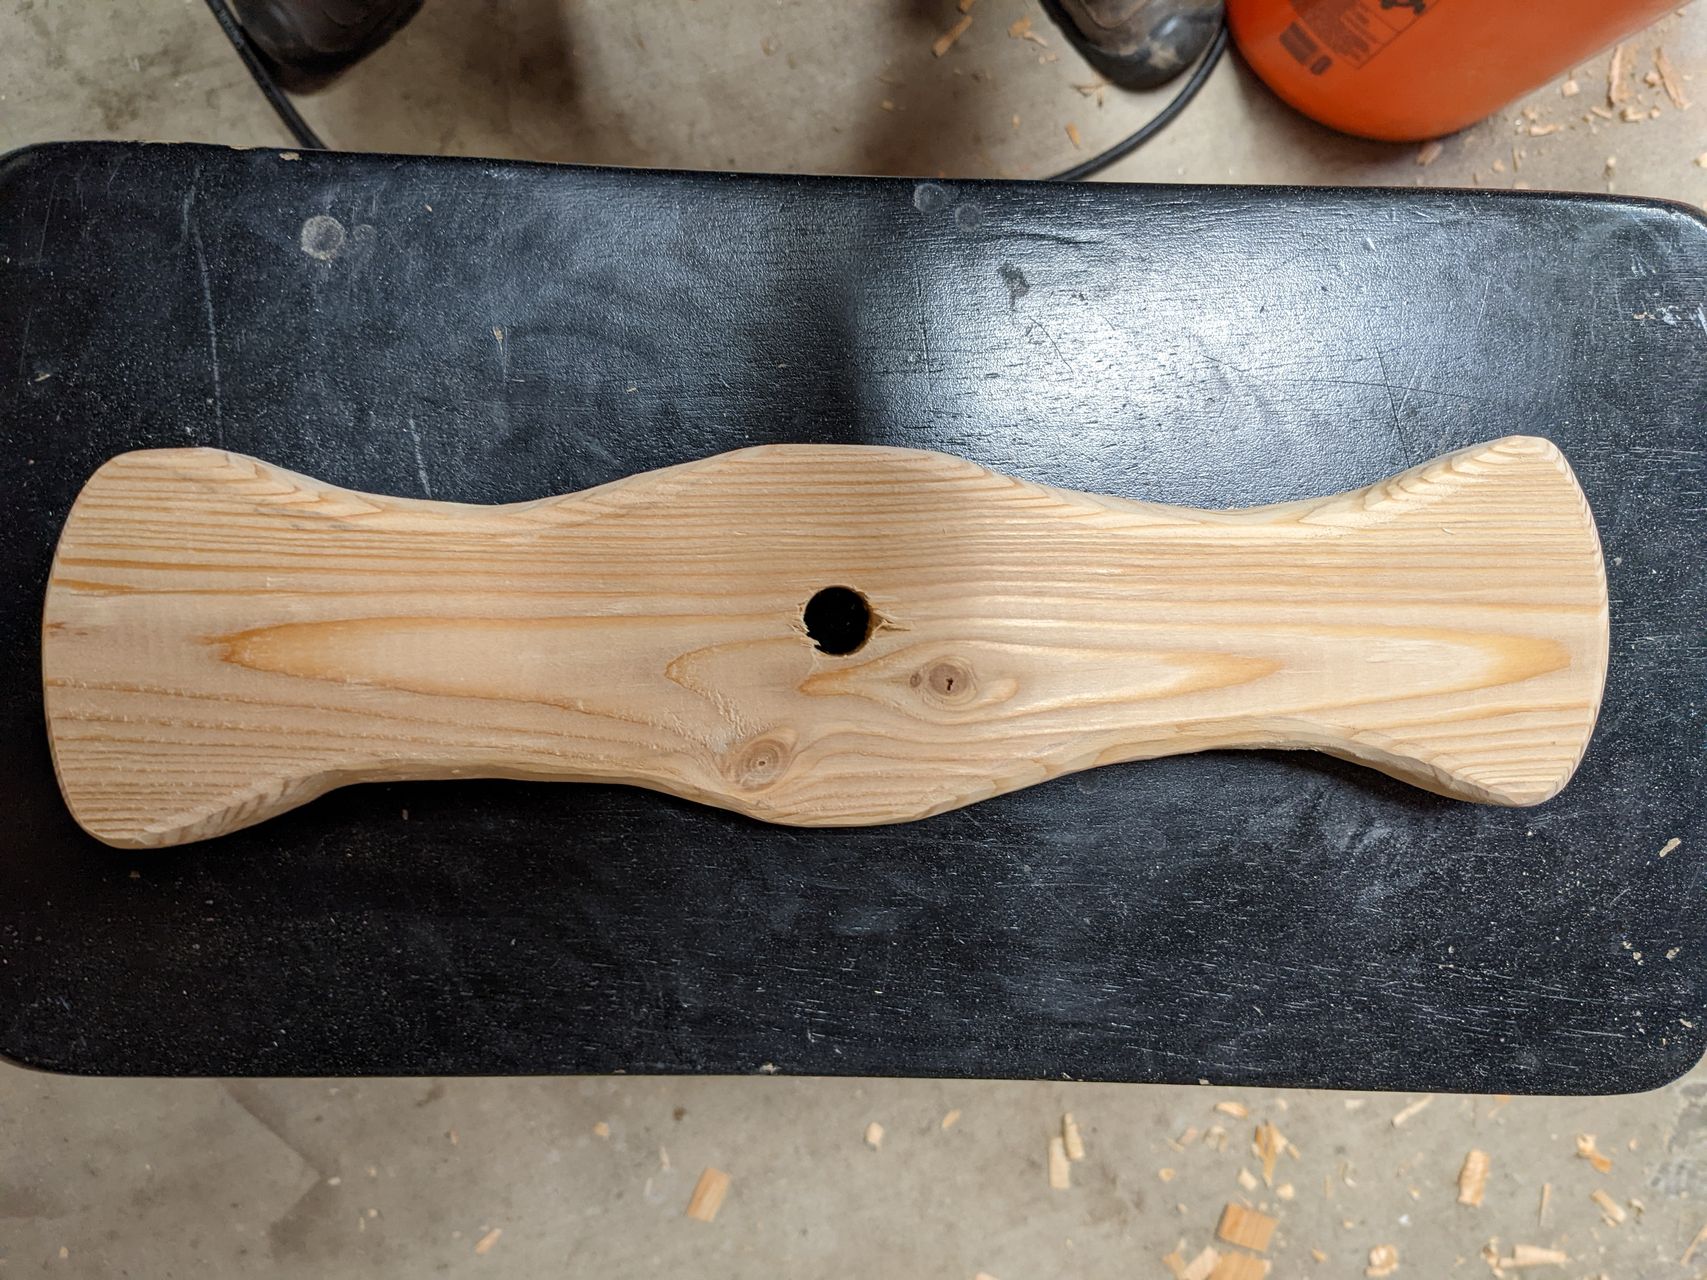 Finished press handle.
Pressure plate
Attaching the pressure plate to the end of the screw was something I thought about for a while, and after I test this I am open to redoing it.
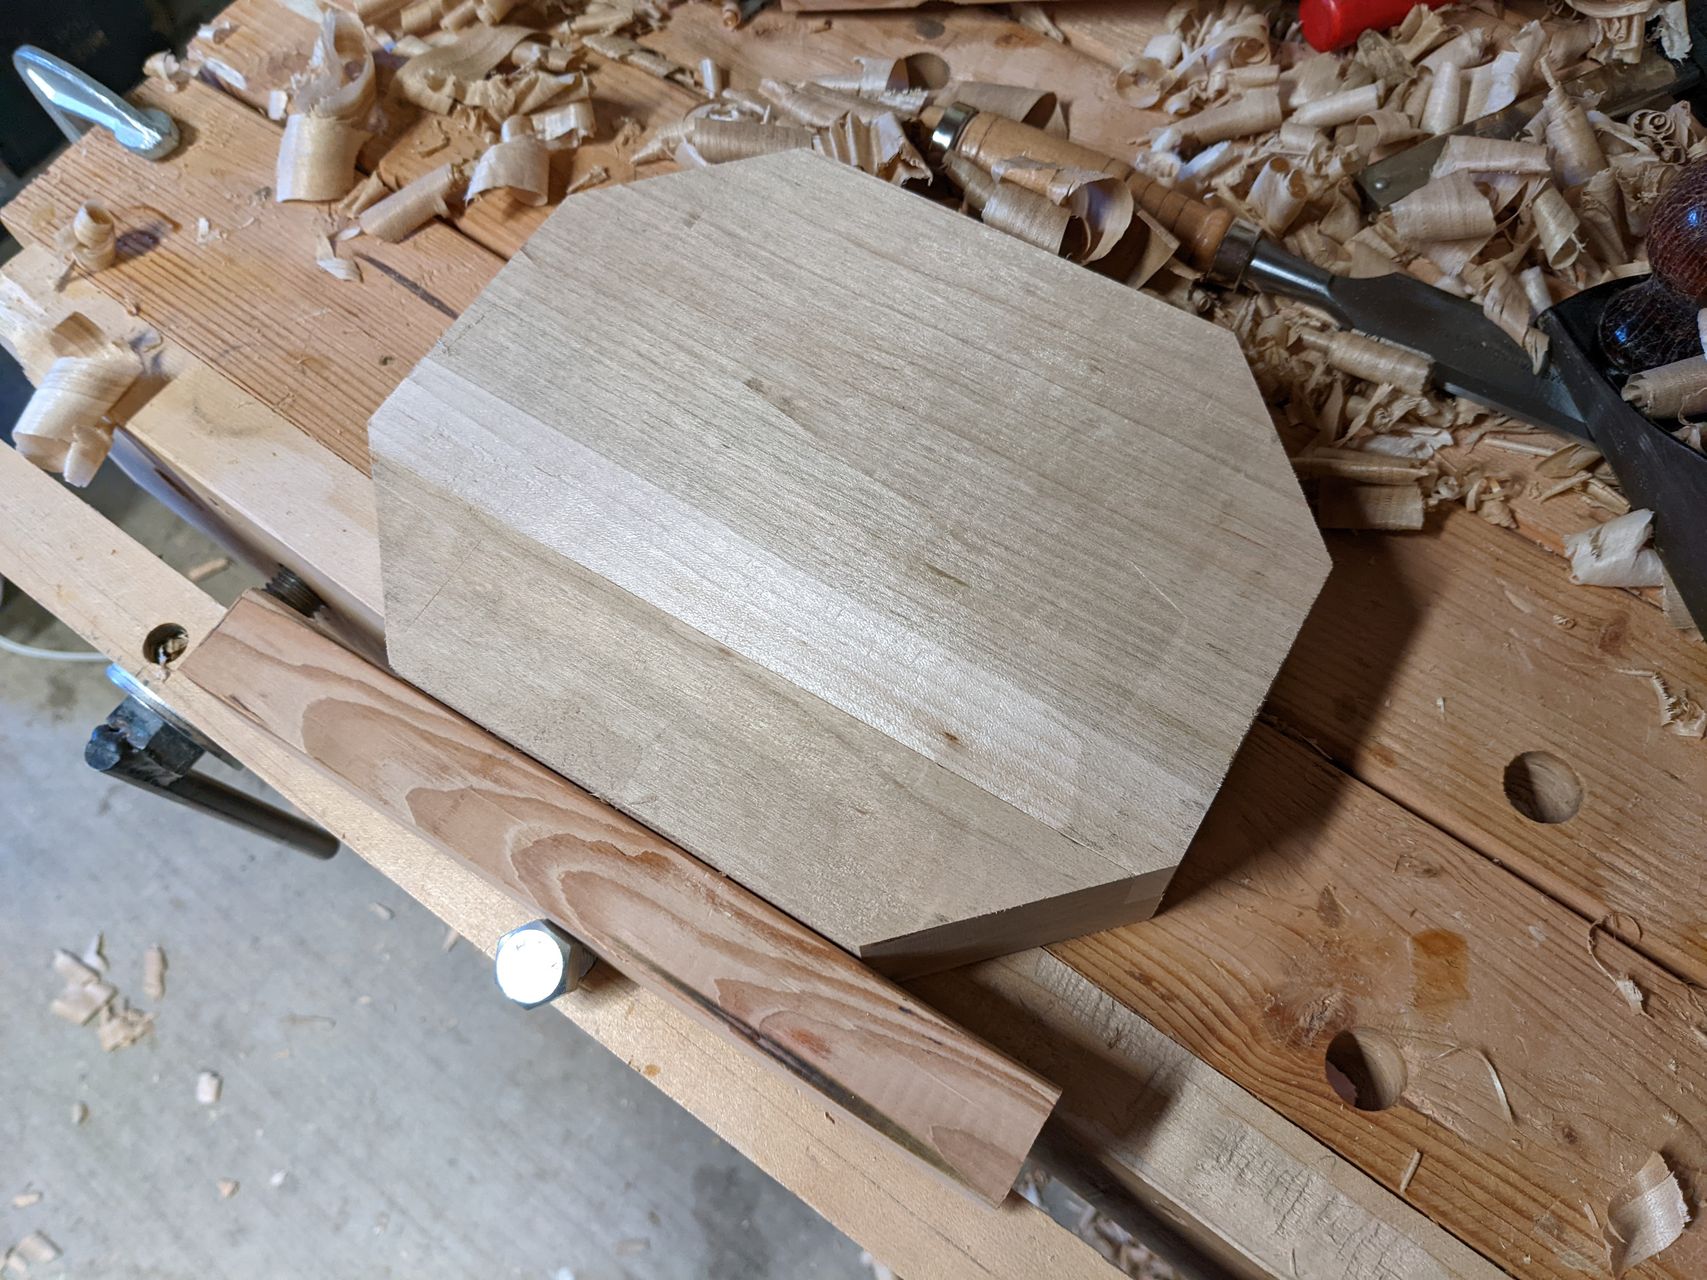
I laminated a few pieces of hard mape that were in my scrap pile together to create a piece of wood that I think will withstand the pressure that I will need to apply to this.
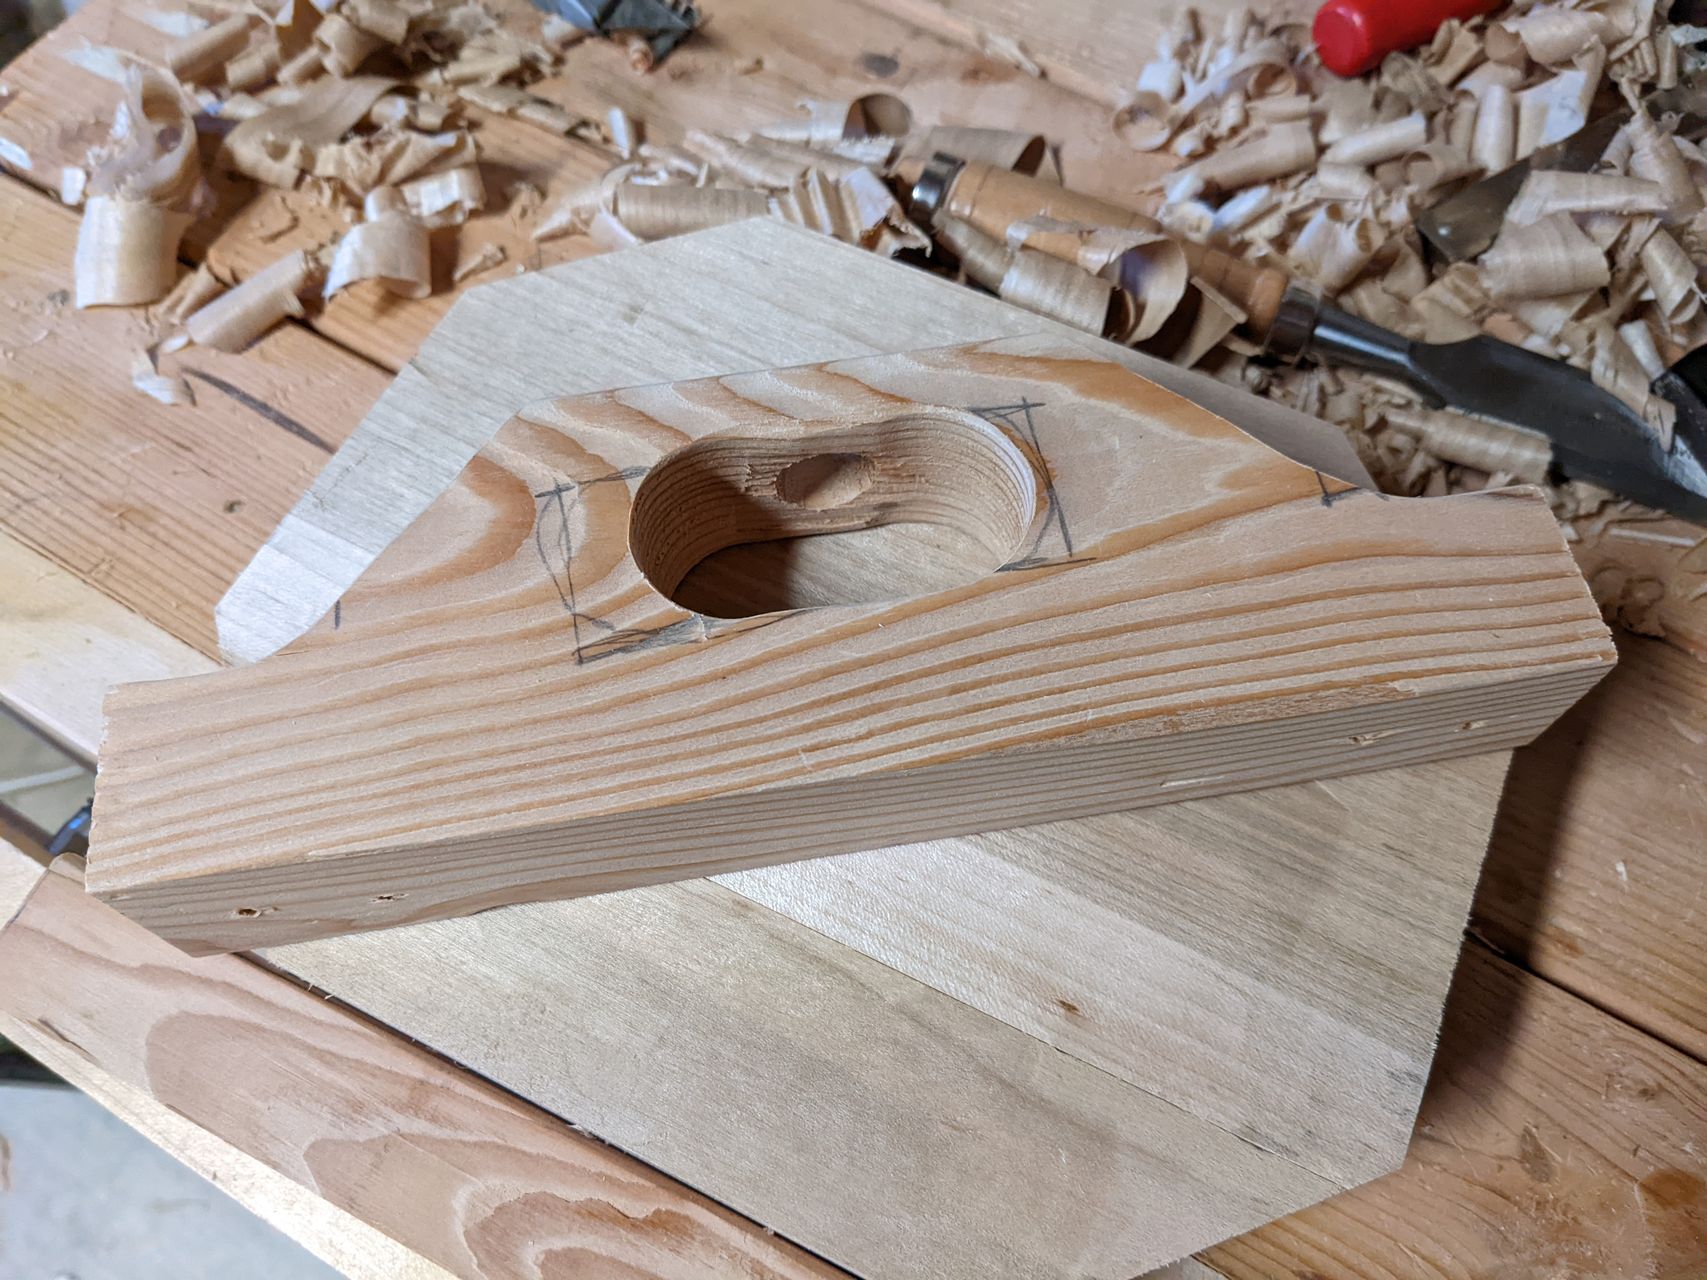
I had originally planned to drill a hole for the screw to sit in, and place the plate under the screw with the hole using pressure to hold it in place. This would make it a little messy and difficult to retract after each presssing, so I decided to make a yoke to hold the end of the screw. This also let me add about an additional inch of depth or more if I count not needing to go in the hole.
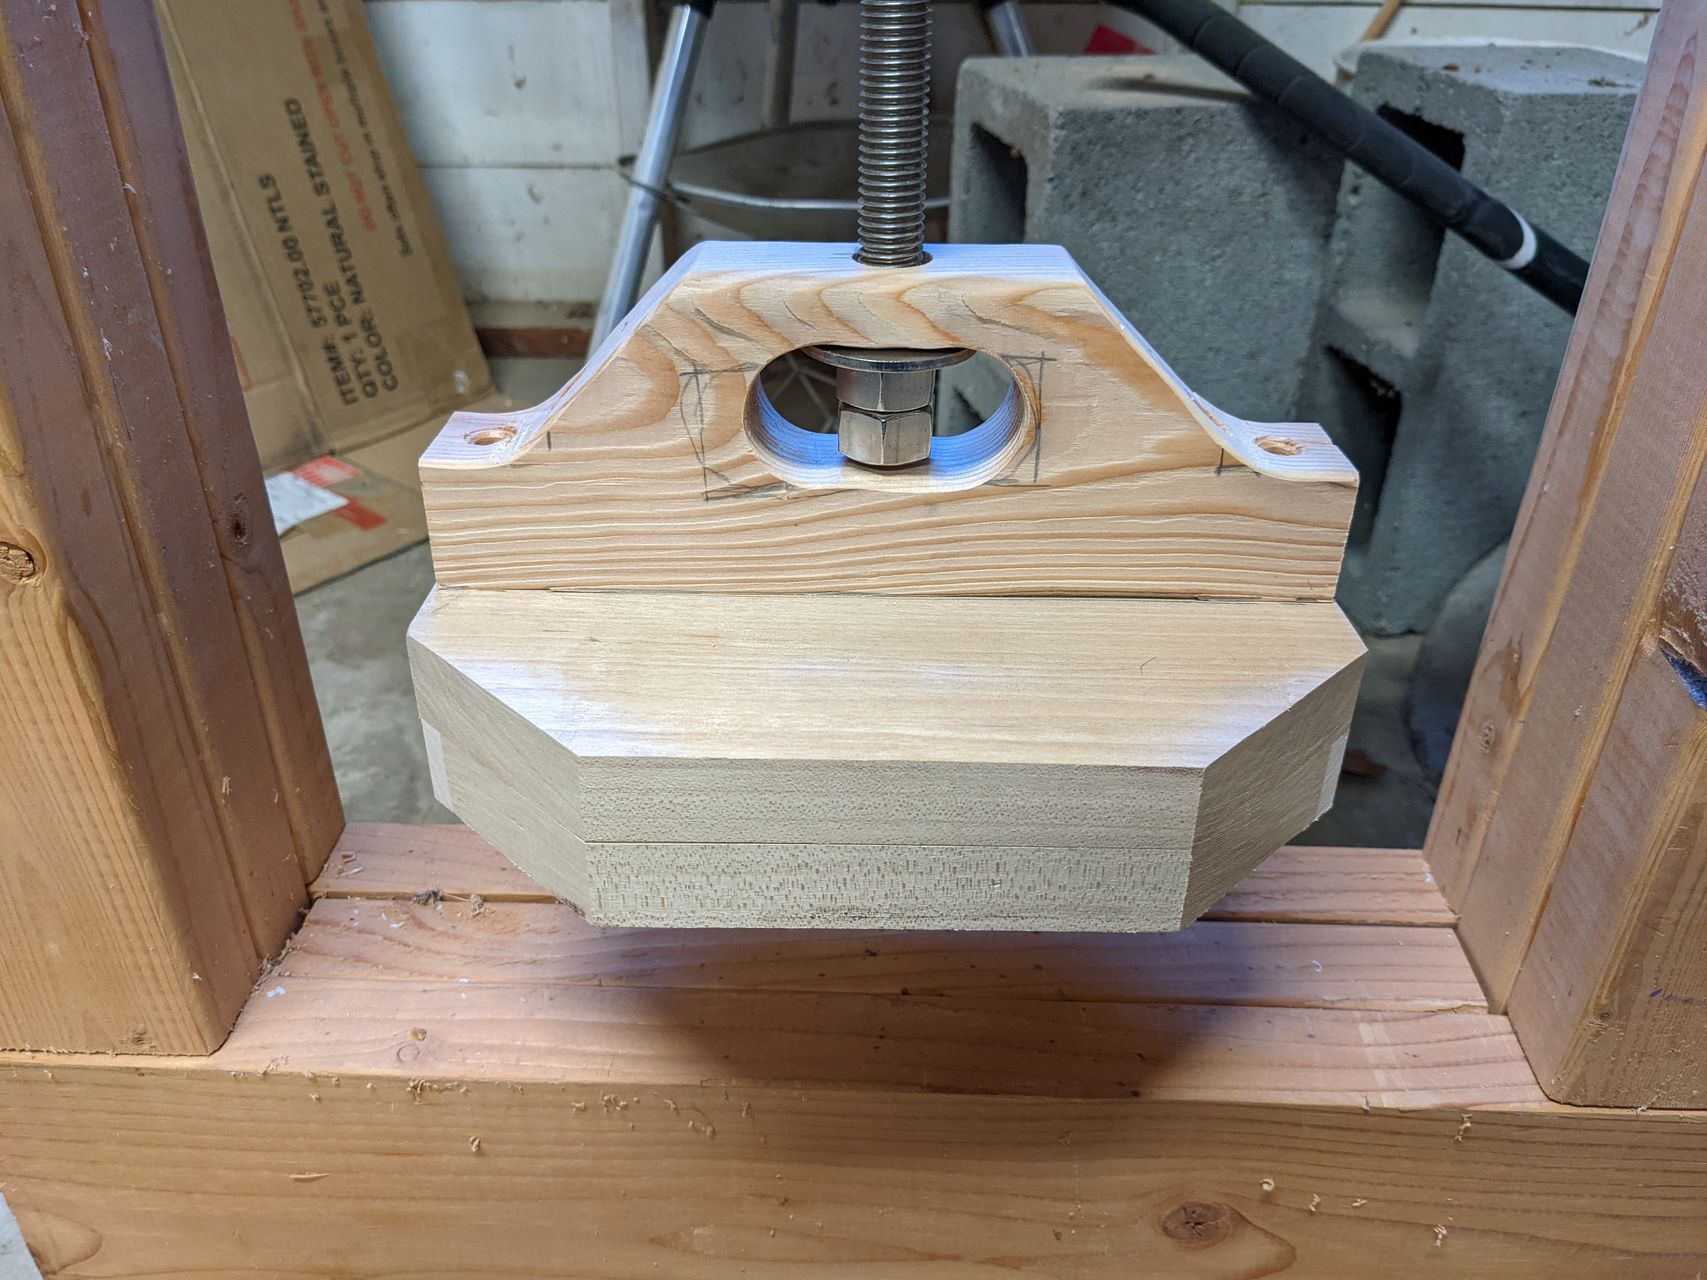
The yoke was made from a piece of pine 2x4 using a forstner bit to drill out the hole for the nuts to freely rotate in. I made sure there was enough space to get a wrench in to tighten the nuts. I might add a metal plate to contact area below the screw if I find that it is damaging the wood. I am also a little worried that if the plate gets stuck the yoke won't be strong enough to pull up on and will break near the top where the screw goes through it.
I pre-drilled two counter sunk holes on each end of the yoke and screw it onto the pressure plate.
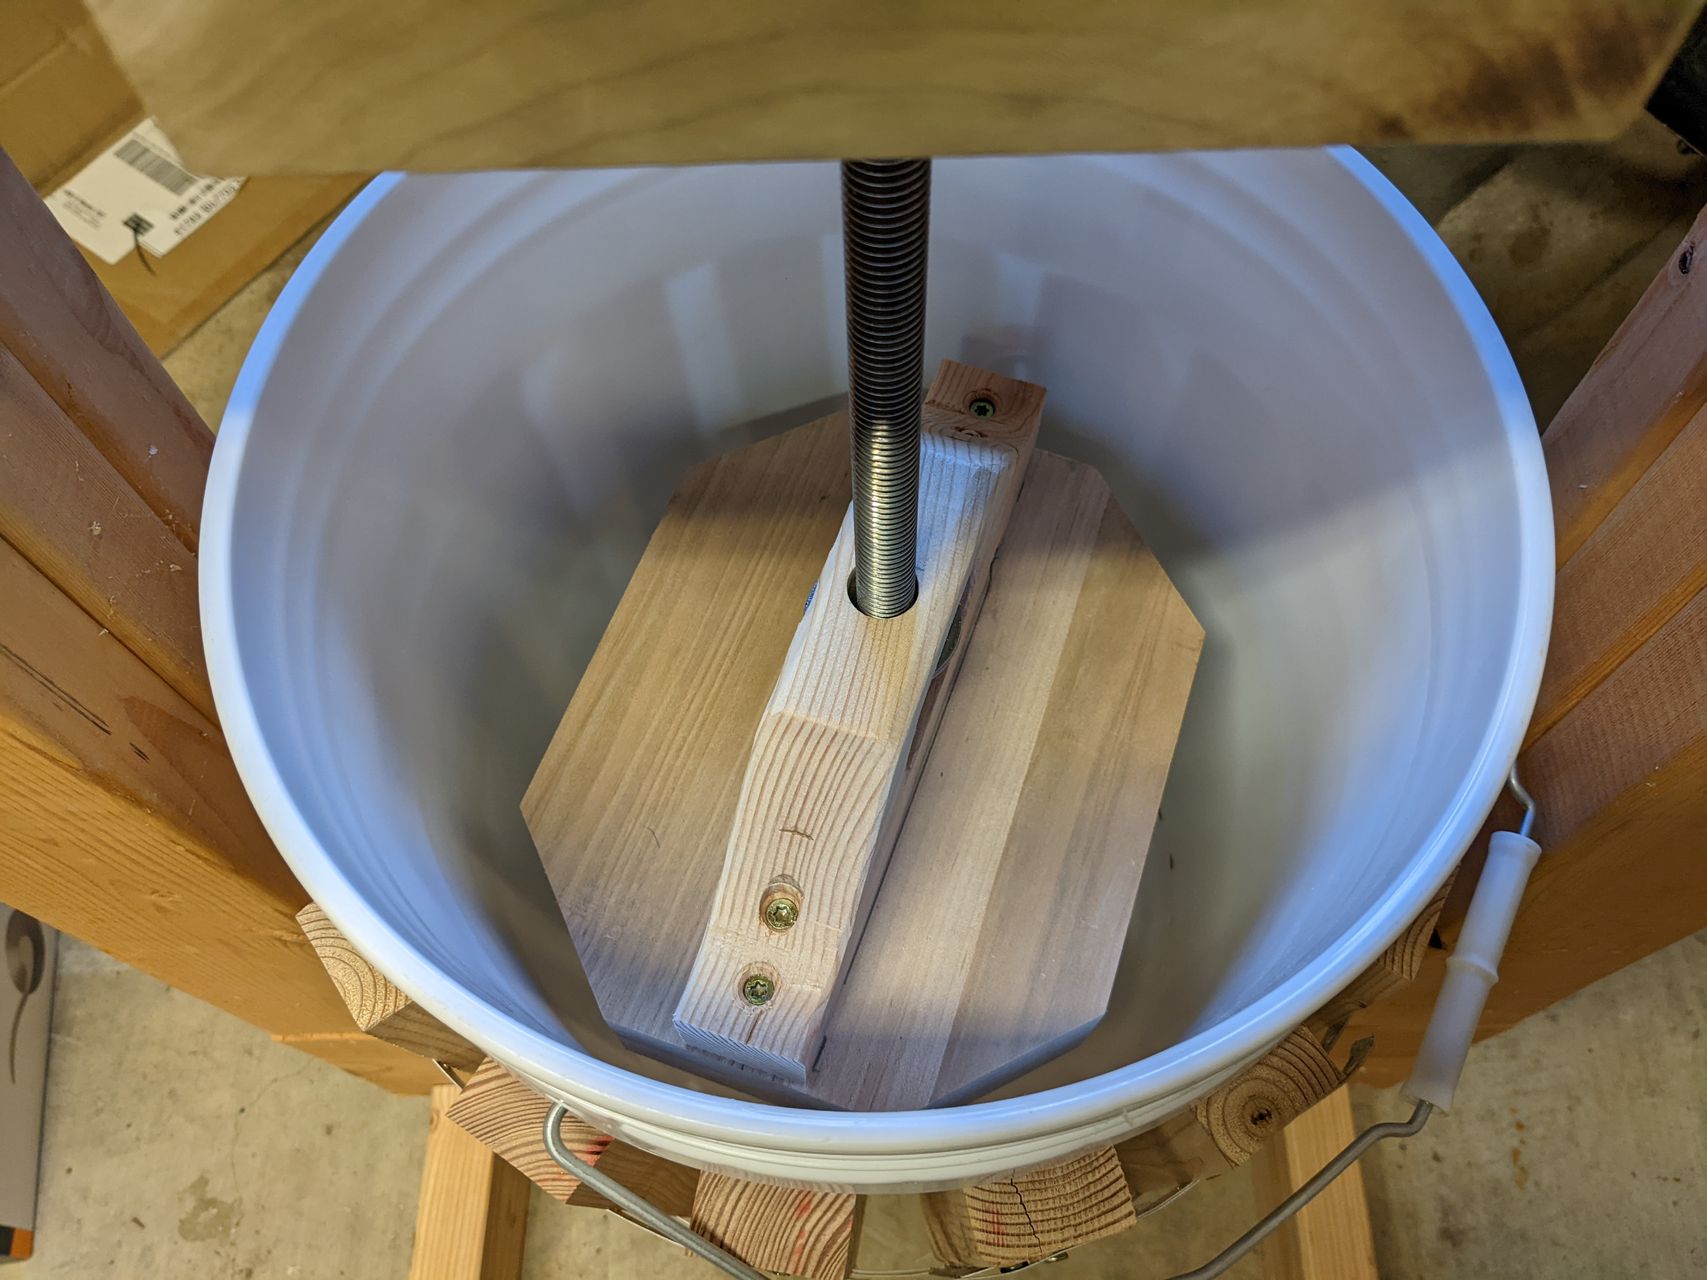
I test fit the whole assembly, it looks like the plate is just small enough to travel to the bottom of the bucket. If the two sides with wider gaps are too big, I'll have to make a new one, but it should be easy to replace if I want to keep the yoke or plate.
The plate will need to have some kind of finish applied to it. I will probably use the mineral oil and beeswax mixture that I apply to my cutting boards, as it is food safe and won't go rancid.
Drain
To go under the bucket, I drilled a large hole in one end of a rimmed cookie sheet. I think this will work well to collect the juice and drain it into a bucket or funnel. I won't attach this piece to the frame so that it is easy to take off for cleaning or to replace if it doesn't work well.
Future steps
Now that I have the press finished, I need to aactually press some fruit. I have five gallons of apples fermenting in a mini-fridge at the moment, which will be a good first test. Following that, I know several friends with other fruits that I've discussed fruit wine making with before. I'll let you all know how that goes.
Feb 05, 2022
Motivation
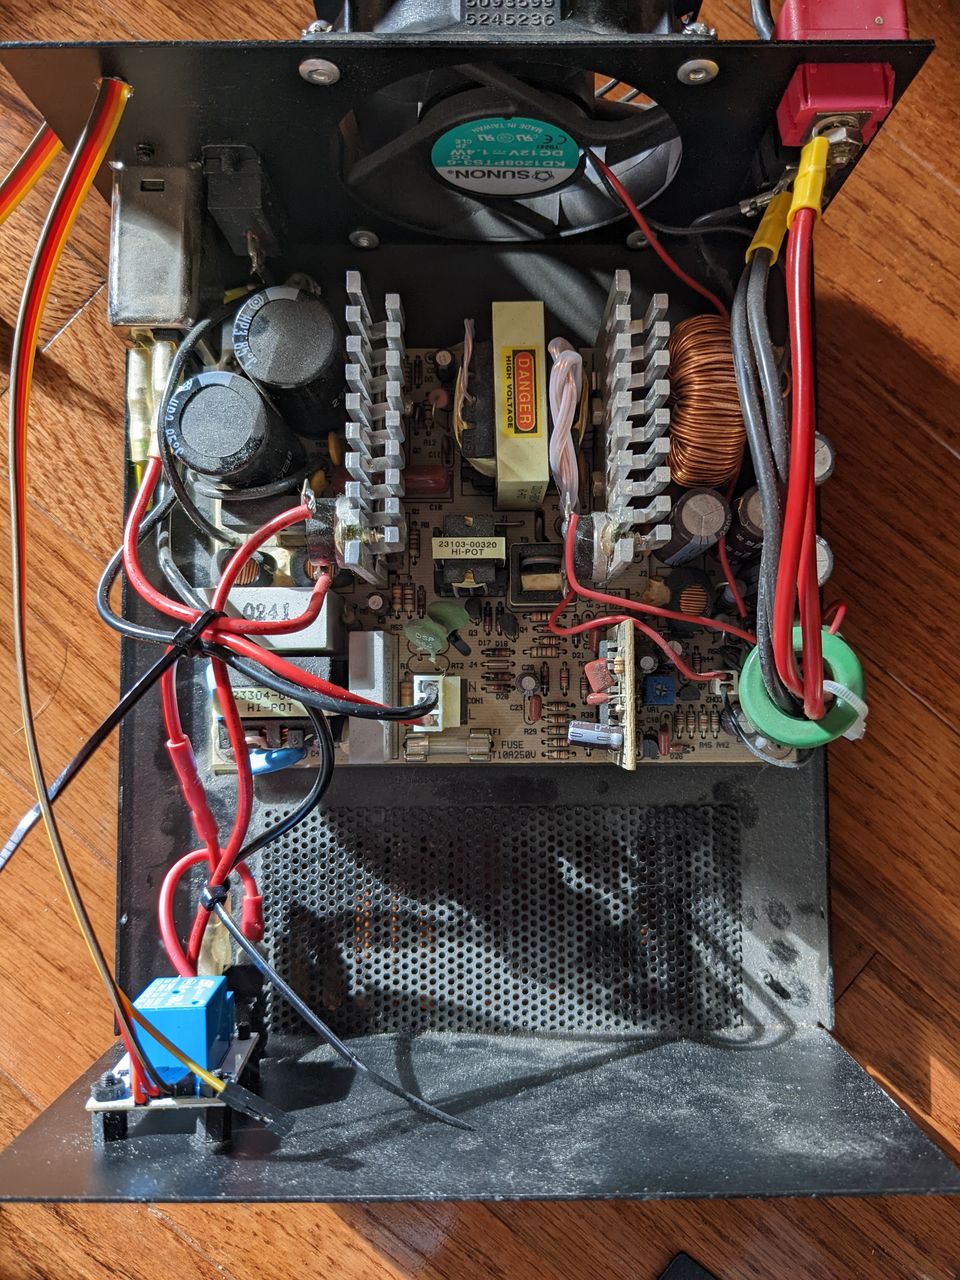
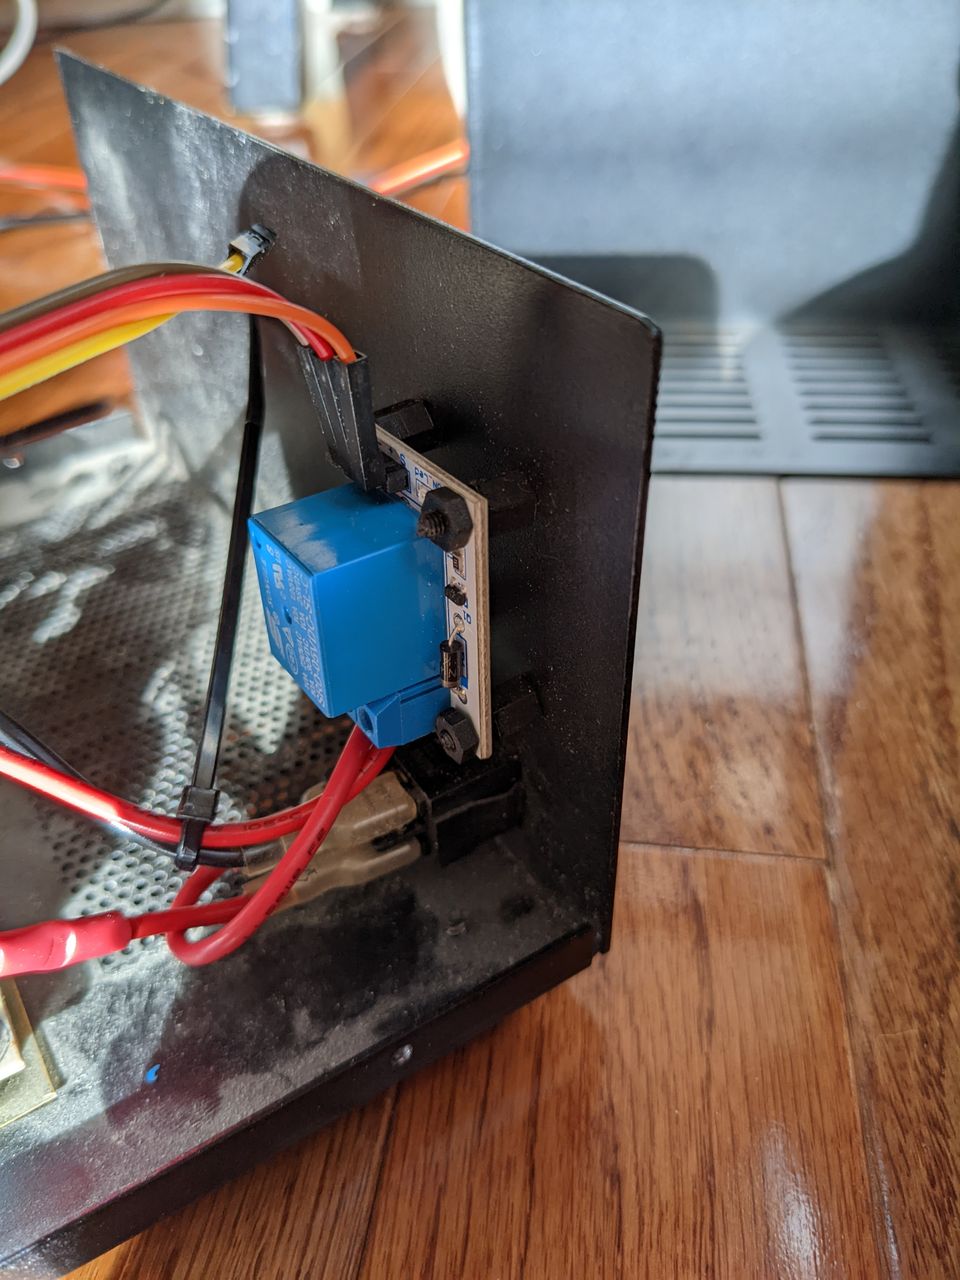
I've been trying to operate my HF radio station remotely for the last month, using Windows Remote Desktop and WSJT-X to sit and make some FT8 contacts while drinking my morning coffee. This has worked well but I want to remove the step of having to remember to turn off my radio when I am done. The power supply and radio are mounted in a closed cabinet. Leaving the cabinet open invites exploration by our feline companion, while leaving it shut and powered up for long periods of time may result in the temperature rising more than I want.
I ordered a simple relay board and decided to put it inside of my power supply, to be triggered by a program on the computer to turn the station on and off. West Mountain Radio sells a network connected control and monitor system with Power Pole connectors that would be great for this, but it's also $280 which is a lot more than I want to spend for this little effort.
Progress
Last weekend after getting all the parts, I took a few moments out in my shop to drill out some holes and mount the relay board, and wire the relay into the circuit of the power supply. I had selected a relay that is adequate for the AC side of the power supply, which are more commonly available on a premade board than those capable of handling 12V/25A. I made a few mistakes wiring it up, first mistakenly wiring it in series with the light inside the switch, and then wiring it to be normally closed when the relay is not powered.
 .
.
 .
.
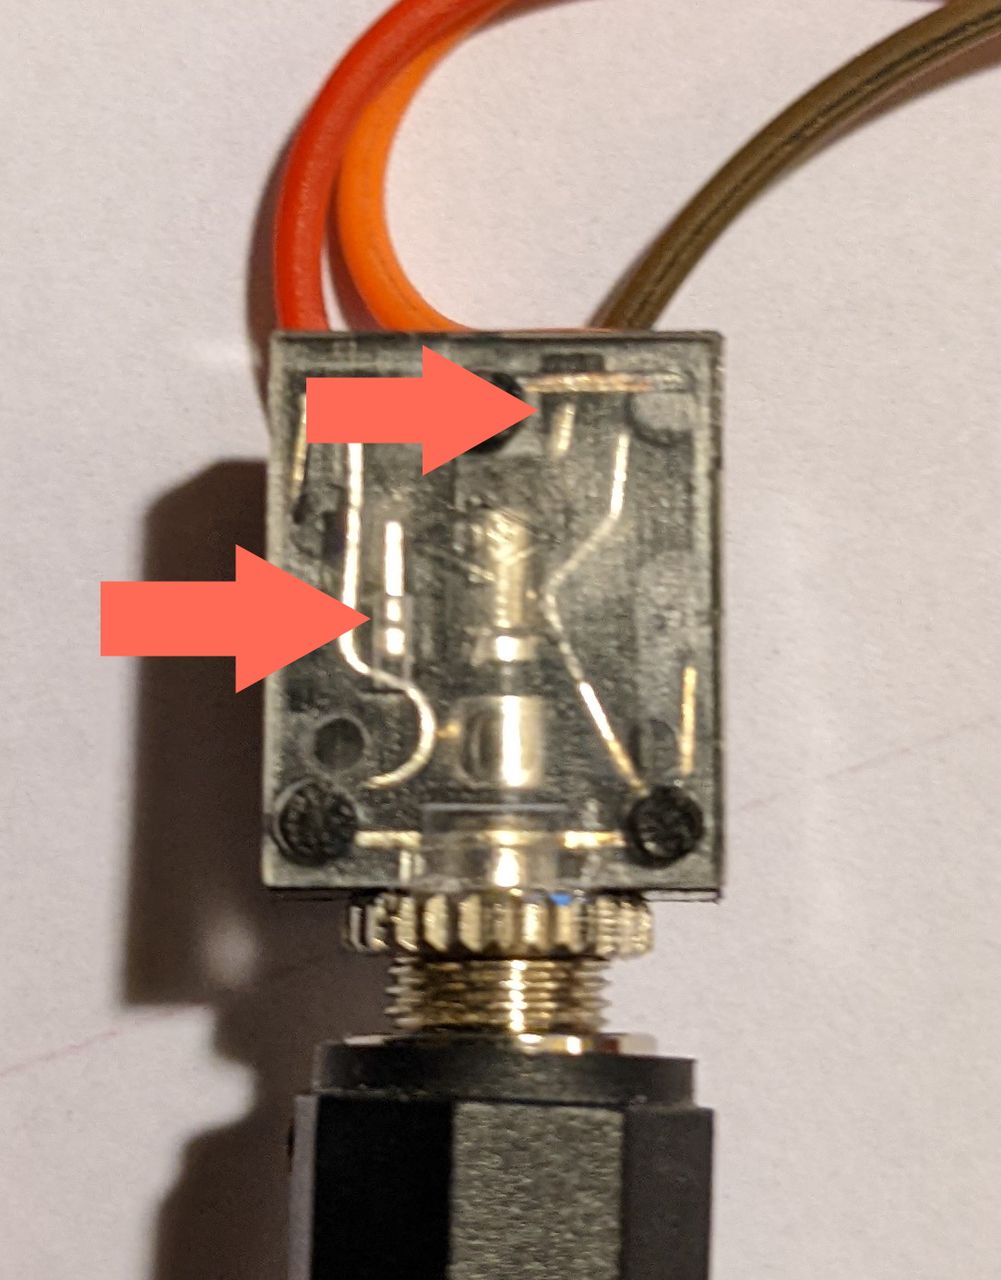
The final mistake I made was wiring up connector that I put on the back of my power supply. I had decided to use a 1/8" TRS connector to provide power, ground, and signal to the relay from the control board, but instead of soldering to the tip and ring pins, I soldered to pins used to indicate when the plug is removed! I connected ground to the shield, power to the ring, and signal to the tip, figuring this would ensure the least bad results if any of the pins made contact while inserting the plug.
After fixing the misconnected pins on the TRS socket, I needed to wire this up to my computer somehow. My temporary solution is to use an old Arduino (which has been flaky to program) to provide +5V and ground to power the relay whenever my computer is connected to it. Longer term, I am planning to develop a shack control board and software that can use an Arduino or similar board to monitor and control several aspects of my shack.
Jan 21, 2022
My home shack (circa-2015 to early 2023):
(add recent photo here)
Installed in a built-in cabinet in my living room is a small shack that I use for HF work.
- Icom IC-706 MkIIG
- LDG Z-series auto tuner
- MFJ manual tuner, used for SWR meter and switch.
- West Mountain Radio Rig Blaster P&P
- USB Sound Card
- Astron switching power supply
Antennas:
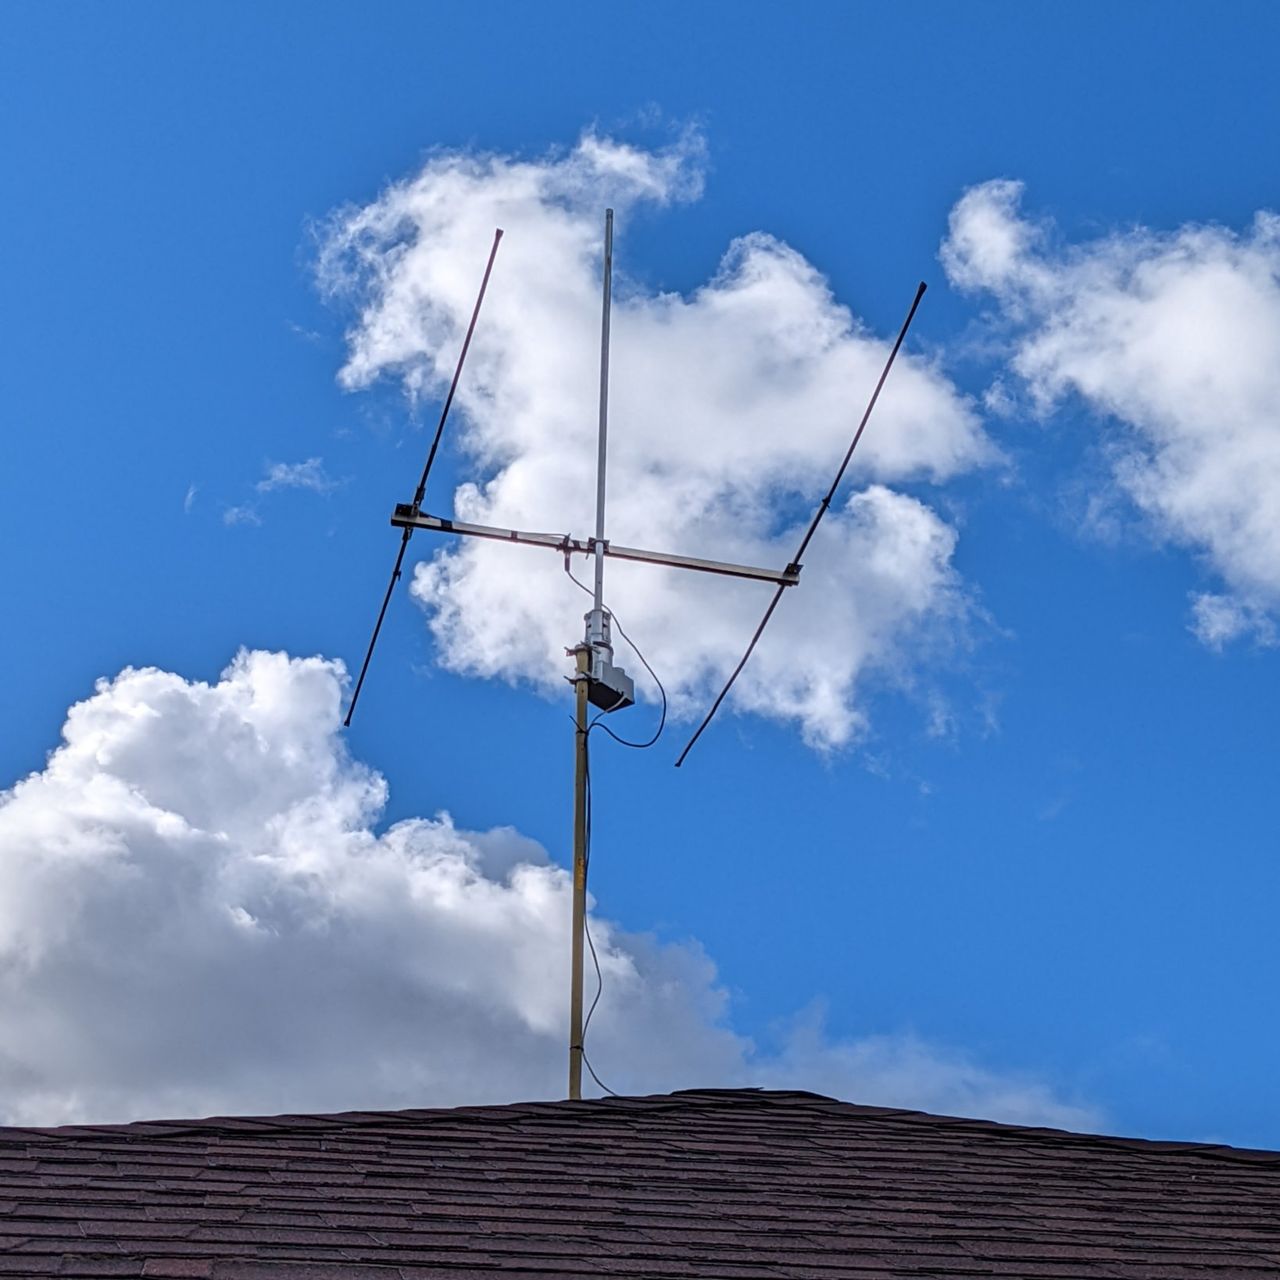
- Half-size G5RV for HF/6M, currently at around 18 ft off the ground.
Future improvements:
- Install 2-element 6m antenna on rotator on a mast over my garage.
- 2m and 70cm
Dec 11, 2021
Design
I wanted a remote antenna switch, and commercial models seem to be expensive relative to what I am willing to spend. I planned to combine an Arduino, ethernet shield with power over ethernet, and a board with four relays. This assumes that commonly available relay boards would work fine for switching HF signals, providing both adequate isolation (separation when an antenna is turned off) and have minimal losses when in use. I had planned to add on remote control for an automatic antenna tuner and an antenna rotator, but those two features will be for some future iteration of the project. I have at least two HF antennas I wanted to connect, a short G5RV and a two element 6M beam.
Micrcontroller
After running into issues with a standard Arduino Uno and ethernet shield - there wasn't enough memory to serve up a minimal HTML page via HTTP to control the switch. I looked at some successful projects using networked Arduinos for remote control, like the OpenSprinkler, finding the source code was more optimized than I thought I could get for a one-off hobby project.
Next idea was to look at something like the Arduino Yún, which I discovered was unavailable at tthe time. I did find Adafruit selling a clone called the Seeeduino Cloud, marked as compatible with the Yún, and bought a Power over Ethernet (POE). I would not recommend the Seeeduino Cloud as it uses a custom branch of the OpenWRT Linux distribution that several years since having any kind of update, and minimal documentation. So I set up two parts - a static HTML page with JavaScript for interactivity, served up by the Seeeduino's Linux side, and used the Arduino YunBridge library with a REST API to turn the appropriate pins for each relay on and off. It works okay, but can be a bit buggy when the Arduino loses it's connection.
Relay board
I mounted a Sainsmart relay board and Seeeduino into an old project box I had bought years ago for a manual antenna switch and never implemented. I built a small RF sheild around the relay board using an old piece of aluminum bent to fit around it, and wired it up using some speaker wire and panel mount SO239 connectors
I had considered their relay board with a built-in web server, but this was out of stock at the time.
Testing
I can't tell if there is any isolation between these. I used a friend's NanoVNA to find minimal losses on each of the connectors when selected, but I cannot hear any difference between connectors on the radio with one antenna hooked up.
My next steps will be to rewire the relay board to directly solder to the PCB with short stubs of 14 gage copper wire to each connector and see if this works better.
Antenna Rotator?
My neighbor, another ham, gave me a TV antenna rotator and homebrew controller. The controller requires a five wire connection to the rotator, three for power and two to measure voltage across a potentiometer that indicates direction. I had planned to incorporate controlling the rotator into the initial project until I started to investiate how to provide power to it. The antenna rotator obviously requires more power to operate than I could deliver over PoE. The homebrew controller provides 40V AC from a substanial transformer connected 110V AC. The 40V AC appears to need to be reversed to rotate the controller in opposite directions, meaning four relays need to be used as a DPDT switch. By the time I configure this, I still need to provide at least three wires up to the rotator, plus the ethernet to the Seeeduino. I am not sure I'll complete this, instead I am planning to run 18 gauge, 7 conductor, sprinkler wire to the rotator.
Antenna Tuner?
Secondary to the antenna switch and rotator controller, I wanted to connect either my LDG Z100 autotuner or another autotuner to the Seeeduino. Locating the tuner near the antenna switch would allow me to minimize the impedance mismatch over the majority of my feedline, about 50ft from my shack to the mast on my garage. The controls for the LDG autotuner appear to be pretty minimal, using a four pin connector from my Icom radio, esentially power and ground, and two pins communicate when to tune and status of tuning. This should be easy to add at a future point.
Dec 09, 2021
Plans
One of those magical things that has kept me interested in ham radio all these years has been the idea of bouncing signals off of things, particularly those in space. I've long wanted to give meteor scatter a try, so I want to get my station set up for that this winter. It seems much more within reach than satellite operations (next on my list) or EME communication. Satellite repeaters requiring specialized antennas or at least good timing and knowing where to point a handheld antenna, while EME requiring some amplifiers outside of my budget for this hobby.
It appears I can use a 2-element beam for 50MHz that my neighbor gave me, along with my IC-706MKIIG radio, and the WSJT-X software. I want to mount the 50MHz antenna on a mast over my garage, and then get the software and radio set up to try some meteor scatter contacts in the morning before my kid gets up.
A few resources I've been refering to.
The pages I've looked at to help me assemble this station:
Progress - February 2022
I got my 6m antenna up this weekend on a tripod and 10 foot mast. This is at the high end of the recommended height without guywires for the tripod, so I should make adding those my next step. I've been unable to get a friend's NanoVNA to work to check the antenna's resonance.
I gave up on trying to automate the rotator, I might add something to the control box in the future, but for now, the antenna is facing roughly southeast, which I hope will give me some opportunity for early morning meteor scatter operations.
Dec 08, 2021
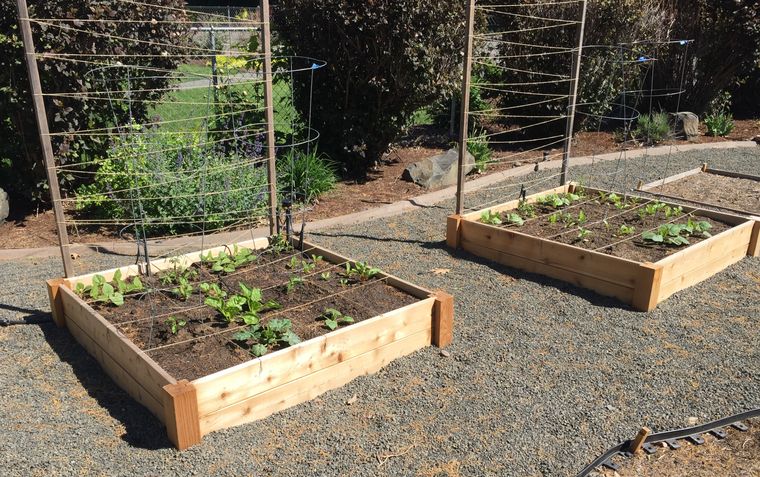
A couple of years ago we decided to move our vegetable garden to the front yard, with the goal of reducing the amount of lawn we had and making use of one of the sunnier and less utilized spots in our yard. Our existing raised beds had been build by a previous owner, placed in the shaddow of a tall hedge running around the back yard.
They are about 11 inches deep, and roughly 4 feet across for easy access. We had planned to use these for the "Square Foot Gardening" method, but since decided that our root vegetables all end up too small due to being crowded. The boxes are filled with a planting mix from one of our local garden centers composed of equal parts soil, mulch, and composted cow manure, which has worked great for growing vegetables.
In the years since building the first two, I've added two more, and are planning to build two more this winter. With the four we have we were getting quite a few fresh vegetables and freezing some for the winter. Six will probably be enough for our family for a while. They won't entirely replace purchases from the farmers market and grocery store -- there are some veggies that are too tedious to grow. We mostly stick to tomatoes, peppers, squash, and a few root vegetables. Leafy greens are difficult to keep pest free, especially from leaf miners.
Sliding dovetail joint
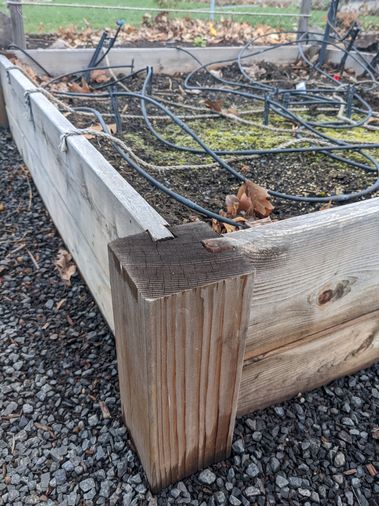 I had to search a bit to find one that looked good, most look sloppier than this but are holding up well.
I built these from my own plans out of cedar, using a sliding dovetail joint to attach the sides. The first time I borrowed a router from a friend and tediously used the only dovetail bit he had to make four passes through the slot to enlarge it to an adequately sized slot for the boards to slide into. I had built a little fence jig to attach to my friend's router to help with this. The next year I bought a large dovetail bit and my own router, doing all eight corner pieces at once. The slot was not quite straight doing this even with a commercial mortising jig, and usually ends up a little loose. I often tack the boards in place with a brad nailer just to hold them together until I can put soil inside, at which point the pressure on the walls pushes everything into place.
This year I am going to try individual pieces again, but using a router table. In previous years as well as this year, I need to make several passes with a narrow straight cutting bit to cut the 3/4" deep hole before making a final pass to carve out the dovetail walls. I'll let you all know how it goes.
Dec 04, 2021
Around the time I started to get into woodworking, I bought a Shapeoko2 CNC machine during their crowdfunding campaign. I had mostly planned to use it for electronics projects, milling single layer circuit boards and making simple enclosures. My in-laws then asked for larger than normal house numbers as a holiday gift. They lived in a retirement community the time and claimed the house numbers were too hard to read from a distance. I took this as a good opportunity to learn how to use the machine and required software, I could mill them out of MDF and then give them a good coat of an acrylic spraypaint to seal them against the weather.
It might have been one of a few CNC projects I completed, I can't actually think of the others. For a number of reason, I sold the machine and bought a bunch of more traditional woodworking equipment instead. Since lots of people have compared CNC versus traditional woodworking techniques, I won't try to recap all the differences here. A quick search on YouTube will yield lots of videos.
Ultimately, the thing that made me sell the machine was the software. At the time I was using Linux on all my home computers, and the CNC ecosystem for Linux wasn't great. LibreCAD is a decent CAD package for two dimensional work, and did a good job for design work. The Shapeoko's GRBL controller, paired with Universal G-code Sender software worked well for controlling the machine. The challenge I had was finding a good Computer Aided Manufacturing (CAM) software to convert the 2D CAD drawings to the G-code that tells the what to do. With good reason, this is a challenging bit of software to develop - there are a lot of (literal) moving parts. Unfortunately, sticking to the Linux environment, the available options were all pretty sub-par.
So, I've kind of decided to keep computer's out of my shop. I'd like to learn techniques (both with power and hand tools) that let me use my brain and my hands to build something. I spend a lot of my work day in front of a computer screen, and I didn't want to add yet another hobby that kept me sitting in front of a glowing rectangle. And the original goal of milling circuit boards - someday I want to learn some of the old-school homebrew techniques for building circuits (like Manhattan or dead-bug style construction).
As a result, I bought a scroll saw - it's one of several tools that, depending on the size and material) replaced my need for a CNC machine. It wasn't a great purchase, but I did a few projects with it. It's a lot faster to print out my design, tack it onto a board, and cut out than it would take me to go through using a buggy piece of CAM software and upload it to the machine. I ended up doing another set of house numbers using the scroll saw, and I think they came out just as nice as the CNC product would be. Of course, I ending up getting rid of the scroll saw, but if I had to do this project again, I would pick up another cheap one over trying to find someone with a CNC machine.
Nov 27, 2021
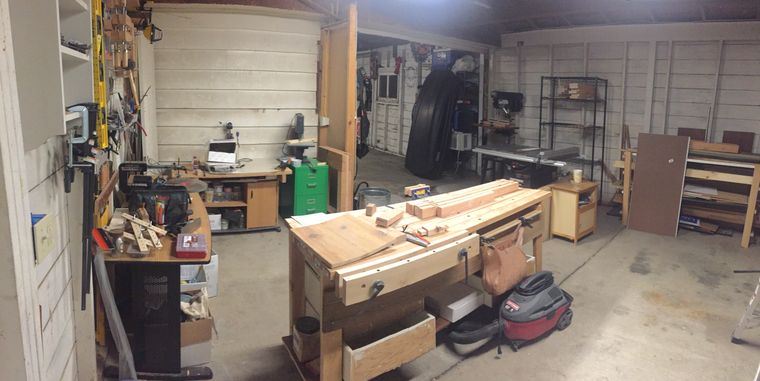
My woodshop is the back half of my garage, which was added as an addition by some previous owner. There is an obvious gap between the front and back halfs, where a hole was framed up and cut open I've long wanted to make my shop more usable in the winter by dividing it off from the garage. Every winter I use a few electric heaters to warm it up each day that I want to use it. While I would like to insulate the walls someday, I'm starting with cutting the space to heat in half as a quick way to make the space heaters more effective.
This weekend I framed out a wall, hung a couple of interior doors that were in the garage rafters when I moved in, and used a sheet of fiberboard cover one side.
My next steps are to close off the right hand side with a plexiglass window to allow a little light and visibilty between halves of the garage. Then I want to put up some trim to make the doors look a bit more professional and seal off the edges. And they all need a good cleaning from the dust that has accumulated on them over the years.
 Image of shop wall in progress
 A view of my shop in 2019 showing the hole in the from the other side.
Previous shop improvements I made include upgrading the electrical (I contracted this out), added some air filtration equipment, and a couple of additional places to store tools and supplies.
Nov 26, 2021
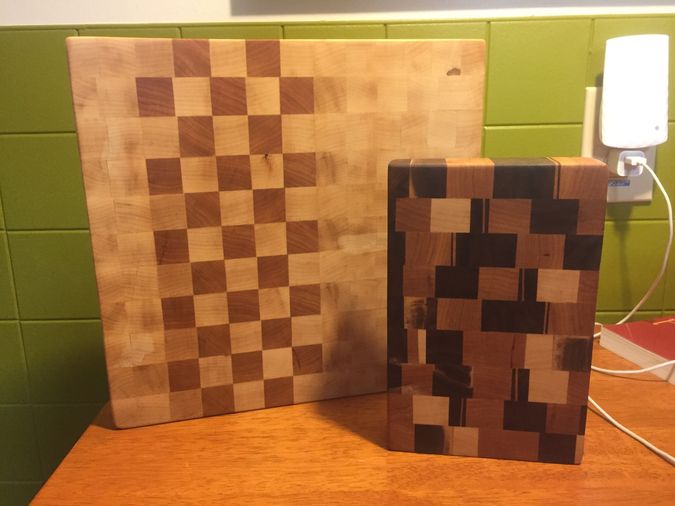 Two of the four cutting boards I made shown next to each other.
I started making a big end grain cutting board a way of saying thanks to a good friend who catered our baby shower and learned a lot of things along the way.
Concept
My first thought was to make these big and heavy, with a high contrast checkerboard pattern using one-inch squares as a reference for cutting vegetables. I was going to make a pair and keep the worse one for myself. This way I would have two chances at everything, and end up with a nice big cutting board.
Implementation
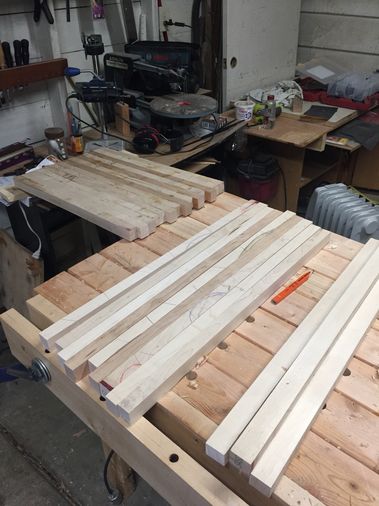
I bought the required amount of hard maple and black walnut for this approach only to find out that the black walnut was a lot more difficult to work with. In particular, cutting the strips of black walnut on my table saw was resulting in the wood binding around the blade, both causing the resulting strip to come out with a bow in it, and stopping the blade, causing the circuit breaker to trip and the lights to go out. I tried a few upgrades, including putting the ribbing knife back in place (always a good idea!) and buying a rip blade, as I had only been using a combination blade so far. I also used it as sign that I should upgrade the electrical wiring in my shop, as previously the whole garage was on a single 20A circuit. I also switched to using a red cherry wood instead of the black walnut. The contrast between the cherry and maple wasn't quite as impressive, but it looks better than the original would have come out.
I hand planed most of the 1x1 strips after cutting them down to just a bit oversized. This was tedious work that I could have easily done with a good setup on the tablesaw, but also really good practice at using a handplane. Some of the lack of perfect intersections in the grid are due to my planing being a little off.
After gluing up the strips into a slab, I cross-cut them with my table saw to two inch width sections. These sections would then be turned end grain up and glued on facegrain in alternating pairs to create the checkerboard effect.
I took these cross-cut sections over to another woodworking friend's shop to use his planer to get them right to just to 1" wide in this dimension. Using the planeer was not a great idea. Running the sections through the planer, which could only be done across the grain at this poin, ended up creating all kinds of problems. As a result, I lost about a third of the cross-cut sections! The first problem was going across the grain caused a lot of tear-out and breaking segments as it passed under the cutters. The fibers that were planed off were not short, but 2" long bits of wood, which quickly clogged the planer and chip collector it was hooked up to. At some point during the session I found out my friend had not really used the planer much since buying it!
Once I got these back to my shop, I glued the face grain sides together, alternating the two types of sections to create the checkerboard pattern. This took a lot of clamps, cauls, and patience. Finally I sanded them successively to 220 grit, put a slight roundover on every side, and oiled them with butchers block oil. My spouse thought I was a little obsessed with how nice they looked after all that.
Making a second set
As I was finishing the big checkerboard set, I ended up doing another pair using the scraps of walnut, with a little bit of the cherry and maple for contrast. I only used my hand planes to shape these, but as I wasn't going for perfect 1" square strips, I was able to get a little more creative in the pattern. I glued up three different slabs, crosscut them, and then mixed and matched, flipping and shifting the pieces to get a more random looking pattern to them. After making both sets of cutting boards, I really like these a whole lot better. I kept a slightly smaller one and gave the larger of these to a friend who was moving away.
Thoughts
- The big one is just a little too heavy (1.5" thick, surface area is 11" by 10"). It is a great size for heavy-duty project cooking where lots of vegetable prep is needed, but a little too heavy to want to get out day-to-day cooking. I am glad I didn't make it any bigger by surface area, like I would have if I hadn't lost so many pieces to the power planer. If I made one again, I would target closer to 1" thick.
- The small one is just a little too small (8.5" by 5") to use for much, but regularly gets used for cutting up fruit or cheese, or when we just need to dice one or two cups of a veggie.
- My bigger one is a bit warped due to me being hasty while gluing it up, so I use a towel or piece of drawer liner under it to help keep it from rocking.
- After their first wash the grain got raised a little bit by the water causing them to loose a bit of their smoothness. I sanded these a second time which took care of the rough texture. If I ever make another one as a gift, I want to remember to do this!
- Both get used almost every day! It was a great project to learn a lot about woodworking, and I'd recommend anyone wanting to do a useful project.
Nov 26, 2021
Before I started woodworking, I always thought handplanes were a quirky part of the woodworking hobby, something that people collected but not commonly used. I bought one #4 plane from Harbor Freight during my cutting board project to help square up the strips. I figured it was a lot cheaper than buying a planer or other pieces of power equipment. In trying to make it actually work, I found out these are still serious tools, and lots of craftsman do really amazing woodworking by hand. While there are a number of YouTube channels dedicated to hand tool woodworking, the one I most recommend is Rex Kruger (YouTube). He has a bunch of great videos about restoring and using old and cheap tools, and does a great job explaining the how and why of these tools and techniques.
 wood planes lined up on workbench
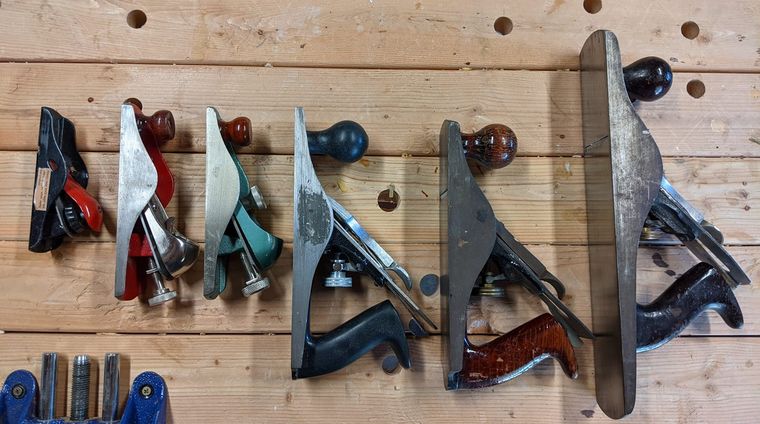
An inventory of my hand planes
From left to right in the photo above.
Harbor Freight block plane
Pretty much useless, occasionally use to knock off some sharp edges. Came with the #4 plane as a box set.
Dunlop block plane
Likely belonged to my grandfather, I found this still in the box in my dad's garage. I use this one regularly for trimming up the ends of boards.
Craftsman block plane
Very similar model, bought at an antique store near my parent's house before I knew about the one my dad had.
Harbor Freight No. 4 "Scrub" Plane
This was the first plane I bought and found impossible to use out of the box. (a plane, from harbor freight, that wasn't ready to go? you don't say...) I later gave the blade a heavy camber to use it as a scrub plane which it does really well at due to the wide throat.
Dunlop No. 4 Smoothing Plane
Likely belonged to my grandfather, kept in the original box for years. I love using this plane, it works really well for finishing a project. My dad pointed me to these after buying the Stanley #5 and Craftsman Block Plane.
Stanley No. 5 Jack Plane
Bought at an antique store near my parents house. This is really my "jack" of all trades plane, using it for everything from stock prep to planing edges for joints.
Nov 26, 2021
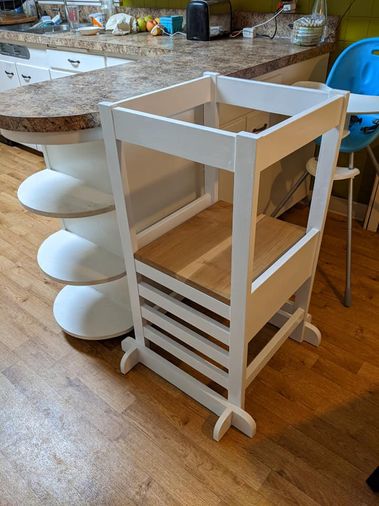
Concept
I modified these plans from Ana White by removing the arch shape and using mortise and tenon joints instead of the pocket screws. I could have easily done it with the pocket screws and had a great result, but I wanted to challenge myself doing a whole bunch of morises and tenons joints.
I used this project to practice making mortise and tenon joints, as my first real project (besides my miter saw stand) used a tenon jig that I made to fit over the fence of my table saw. The mortises were made using my drill press. I assembled two of the sides before adding the mortises for the biggest side panels, and drilling out the mortises on these pieces with the drill press was the most awkward step. The tenon jig was not perfect - I had to constantly apply a sideways pressure into the fence to keep it from wobbling.
 .
.
Thoughts
This was a great project, and with the mortise and tenon joints it gave me a chance to challenge myself.
The adjustable floor has worked well as my kid has grown. We probably won't use it all the way to the bottom rung, as a step stool might work just as well at that point.
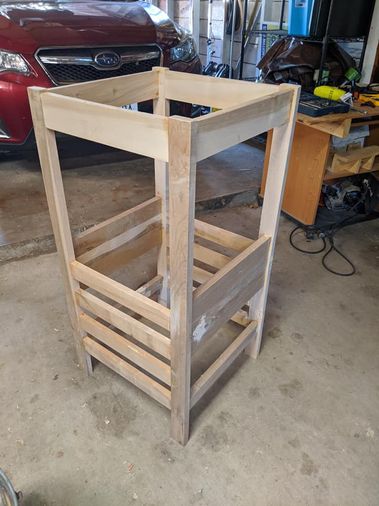
My only complaint about the project is that I used some housepaint to finish it. I would have left it with just wood finish, but there were a number of blemishes in the wood when I bought it and more that I added while planing the pieces. I patched these with some wood filler. I put the paint on in a way that left a lot of drips and blops. Since it is used by a preschooler for all kinds of snacks and other activities, it been picking up all kinds of smudges and dirt, and I haven't found a good cleaner that actually removes them.
Nov 26, 2021
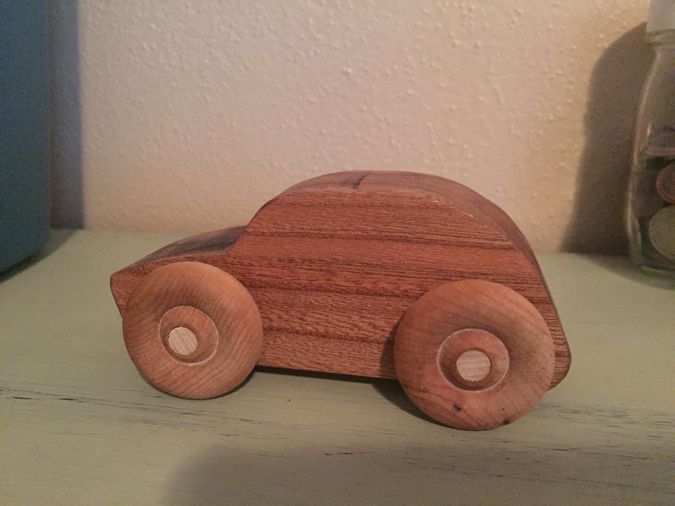
I have wanted to make more wooden toys for my kid, and after purchasing a used scroll saw, I was able to make a couple of toy cars like this out of some scrap elm I had in the shop. I had bought the wheels from a wood supply shop in Portland on a visit, although I think any chain craft store might have them.
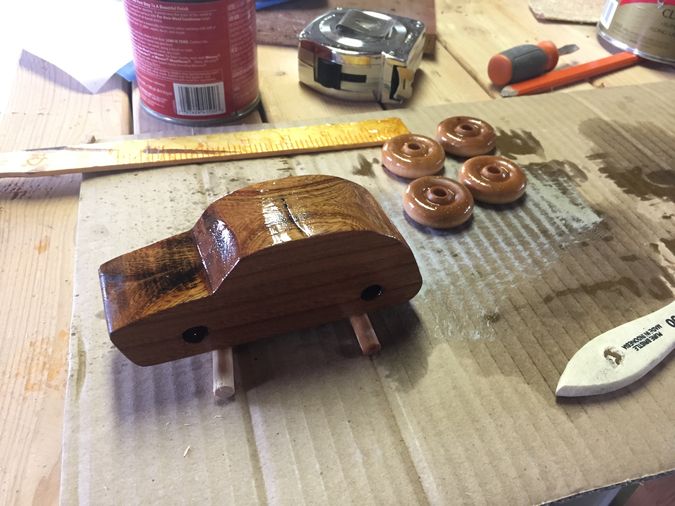
I ended up making two, the one pictured below, and a newer one with a few small issues addressed. The length of the axles and the roundness of the axle holes is critical to get them to roll well, the second car I made works much better. The photo of the car being finished shows how I messed up drilling the hole for the front axle, it is not quite round. The second car also had some paste wax applied to the inside of the axle holes before assembly.
One remaining issue is the size of these cars - they ended up being just a little too big for my kid to play with when I made them (around 18 months old). I would reduce the size by about a third in all dimensions if I ever make more of these. The wheels already look a little too big, but I think having them be a more managable size would make them more fun to play with.
Ultimately, I got rid of the scroll saw -- I had bought it used, without any blades. As the owner demonstrated it and told me his mother-in-law had used it for some crafts, I thought it was good to go. After getting it home and set up, I noticed a few parts showed some damage to the blade holder that made it rattle when in use, and difficult to tension. As a result I broke quite a few blades trying to complete these toy cars and another project. I might have been able to craft a few replacement parts, but decided it was a better use of my time to practice with a coping or turning saw for these kinds of projects.
TODO: trace cars to create template with 66% of current size, upload template here
Nov 25, 2021
Concept
In late 2020, I realized I was going to need a better desk to continue working from home with, so I decided it was time to finally build one. This had been a goal of mine when getting into woodworking, but given the circumstances, I thought it was a good time to take a first shot at one. I ended up building something like a basic table, a little larger than most commercial desks, and gave it legs and supports at the far sides.
The desk-top is assembled from pieces of locally source cherry that I joined with a borrowed biscuit joiner and then planed flat. I put a slight half-inch bevel around the outside with a handplane.
Thoughts
The top came out great - I really took the time to learn to handplane it smooth and finish with shellac. It has a few blemishes from places where the grain switches direction and my handplaning messed it up, but not bad for my first try at a 'tabletop'.
There are a few things I'd like to improve about this desk in the future:
- The legs ended up being extremely light weight and quickly thrown together, and while they serve their purpose, someday I want to replace them with something more study. It's also about two inches too high. The biggest reason the legs ended up the way they did was that I didn't buy enough wood to begin with.
- It doesn't have any storage. As shown in the photo, I have some milk crates holding various things and a printer under it. Someday I might build a portable cabinet that fits under it and holds these kind of things.
- I'd like to add a tray or shelf near the back to help with cable organization and to hold up my laptop and monitor at the same level. Maybe for cable organization to add a tray under the desk surface and use desk grommets to provide access for cables.
The plans I had sketched out show some of these additional features and how I'd really like to do the legs - I'm including them below (without commentary) as a friend had asked about my design process.
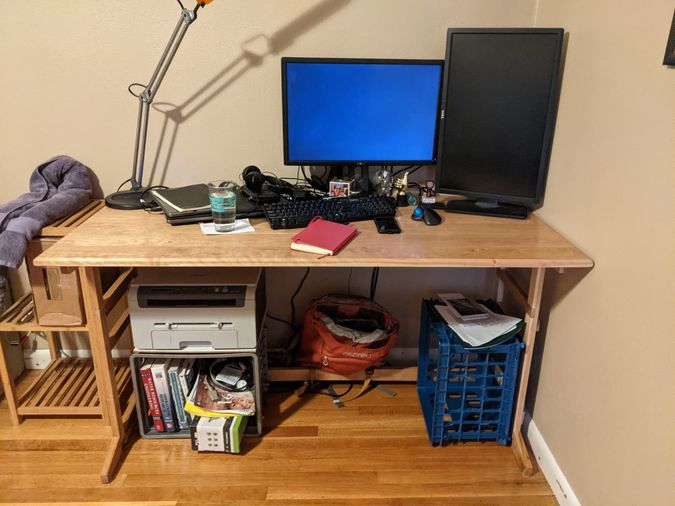 Desk with office equipment and other stuff on it, pardon the mess!
Plans
 Overall design and leg detail, along with a side sketch of a knitting box I still need to make.
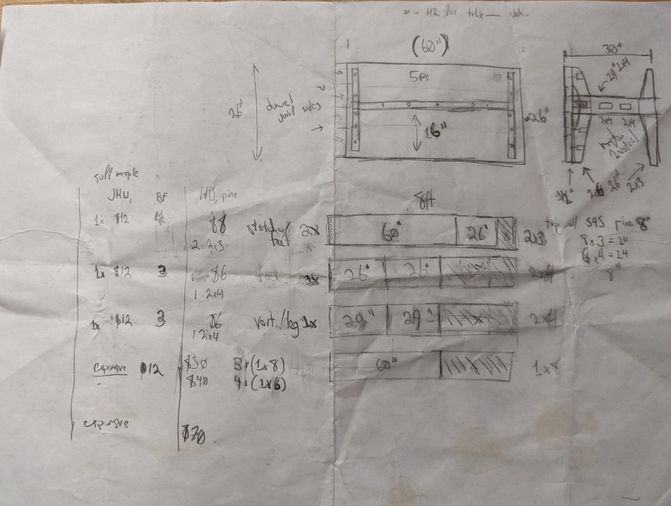 A brief cut list and bill of materials to inform my shopping.
Nov 25, 2021
A few years ago we decided to put a screech owl box in our big oak tree. We regularly hear them calling at night during the summer when our windows are open.
I found plans from WDFW and Cornell Lab of Ornithology, which I ended up using the WDFW plans. I made the box from a piece of western red cedar from the lumberyard, and with the help of my dad got it tied up to the tree. It has been up for a few years, although we only had an owl visit once to get shelter from a snowstorm. So far, it's mostly be home to the yard's resident squirels.
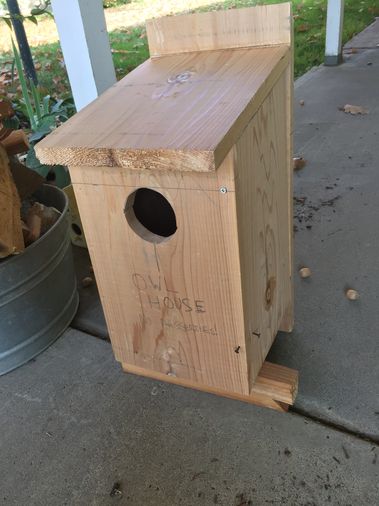 owl house as assembled
 owl house in tree with a screech owl poking it's head out.
Nov 19, 2021
Here's a few bits of shop furniture I've built and my thoughts about what I would do different next time. I figure shop furniture is a great place to learn new techniques without worrying about aesthetics. I often use construction lumber and recycled materials for these.
Miter saw stand
Concept
This was my first attempt at mortise and tenon joints. A friend gave me the cabinet drawers out of a kitchen he was remodeling, which worked perfectly for adding some storage to this project. I used my drill press to hog out the mortises and a set of chisels to clean them up. I built a basic tenon jig for my table saw. Both were pretty rough and I was worried the whole assembly wouldn't go together well after a test fit. I had planned for side panels made from peg board for storing additional tools and sawblades, and once I added these, the whole thing was a lot more stable.
Thoughts
I use the bigger drawers near the bottom for storing various smaller tools and jigs, and the top drawer for all my screws, nails, and other fasteners. I made a simple set of dividers from some MDF and stuck them down in there. This mostly works well, but it is an odd place to put all of those.
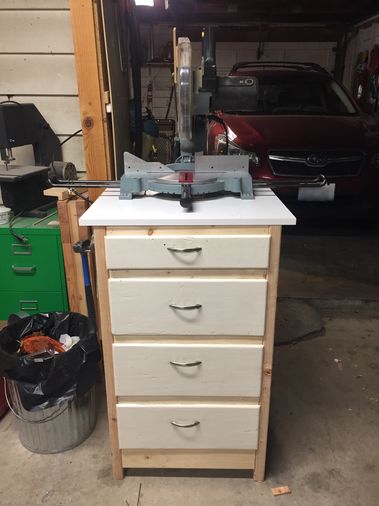
The castors on the bottom are also a bit funky, I had put two with swivels and two without, to save some money, but this arrangement doesn't provide much maneuverability when moving around the shop. As a result, I often end up lifting one side off the ground to roll it around.
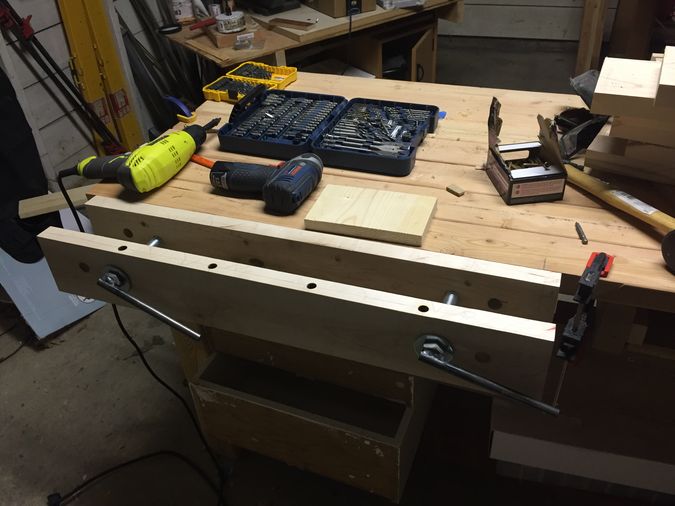
Workbench
Concept
I built this workbench without knowing what I was doing and has grown organically with my needs. The base was inspired by Matthias Wandel's plans while the top was roughly in the english-style bench... but I would call it a picnic table top. I've since added a vise, tool well, more bracing, and some extra shelves.
Thoughts
It's due to be replaced someday as it is a little shakey and the top is slightly warped due to a slight twist to the frame. I've tried planing the top a few times, and it is free of any big bumps, but the warp/twist is a bit of problem when working on large panels. It'll probably get repurposed as another bench for gardening or light metal work when I do replace it. I've since added more bracing to the back to keep it from racking when I am really vigorously planing a piece of wood, and another storage shelf for tools. There is also a tool well off to one side of the bench that I use for storing various bits of workholding gear like bench dogs and holdfasts.
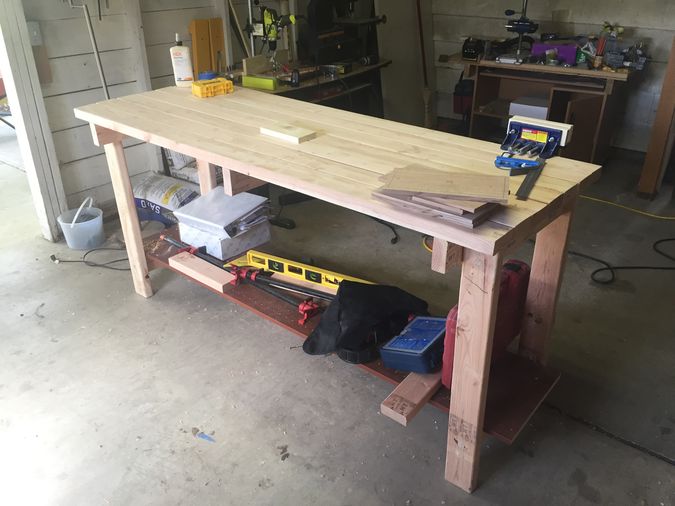
Update - April 2022
I am in the process of replacing the boards ontop of the workbench with some 2x6s on one side to provide a flatter surface for handplaning and provide more space for a planing stop. In the process, I seem to be improving the stiffness of the workbench. It has taken me a couple of one hour sessions to replace the boards.
Vise
Concept
The Harbor Freight carpenters vise that I started with is great for small pieces, but sticks up over the edge of the bench.
To help fix this, I built a very simple vise from a piece of hard maple, and two 8" long 3/4" diameter bolts which a friend welded handles onto. The rough idea was from One Minute Woodworking's video on YouTube, although looking back at it, my plans have the bolts mounted backwards from theirs. It was dirt cheap, the maple might have been the most expensive piece.
Thoughts
It gets plenty of grip for handplaning and helping hold pieces to the bench, but turning both handles to tighten and loosen it can be a little tedious. The handles on the bolts get in the way sometime, next time I would do some kind of wooden knobs and epoxy them on.
Nov 13, 2021
Woodworking
Ongoing:
Completed:
Someday:
- Solid wood base for a custom record player
- New legs for my desk
Ham Radio
Ongoing:
Someday:
Computers/Programming
Ongoing:
Completed:
Python
R
Someday:
- Email migration from gmail
Nov 13, 2021
Video Channels
Books
Shops
- Jensen's Hardwood (web / facebook) - great place to buy hardwood in the Walla Walla Valley.
Nov 11, 2021
About Me
I'm a water resources engineer by training, who does software development and support of other water resources engineers for a large public agency. When I am not doing that, I dabble in woodworking, birding, organic gardening, photography, and ham radio.
What do I want to do here:
- keep track of ongoing hobby projects, provide myself some accountability on them.
- one post per project, updated as it progresses.
- share information or thoughts relevant to those projects
- kind of a public version of my personal OneNote
- post less on social media and more on the old-web
- keep track of interesting things I read
What about the old blog?
Oh, that one with three or four posts about reading HEC-DSS files in R?. I'm going to leave that up for now with comments turned off, but most of the content is on my professional github profile.
Why the blog name?
The phonetic alphabet for the last three letters of my amateur radio callsign.
What, no comments?
Yes, no comments. Send correspondence to my email
Nov 09, 2021
TODO items (updated occasionally)
- get a decent theme working
- turns out your pelican-themes directory needs to actually have themes in it! I naively cloned the
pelican-themes github repo and got empty directories.
- make markdown first level headers slightly smaller than post title.
- add
<h2> css to make slightly smaller than <h1>: updated theme's main.css, maybe there should be a better approach. Tried adding a second css file to template's base.html. Learned about the > operator in css. New css file works well enough.
- Insert header image - on hold
- need to modify base.html template; identify file, add static image.
- upload a few photos of woodworking projects - in progress
- upload some short descriptions of programming projects - in progress
- add caption style using
img + p in css