End grain cutting boards
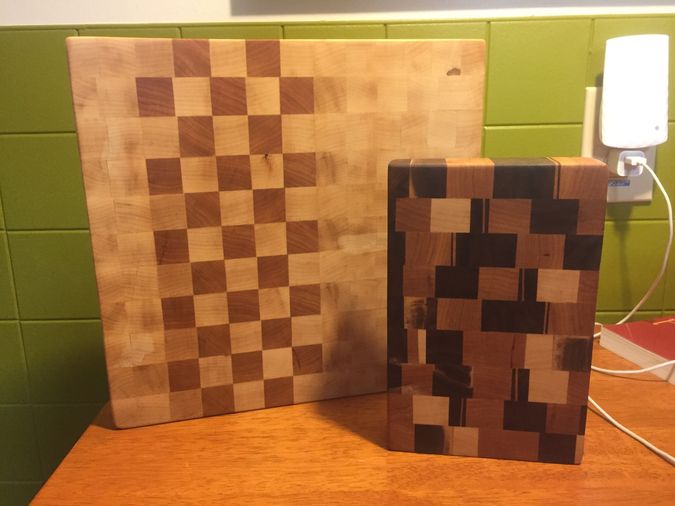 Two of the four cutting boards I made shown next to each other.
I started making a big end grain cutting board a way of saying thanks to a good friend who catered our baby shower and learned a lot of things along the way.
Concept
My first thought was to make these big and heavy, with a high contrast checkerboard pattern using one-inch squares as a reference for cutting vegetables. I was going to make a pair and keep the worse one for myself. This way I would have two chances at everything, and end up with a nice big cutting board.
Implementation
I bought the required amount of hard maple and black walnut for this approach only to find out that the black walnut was a lot more difficult to work with. In particular, cutting the strips of black walnut on my table saw was resulting in the wood binding around the blade, both causing the resulting strip to come out with a bow in it, and stopping the blade, causing the circuit breaker to trip and the lights to go out. I tried a few upgrades, including putting the ribbing knife back in place (always a good idea!) and buying a rip blade, as I had only been using a combination blade so far. I also used it as sign that I should upgrade the electrical wiring in my shop, as previously the whole garage was on a single 20A circuit. I also switched to using a red cherry wood instead of the black walnut. The contrast between the cherry and maple wasn't quite as impressive, but it looks better than the original would have come out.
I hand planed most of the 1x1 strips after cutting them down to just a bit oversized. This was tedious work that I could have easily done with a good setup on the tablesaw, but also really good practice at using a handplane. Some of the lack of perfect intersections in the grid are due to my planing being a little off.
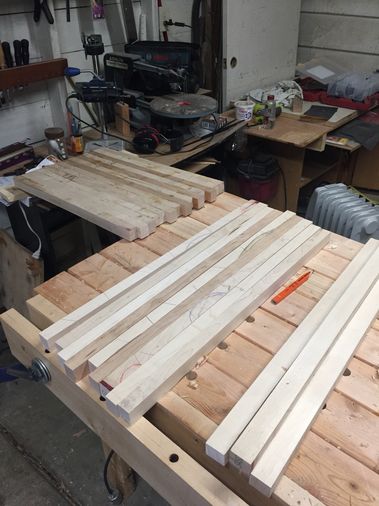
After gluing up the strips into a slab, I cross-cut them with my table saw to two inch width sections. These sections would then be turned end grain up and glued on facegrain in alternating pairs to create the checkerboard effect.
I took these cross-cut sections over to another woodworking friend's shop to use his planer to get them right to just to 1" wide in this dimension. Using the planeer was not a great idea. Running the sections through the planer, which could only be done across the grain at this poin, ended up creating all kinds of problems. As a result, I lost about a third of the cross-cut sections! The first problem was going across the grain caused a lot of tear-out and breaking segments as it passed under the cutters. The fibers that were planed off were not short, but 2" long bits of wood, which quickly clogged the planer and chip collector it was hooked up to. At some point during the session I found out my friend had not really used the planer much since buying it!
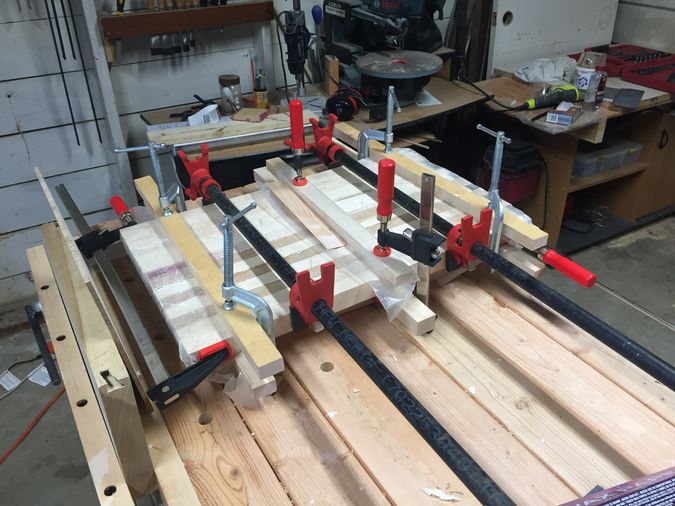
Once I got these back to my shop, I glued the face grain sides together, alternating the two types of sections to create the checkerboard pattern. This took a lot of clamps, cauls, and patience. Finally I sanded them successively to 220 grit, put a slight roundover on every side, and oiled them with butchers block oil. My spouse thought I was a little obsessed with how nice they looked after all that.
Making a second set
As I was finishing the big checkerboard set, I ended up doing another pair using the scraps of walnut, with a little bit of the cherry and maple for contrast. I only used my hand planes to shape these, but as I wasn't going for perfect 1" square strips, I was able to get a little more creative in the pattern. I glued up three different slabs, crosscut them, and then mixed and matched, flipping and shifting the pieces to get a more random looking pattern to them. After making both sets of cutting boards, I really like these a whole lot better. I kept a slightly smaller one and gave the larger of these to a friend who was moving away.
Thoughts
- The big one is just a little too heavy (1.5" thick, surface area is 11" by 10"). It is a great size for heavy-duty project cooking where lots of vegetable prep is needed, but a little too heavy to want to get out day-to-day cooking. I am glad I didn't make it any bigger by surface area, like I would have if I hadn't lost so many pieces to the power planer. If I made one again, I would target closer to 1" thick.
- The small one is just a little too small (8.5" by 5") to use for much, but regularly gets used for cutting up fruit or cheese, or when we just need to dice one or two cups of a veggie.
- My bigger one is a bit warped due to me being hasty while gluing it up, so I use a towel or piece of drawer liner under it to help keep it from rocking.
- After their first wash the grain got raised a little bit by the water causing them to loose a bit of their smoothness. I sanded these a second time which took care of the rough texture. If I ever make another one as a gift, I want to remember to do this!
- Both get used almost every day! It was a great project to learn a lot about woodworking, and I'd recommend anyone wanting to do a useful project.